
End-to-End Workflow: From New Project to Publishing, Re-tests and Revenue Attribution
Work through 15 stages in order: create the project, round out your prompts, read the evidence, fix brand searches, configure competitors, fill in signal sources, make your site readable to AI, set content rules, build Brand Knowledge, connect channels, create countermeasures from this week’s tasks, review and publish, re-test, connect revenue attribution, and run the weekly routine. Each stage says which page, which tab, what to click and what “done” looks like.
Read this first
Citadex is not a “click once, get an article” tool. It is a pipeline: find out who AI recommends today → work out why it isn’t you → supply the evidence AI needs to see → publish → ask AI again to verify → see how many leads and how much revenue AI brings in. Every stage below covers what to do, on which page, what to click and what “done” looks like. Work through them in order and don’t skip ahead. If you skip the early stages, the articles you generate later have no facts to stand on and nowhere to be published.
The whole workflow at a glance
- Create the project → you have a brand, a market, a first set of prompts and first-round results
- Round out your prompts → the questions you track cover what customers really ask AI, and no buying stage, topic or customer role shows “None” on the Coverage tab
- First check and reading the evidence → for every prompt you know who AI recommended, who it cited, what it searched for and why it wasn’t you
- Fix brand searches → wrong phone numbers, URLs and prices in AI answers are dealt with first, and your official facts are filled in
- Configure competitors → share, battlefield and gaps are all calculated against your real competitors
- Check and fill in signal sources → review sites, brand-information platforms and your own site’s base pages are in place (required)
- Make your site readable to AI → AI traffic data is connected, AI crawlers aren’t blocked, and agents can get tasks done on your site
- Fill in Content Rules → business info (required), tone, CTA
- Fill in Brand Knowledge → pricing, specs and facts with sources (required, before publishing)
- Connect publishing channels → your own site is connected and the browser extension is installed
- Create countermeasure content → generate briefs and articles starting from This week’s tasks on the Workspace and from citation gaps
- Review and publish → read, edit, publish in one click and log it in Content
- Re-test and verify → re-tests, achievements, goals, results report
- Connect revenue attribution → site script + CRM / revenue source, and prove impact with an incrementality experiment
- Day-to-day operations → AI Assistant, the weekly automatic plan, using Citadex inside ChatGPT / Claude, alerts; white label and first diagnosis report for agencies
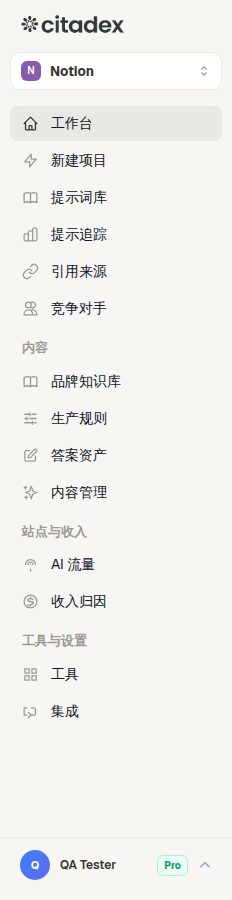
Screenshot 0-1: the full sidebar, marking the pages this tutorial uses: Workspace, New Project, Prompt Library, Prompt Tracking, Citation Sources, Competitors, Brand Knowledge, Content Rules, Answer Assets, Content, Integrations (the sidebar also has AI Traffic and Revenue Attribution, used in stages 7 and 14)
Before you start (5 minutes)
- Account and plan: after signing in, check the plan shown in the top-right corner. Scans, article generation and other credit-based actions are billed in credits; before anything runs you see how many credits it needs and confirm. Integrations, auto-scan, re-tests, agent readiness monitoring and some other features need a paid plan, and the interface marks them. Your credit balance and top-ups are on the API keys & credits page.
- Interface language: switch it in the top-right corner. The language you choose also sets the language of system emails and alert emails.
- Have these ready: the client’s website address, how AI should refer to the brand, target countries and languages, three to five real competitor names, the pricing page and product page URLs, the official support phone number and email, and the CRM or payment tool the client uses (needed in stage 14).
- Team members: members invited into someone else’s workspace see and work on the workspace owner’s projects, and the credits shown in the top-right corner are the owner’s balance. Members with the Viewer role can only view, not change anything.
Note for agencies
One client, one project. Never put two brands in the same project. Prompts, scan results, knowledge base, integrations and revenue attribution are all kept separate per project. Switch projects any time with the project switcher in the top-left corner; every page follows the current project. White label, client accounts and the first diagnosis report are covered in stage 15.
Stage 1: Create the project
Page: sidebar New Project (opens automatically on first sign-in). Five steps: enter URL → scanning → prompts → analyzing → results.
- 1
Step 1: Enter the URL and brand name
Enter the main site’s homepage address. When you leave the field, the system fetches the site and writes the Business description for you; if it can’t, write two sentences yourself: what you do, who you sell to, your main selling points. In Brand Name, enter the brand exactly as it should appear in AI answers.
- 2
Step 1 (same page): Add a market
Click + Add your first market and choose the country, the language (follows the country automatically, can be changed) and the city (optional). A market is “country + language”. The system asks the AI engines from that country, so “United States · English” and “United Kingdom · English” are two different markets and get different AI answers. Every market must have a country; there is no “global” market. Choose the language your target customers actually use. The first market is the primary market. For multi-market clients, add one now and the rest later in Prompt Library. Click Start Analysis →.
- 3
Step 2: Scanning
Runs automatically; nothing to do. A failed fetch won’t block you.
- 4
Step 3: Confirm the prompts
The system generates the questions customers ask AI, grouped by market (15 for one market, 10 per market for several). Go through them one by one: click to rewrite anything that doesn’t sound like a customer, click ✕ to delete irrelevant ones, and add missing ones with Add prompt at the bottom of the group. Click Run Analysis →.
- 5
Step 4: Analyzing
Each prompt is sent to ChatGPT, Claude, Gemini and Perplexity for a first check. This usually takes 1 to 3 minutes.
- 6
Step 5: Results
Look at Brand mention rate, AI Citation Analysis (the sites AI cites most, i.e. your likely competitors) and whether each prompt mentioned you in each model. Click Create Project & Start Monitoring →.
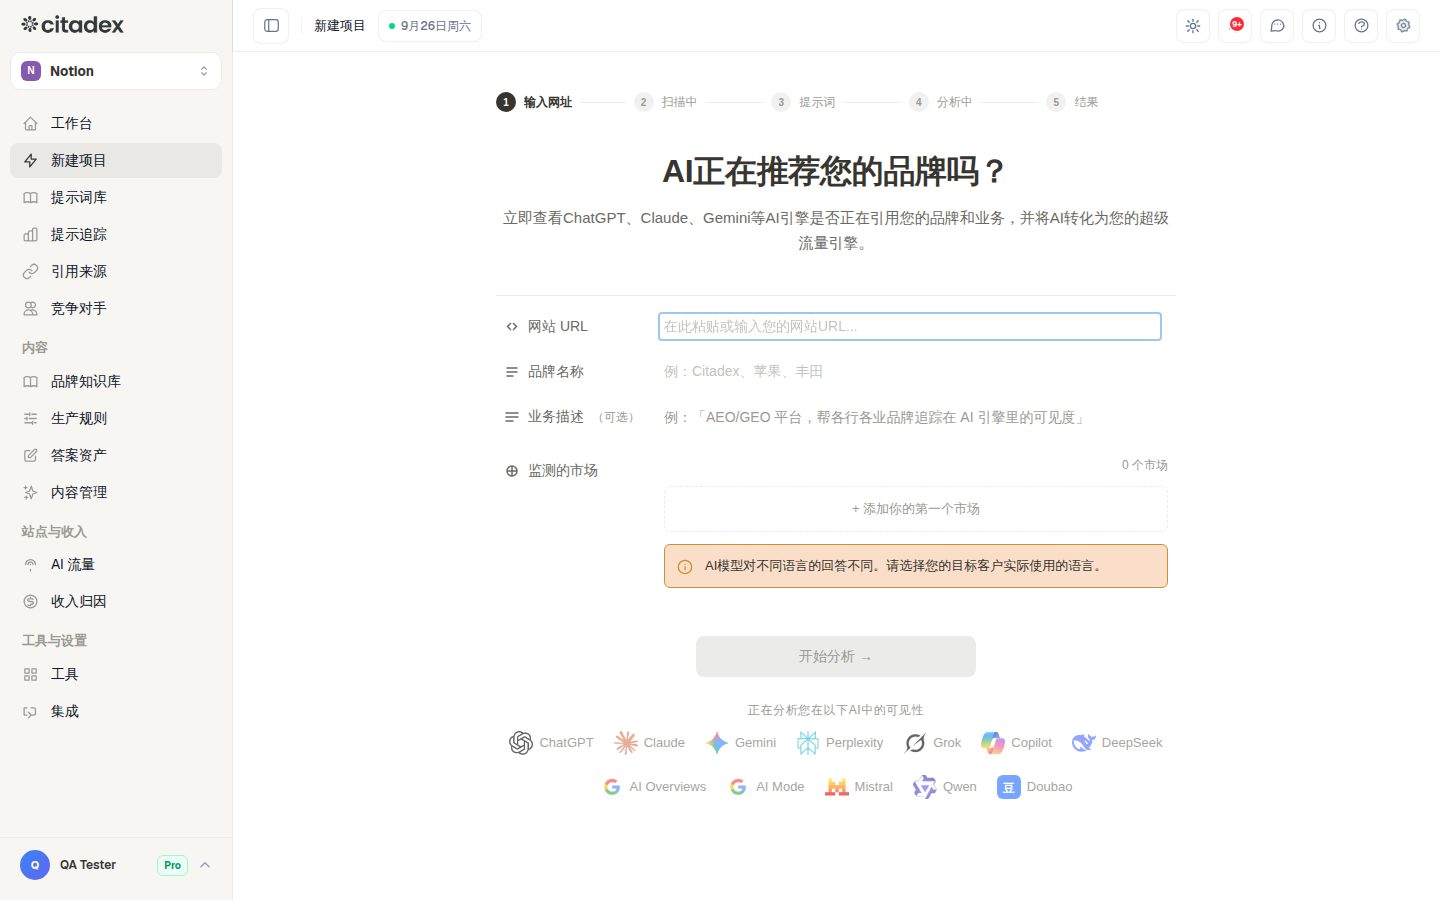
Screenshot 1-1: the step 1 form, marking Website URL, Brand Name, Markets to monitor and the Start Analysis button
Done when: the project appears on the Workspace, Prompt Tracking has the first set of prompts, and most of them already have first-round results.
Stage 2: Round out your prompts
Page: sidebar Prompt Library. Five tabs: Discover, My Prompts, Quick Test, Bulk Upload, Coverage.
Why this is required: you only see what you track. The dozen or so prompts generated in the first round are just a starting point; how real customers phrase their questions has to come from real data.
- 1
Check credits first
There is no limit on how many prompts you track; credits are the only limit. Every prompt is billed in credits on every scan, so the more prompts, the more you spend each week. When the balance is too low, scans don't run and you can't add prompts; adding needs enough credits for the new prompts' first check. The top of My Prompts shows how many you track. Delete the obviously low-value ones before adding new ones.
- 2
Import real search demand
Discover tab → choose the market language in the Language dropdown → Import from Search Console (connect Google Search Console in Integrations first; filter with Questions only and Striking distance (5-20)) or Expand more (PAA · autocomplete). Tick what you want and click Add to tracking.
- 3
Generate from the project or expand from seeds
Generate from project: choose a market and click Confirm & generate. Expand from tracked uses a good prompt as the seed. Custom seed: type one prompt and get about 10 more. Generating candidates costs no credits; scanning and credit charges start only after you add them to tracking.
- 4
Add markets
For clients in several countries or languages, go to My Prompts → + Add markets, choose the country, language and engines, and the system generates starter prompts for that market. Then go back to Discover, switch the language to the new market and add more.
- 5
Bulk import
If you already have a list, use Bulk Upload: a CSV or TXT file with one prompt per line. Duplicates are removed automatically.
- 6
Check the groups
My Prompts groups prompts as brand / competitor / city / generic. Ideally all four groups have prompts, generic has the most and brand the fewest.
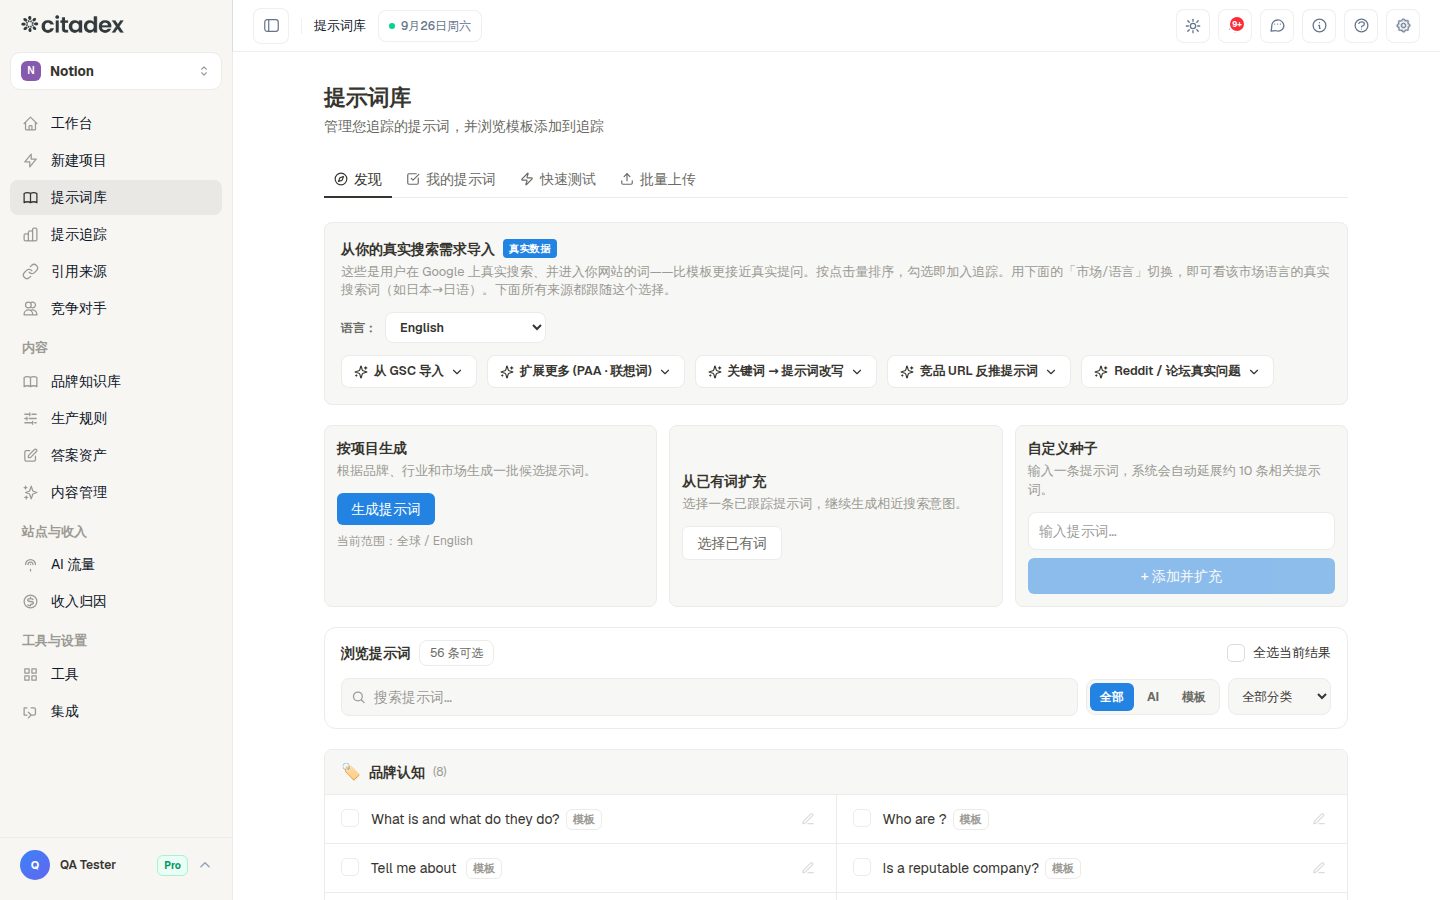
Screenshot 2-1: the Prompt Library Discover tab, marking the Language dropdown, Import from Search Console, Generate from project and Add to tracking
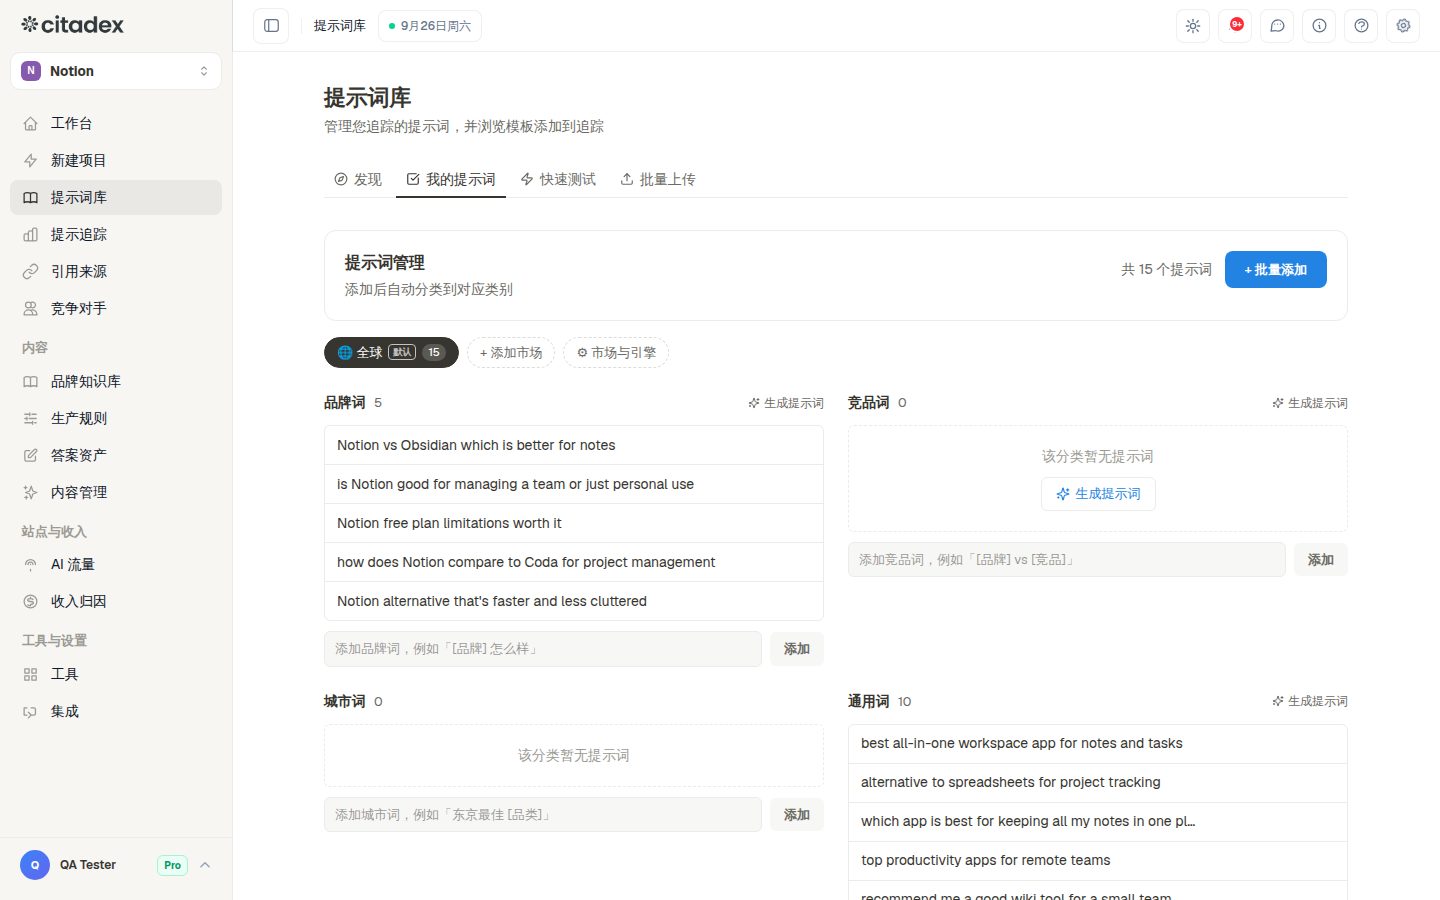
Screenshot 2-2: the prompt total and market labels in My Prompts
Use the Coverage tab to find missing scenarios
Once the first scan has results, open the Coverage tab and check whether your prompts cover the customer’s whole buying journey.
- 1
Check coverage confidence
Coverage confidence groups prompts by Buying stage (awareness / consideration / decision), Topic and Customer role. Each group shows the number of prompts, the number of AI answers, the share that mention you (with a 95% range) and a Confidence level: Enough, Few or None. Topics and customer roles are grouped by AI the first time you open the tab; if the grouping is off, click Edit groups or Regroup.
- 2
Fill in groups marked Few or None
In that group, click Add prompts. The system lists suggested questions; tick them and click Track. Start with the Decision stage, where questions are closest to a purchase.
- 3
One question, several phrasings: Prompt variants
New variant group → pick a tracked prompt → Write variants (casual, specific, comparison, reworded) → Track. A variant group shows a combined Recommended probability, which is steadier than a single phrasing. Variants are scanned and use credits like any other prompt.
- 4
Check the Prompt opportunity score
Prompts are scored on demand, buying intent, current gap, competition and revenue potential; the ones at the top are the most worth your effort. Demand only shows Observed data (90-day Search Console impressions); without data it shows —.
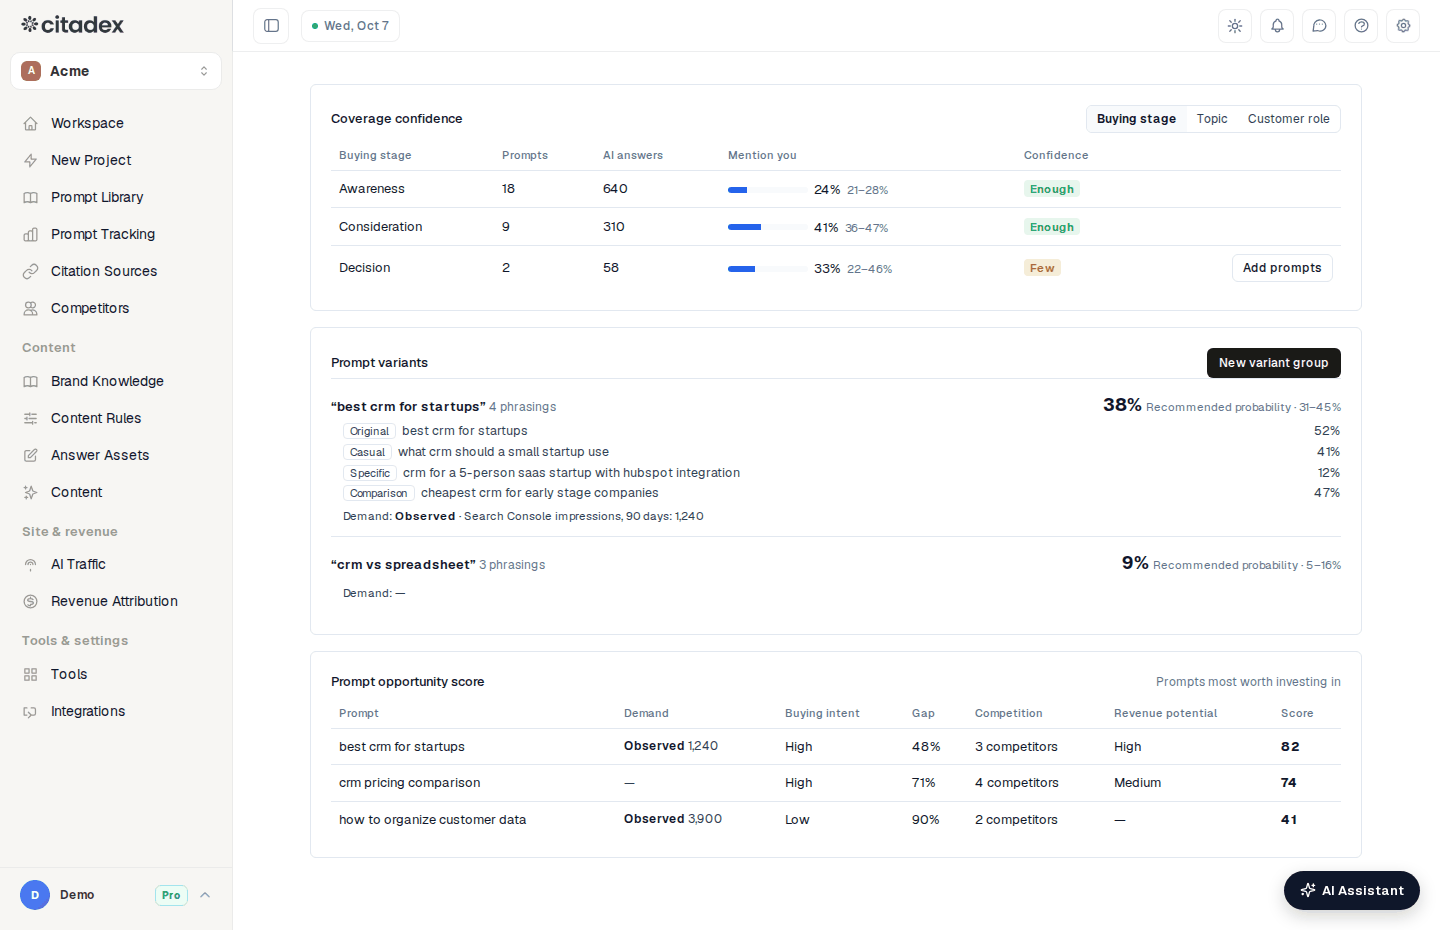
Screenshot 2-3: the Prompt Library Coverage tab, marking the buying stage / topic / customer role switch, the confidence levels Enough / Few / None and the Add prompts button
Done when: each market has a representative set of questions (30 to 50 for a small client, around 100 for a mid-sized one), all four groups have prompts, and none of the three buying stages shows None on the Coverage tab.
A way to save credits
More prompts are not automatically better. Use Quick Test to check whether a question is worth tracking before adding it, and use the Coverage tab to fill real gaps instead of adding a large batch of near-duplicate questions.
Stage 3: Wait for the first check and learn to read the evidence
Page: sidebar Prompt Tracking. Tabs: Tracked, Achievements, Retests, Outreach, AI searches, Brand searches.
- 1
Wait for the automatic check
Newly added prompts are queued for checking automatically, and each row shows Queued / Checking…. You don’t need a “check all” button; there isn’t one. Closing the page doesn’t affect anything; come back later for the results.
- 2
Read the table
Each row shows the prompt, coverage (how many engines mention you), platforms (one icon per engine: grey means not mentioned, #N means top three, 📎 means cited) and check time. The Evidence button is on the right. The Order dropdown above the table changes the sort: custom order, newest added, oldest added, latest checked, coverage high → low, coverage low → high.
- 3
Open the evidence drawer
Click Evidence on any row. Switch between engines; each engine has three tabs. Answer is the AI’s exact words, marked appeared / Appeared but mis-contextualized / not found, with a recommendation level of Top pick / Recommended / Listed option / Mentioned only (hover to see why it was judged that way). Sources lists the URLs this answer cited. Earlier answers shows previous answers to this prompt so you can compare how AI’s wording changed. This is the most important step in the whole workflow: the AI’s exact words are the basis for every optimization that follows.
- 4
Check the data source and what AI searched for
Under the answer you see the data source: captured from the AI app itself matches what users see in the app; model API is benchmark data. Next to it is the Model name. Searches the AI ran before answering lists the terms AI searched for itself before it answered.
- 5
Correct a wrong judgment
In Earlier answers, click Judged wrong?, choose The brand IS mentioned / The brand is NOT mentioned or Recommendation should be, then Submit correction. The original answer is not changed; your correction is recorded next to it.
- 6
For steadier numbers: repeated sampling
For important questions you can turn on Ask 3× per scan in the evidence drawer: on every scan each engine answers 3 times and the result shows as mentioned x/n. This multiplies the scan credits for that prompt, so a dialog explains it first and the setting only takes effect after you click Turn on. You can turn it off any time. Available on some paid plans, marked in the interface.
- 7
Handle context issues
Set Coverage to Context issue. When AI mistakes your brand for another company, the bulk bar shows Fix n brand mismatches, which takes you to Answer Assets to generate one combined clarification article. These are the highest priority; handle them first.
- 8
See the sources for a set of prompts
Tick a few prompts and click View cited sources (N) in the bulk bar; for a single prompt, click ··· at the end of the row → View cited sources. You go straight to Citation Sources, showing data for those prompts only (see stage 11 for how to use it).
- 9
Check the AI searches tab
It collects the terms AI recently searched for your prompts and which sites it cited after each search. Filter Needs action to see terms AI searched but never cited you for; the sites it cited can be pursued in Outreach. Engines that don’t disclose their searches, such as Perplexity, don’t appear here.
- 10
Set the scan frequency
For important prompts, change Scan frequency to daily in the evidence drawer (the number of daily prompts is capped); keep the rest weekly. To re-check one prompt right away, click Scan now.
- 11
Turn on auto-scan
On a paid plan, switch on Auto-scan in the page header so every prompt is re-checked at its own frequency. Without it you only have first-round results and can’t verify impact later.
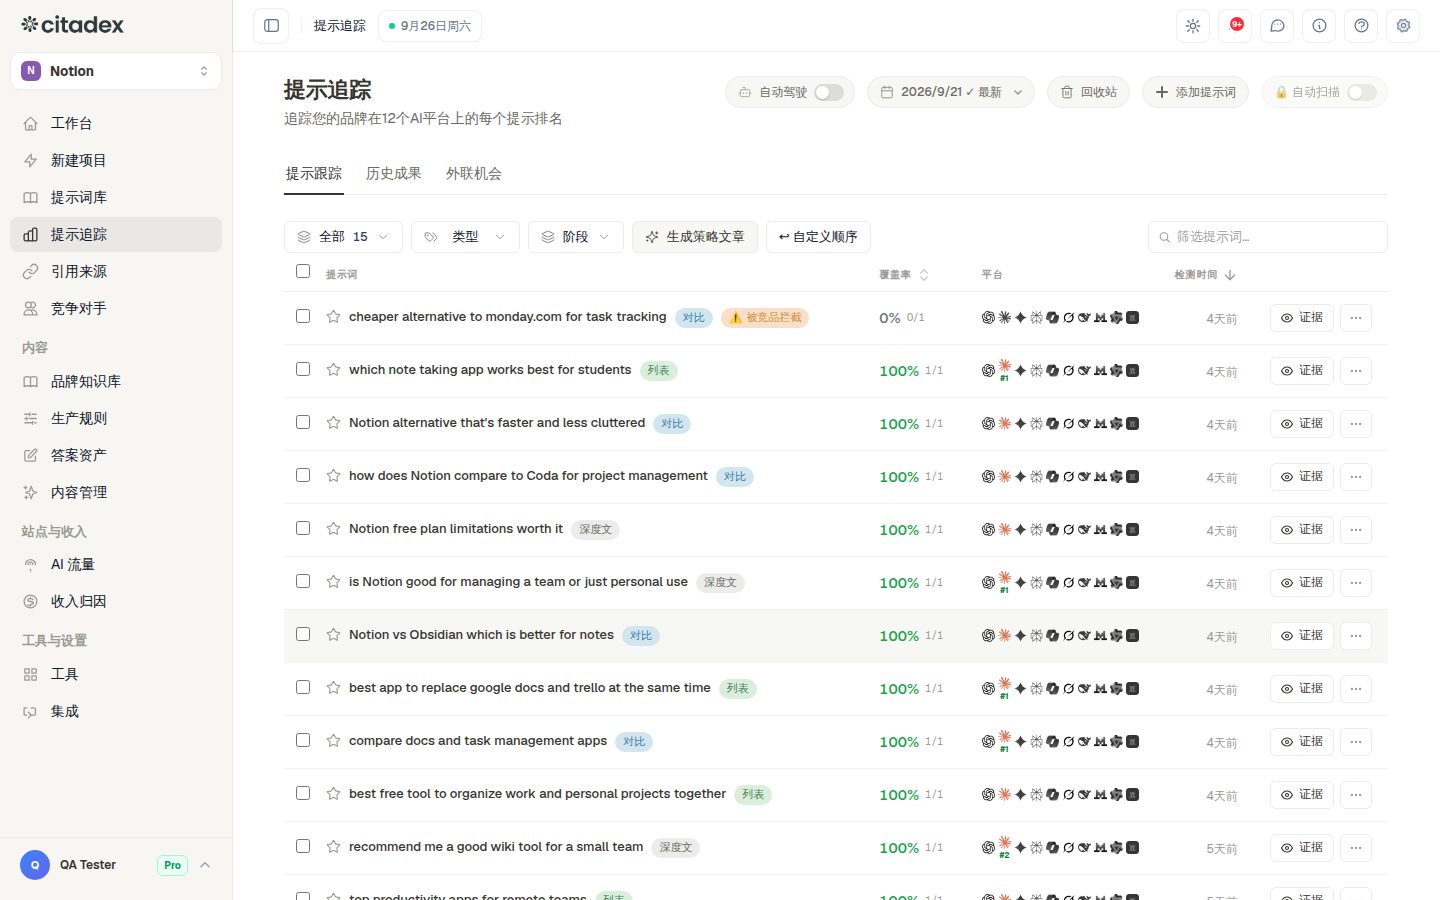
Screenshot 3-1: the Prompt Tracking table, marking coverage, platform icons, check time, the Evidence button and the Auto-scan switch
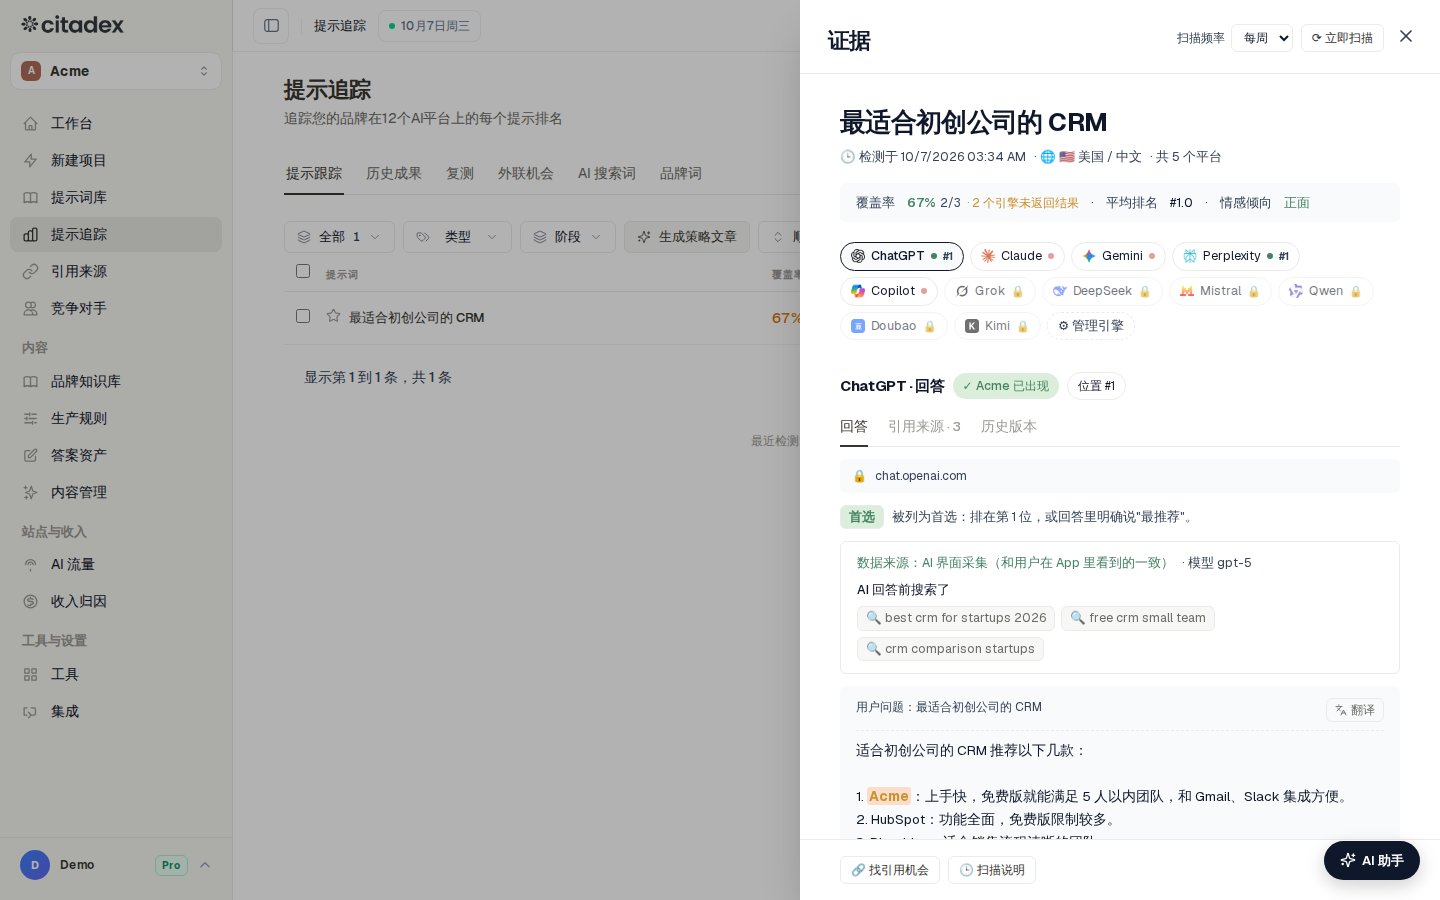
Screenshot 3-2: the evidence drawer, marking the engine switch, the three tabs Answer / Sources / Earlier answers, the recommendation level, the data source and AI searches, scan frequency and Scan now
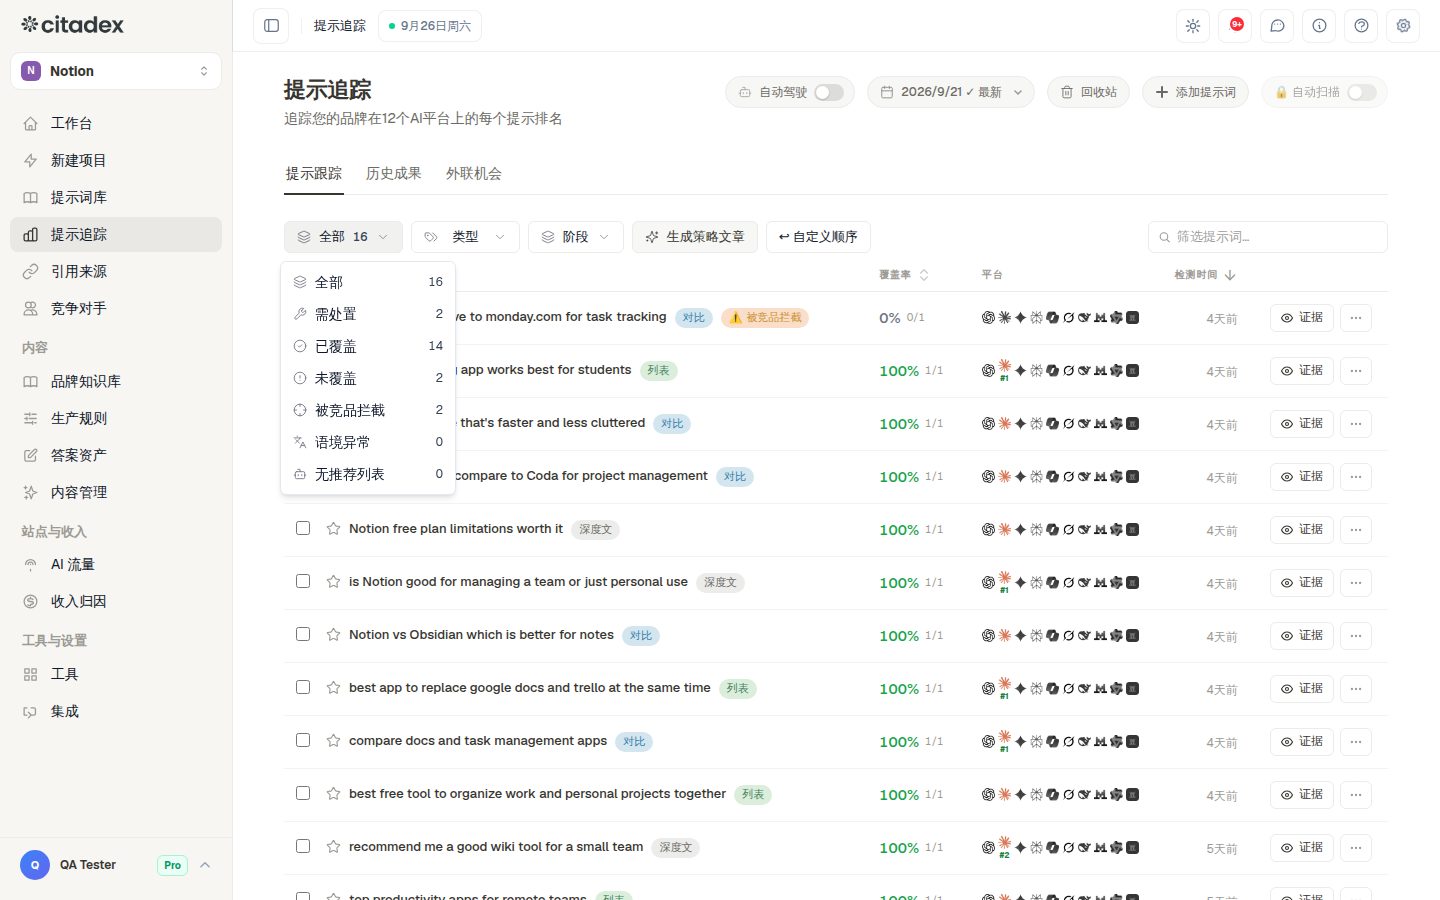
Screenshot 3-3: the Context issue coverage filter and Fix n brand mismatches
The big picture on the Workspace: From mention to recommendation
Back in the sidebar, open Workspace. The From mention to recommendation card turns all answers into one funnel: AI answers → mention you → cite your site → recommend you → recommend you as top pick, and you can split it by AI platform. Being cited is not the same as being recommended; this card shows you which step you’re stuck at. Rates come with a 95% range, and when there are few answers they show as x/n. Weighted recommendation share adjusts for how many competitors were recommended in the same answer, and Sole recommendations counts answers that recommend only you and mention none of your tracked competitors.
If the Workspace shows a Platform-wide changes card, an AI engine changed across all projects on those days (for example, the average number of URLs cited per answer dropped, or it switched to a new model); the same dates are also marked on each prompt’s coverage trend. When your numbers move on the same day and the same engine, check here first before deciding whether the problem is on your side.
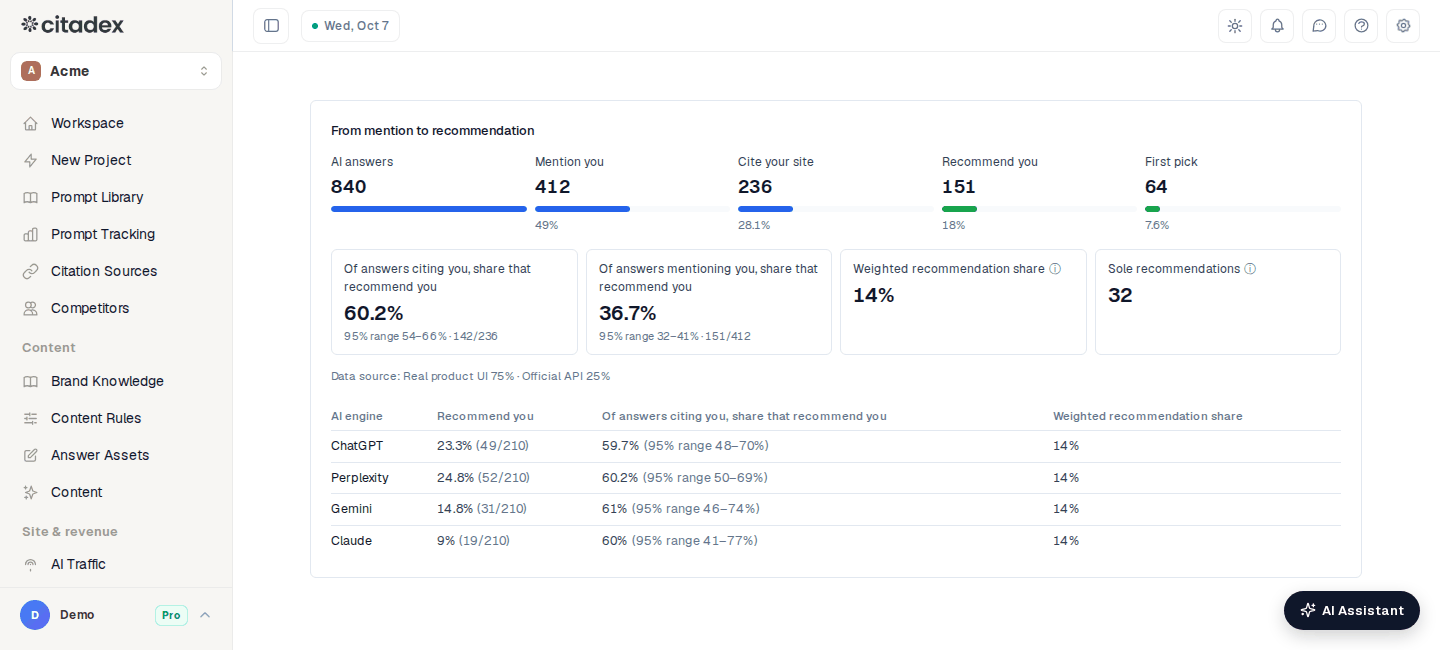
Screenshot 3-4: the From mention to recommendation card on the Workspace, marking the five-step funnel, the 95% range, the data source, weighted recommendation share and the per-platform rows
Done when: every prompt has first-round results; you can say “for these 5 questions, AI recommended X, cited Y and searched for Z before answering”; you know whether the funnel is stuck at mention, citation or recommendation; and auto-scan is on.
Stage 4: Fix brand searches (deal with wrong brand facts in AI answers first)
Page: sidebar Prompt Tracking → Brand searches tab.
Why this comes before writing articles: when AI sends customers to the wrong support number or a fake URL, or quotes a price that doesn’t exist, the loss is more direct than “not being recommended”. Handle these first.
- 1
Fill in Official facts
Fill in Official site and login domains, Support phone numbers, Support email and Prices, then click Save. The system compares AI answers against these; if they’re empty, it can’t detect wrong phone numbers, URLs or prices.
- 2
Generate Brand-defense prompts
Click Generate. The system creates up to 8 questions people ask when they search for your brand, across four kinds (navigation, reputation, transaction, support), in the primary market’s language. They are scanned and billed in credits like any prompt; adding them needs enough credits for their first check.
- 3
Review Brand facts AI gets wrong
Issues from the last 30 days are listed by risk, High / Medium / Low. High: the support phone number or URL given isn’t yours. Medium: the price differs from your official price, or a competitor appears in the answer to a brand search. Low: the answer doesn’t mention you. Click See answer on any item to read the AI’s exact words.
- 4
Deal with the issues
Wrong phone number, URL or price: first update outdated information on your own site and on other platforms, then enter the correct facts in Brand Knowledge (stage 9) and generate a clarification article (stage 11). A competitor appearing in brand-search answers means AI can’t find enough pages about you, so do the brand-information platform registrations in stage 6 first.
- 5
Fill in Brand attributes
Write 3 to 8 attributes you want to be known for (format “attribute: synonym, synonym”) and see what share of the answers that mention you mention each attribute. Below, Objections in answers lists claims such as too expensive, hard to set up or not available in a market, with examples; address them directly when you write content.
High-risk issues automatically appear in This week’s tasks on the Workspace and are notified according to the project’s alert settings.
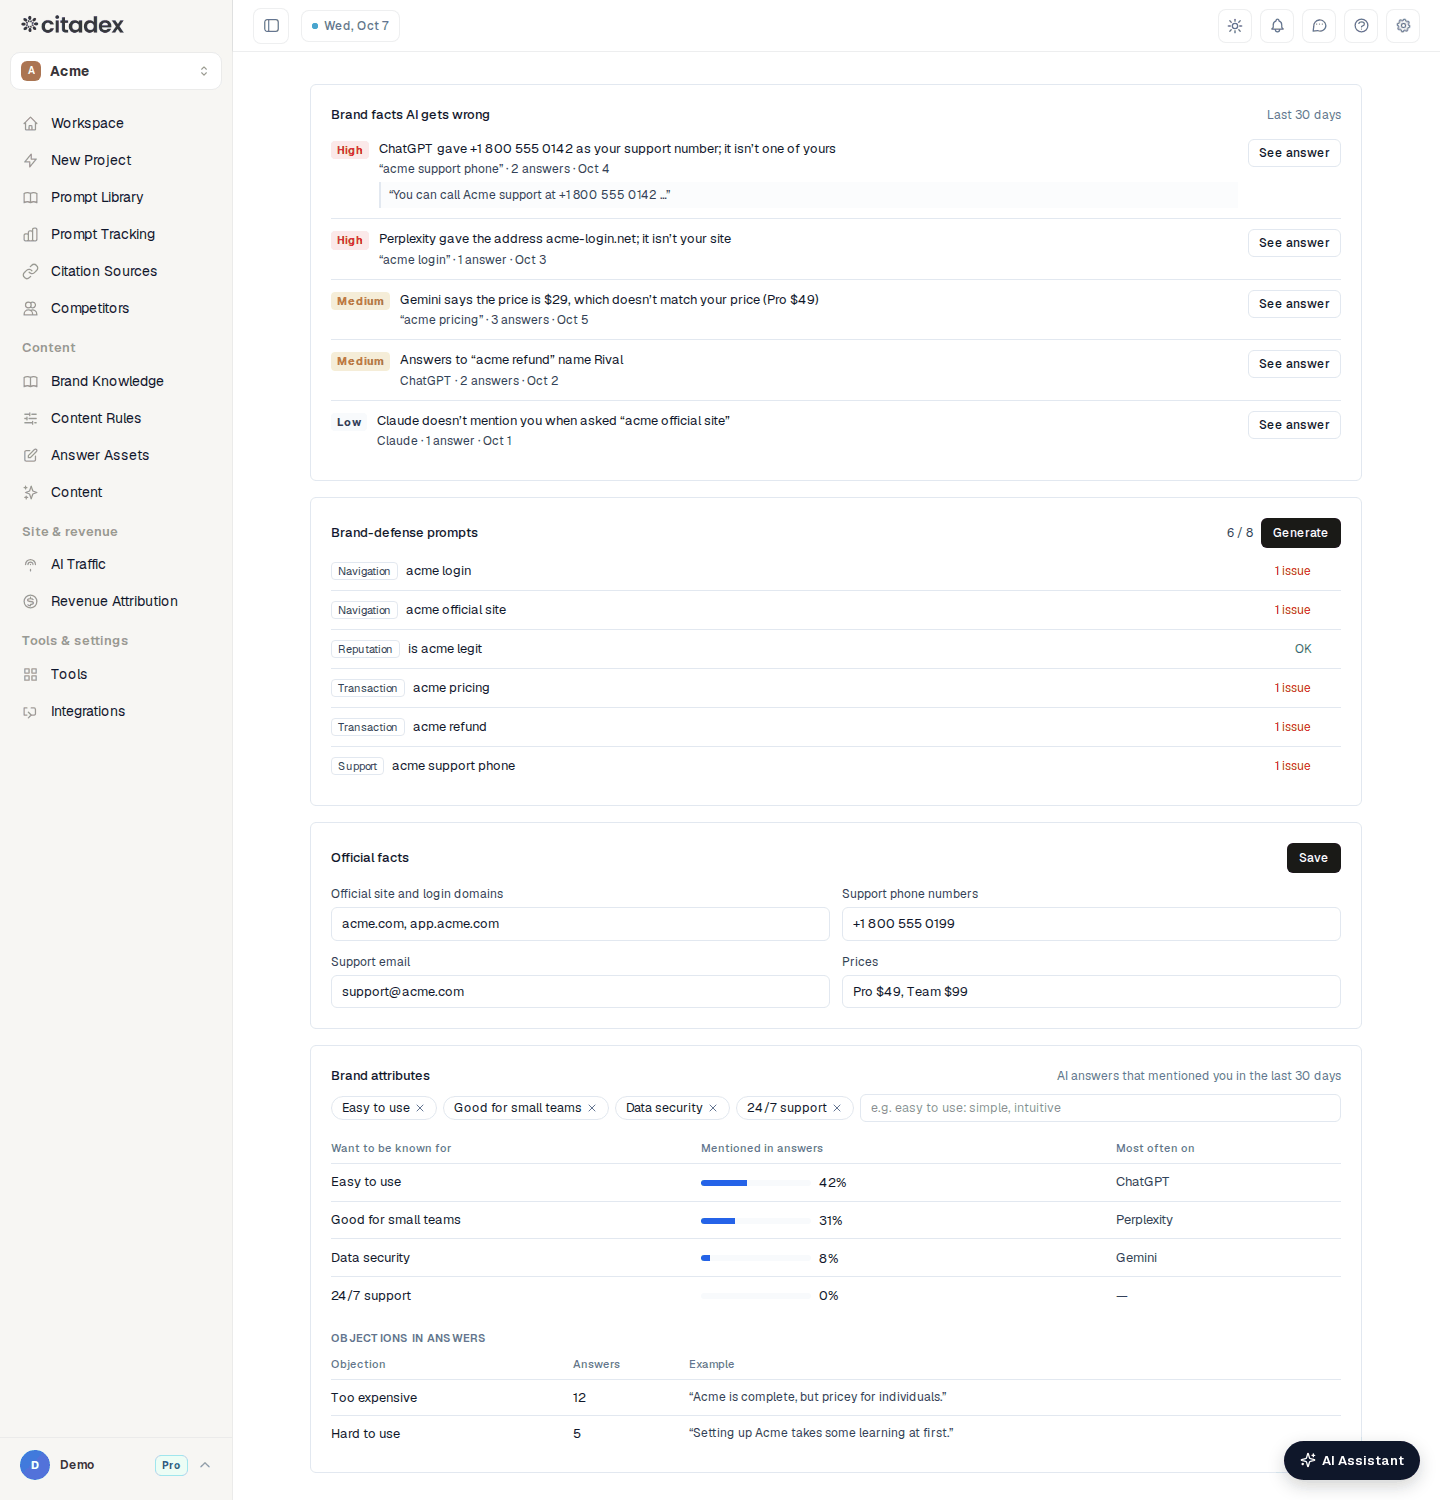
Screenshot 4-1: the Prompt Tracking Brand searches tab, marking the risk levels High / Medium / Low, See answer, the generate button for brand-defense prompts and the Official facts form
Done when: Official facts are saved, brand-defense prompts have been generated and scanned, and every High risk issue has a known cause and is scheduled for a fix.
Stage 5: Configure competitors
Page: sidebar Competitors → Configure competitors in the top right.
Why this is required: share, the prompt battlefield, competitor-only sources and prompt gaps are all calculated from this list. Without it, the system can only guess.
- 1
Add competitors
Enter a competitor’s name or domain and click Add, or pick from Suggested for you (AI-detected) (taken from the AI Citation Analysis in the stage 1 results and from brands that keep appearing in the evidence). Click Save config.
- 2
Look at the gap
See the gap: your AI appearance rate and rank, prompts where you lead or trail, and source gaps. If an unrelated brand shows up in the market share table, hover over it and click Not a competitor.
- 3
Find the questions competitors are winning
Prompt battlefield: one prompt per row, marked P0 / P1 / hold, listing the competitors that appear and the root cause (missing comparison, missing guide, missing citable content). Note down the P0 ones; you’ll use them in stage 11.
- 4
Close tracking gaps
Prompt gaps → Scan (1 to 3 minutes) finds questions where competitors are recommended but you aren’t tracking yet. Click Add to tracking.
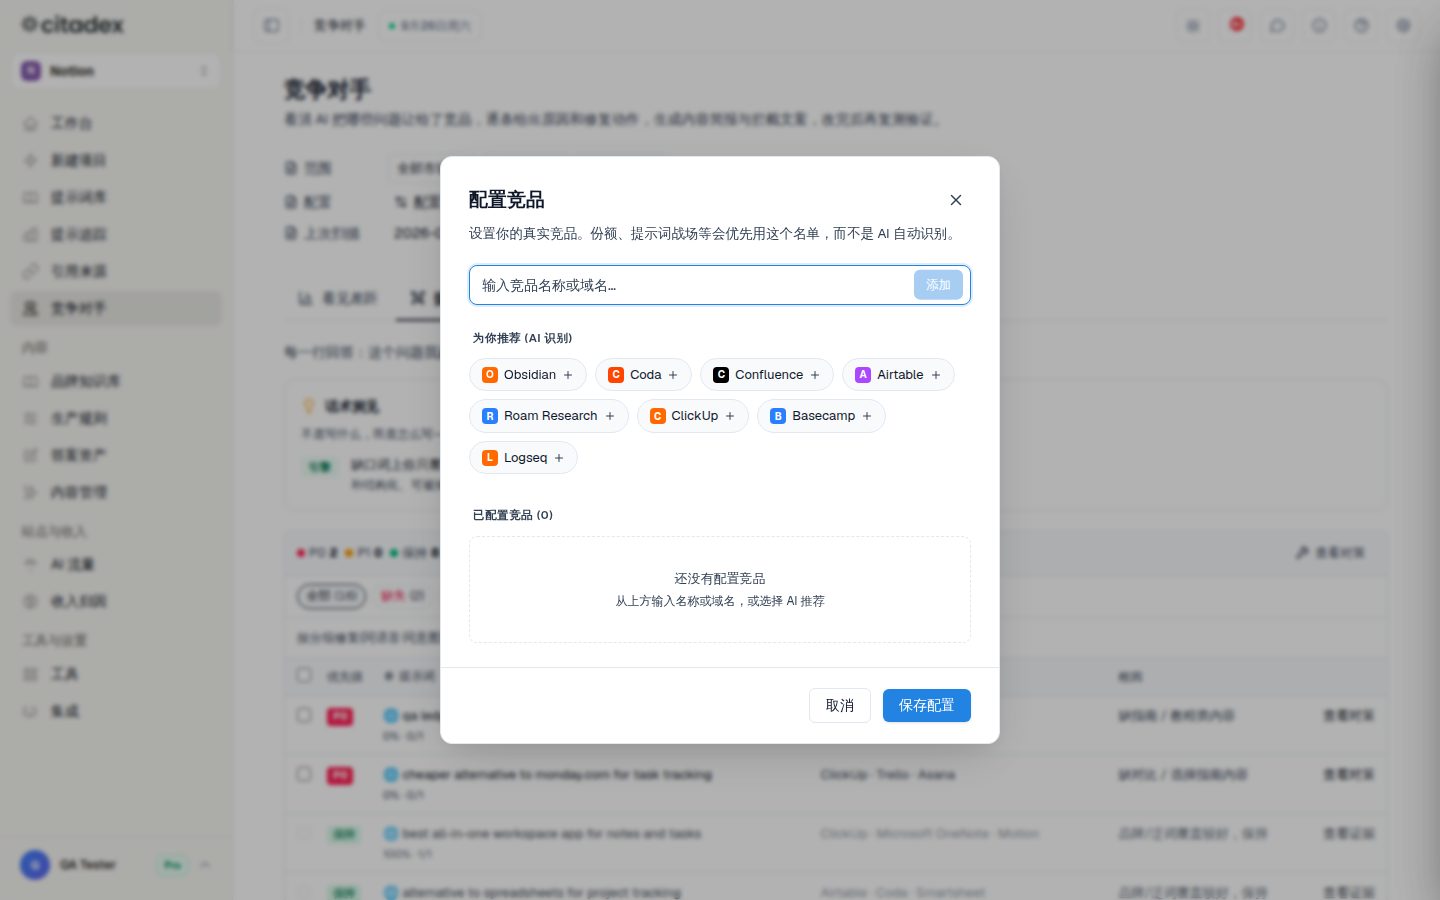
Screenshot 5-1: the Configure competitors dialog, marking the input field, AI-detected suggestions and Save config
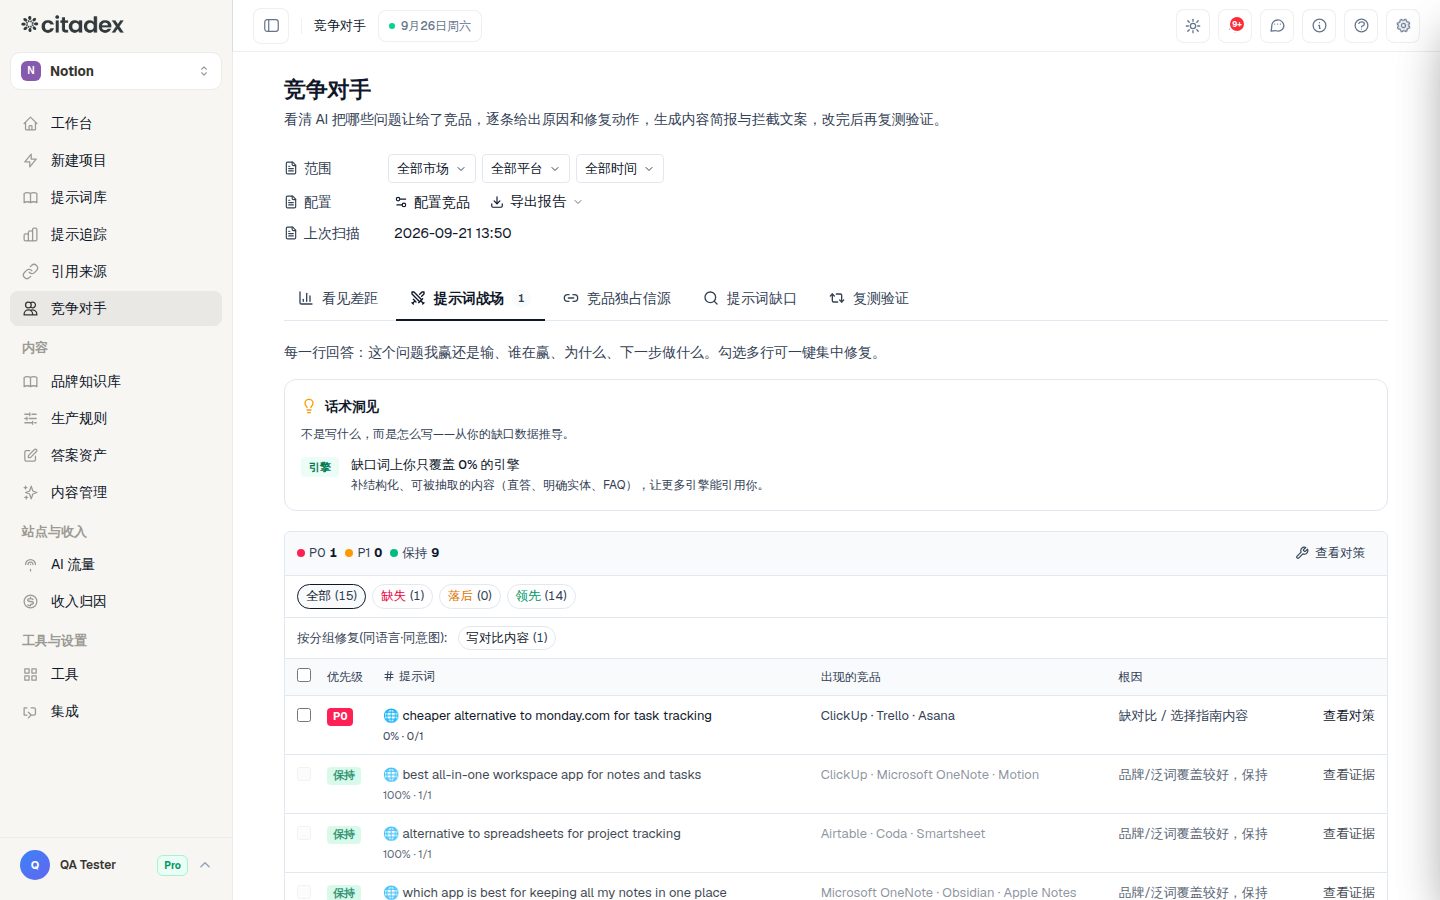
Screenshot 5-2: the prompt battlefield, marking P0 / P1, competitors that appear, root cause and View countermeasure
Done when: the competitor list is your real competitors (3 to 8), and the P0 questions on the battlefield are noted down.
Stage 6: Check and fill in signal sources (required)
Page: sidebar Citation Sources → Market health & repair tab. Pick a market at the top first.
Why this is required, and why it comes before writing: before AI recommends a brand, it checks it against a fairly fixed set of places: are there real reviews on review sites, is the brand information consistent across platforms, does the official site clearly say what the company is. These are the signal sources. Without them, AI won’t dare cite you no matter how many articles you publish.
For the current market, the page checks three groups of items, each showing Covered c/n:
- Collect real reviews on review sites
- Unify brand info so AI recognizes you (brand-information platform registrations)
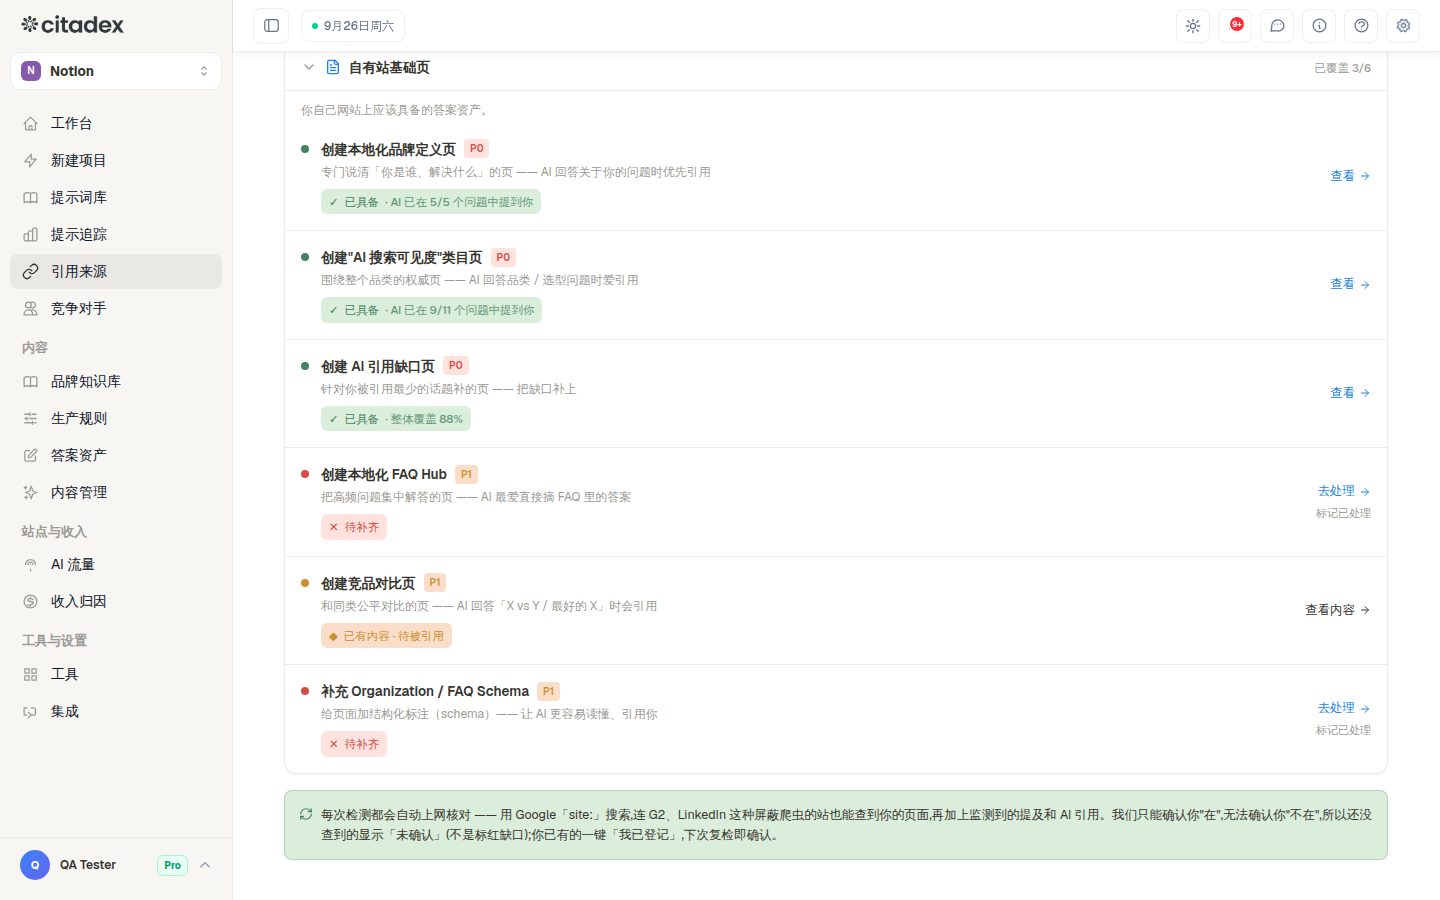
- Own-site base pages: localized brand definition page, category page, AI citation gap pages, FAQ hub, competitor comparison page, Organization / FAQ schema, split into P0 / P1
- 1
Check one market at a time
Check each market separately. Review sites and information platforms in Japan are completely different from those in the US.
- 2
Review sites and brand-information platforms: Go claim →
Each row shows a status of Already in place / Registered · awaiting re-check / Not verified. Click Go claim → to open the other site’s claim or registration page in a new tab, complete what it asks for, then come back and click I'm already on it →; the status changes to Registered · awaiting re-check. This step is manual; the system can’t register on third-party platforms for you.
- 3
Own-site base pages: P0 first, click Take action
This opens the content brief dialog, prefilled with the writing requirements for that kind of page (for example “write a brand definition page”). Click Generate brief → Send to writer → Generate Content on the Answer Assets page (this step needs stages 8 and 9 done first, or it is blocked by “business info not filled in yet”; you can note the list now and generate later). Add Organization / FAQ schema doesn’t go through a brief; it gives you JSON-LD to copy, which you hand to whoever runs the website to add to the page.
- 4
Click Re-detect to verify
After registering or putting a page live, click Re-detect. The system checks online, and what it confirms becomes Already in place. Not verified doesn’t necessarily mean it’s missing, only that the system couldn’t find it; if you know it’s done, click I'm already on it → and the next check will re-verify it.
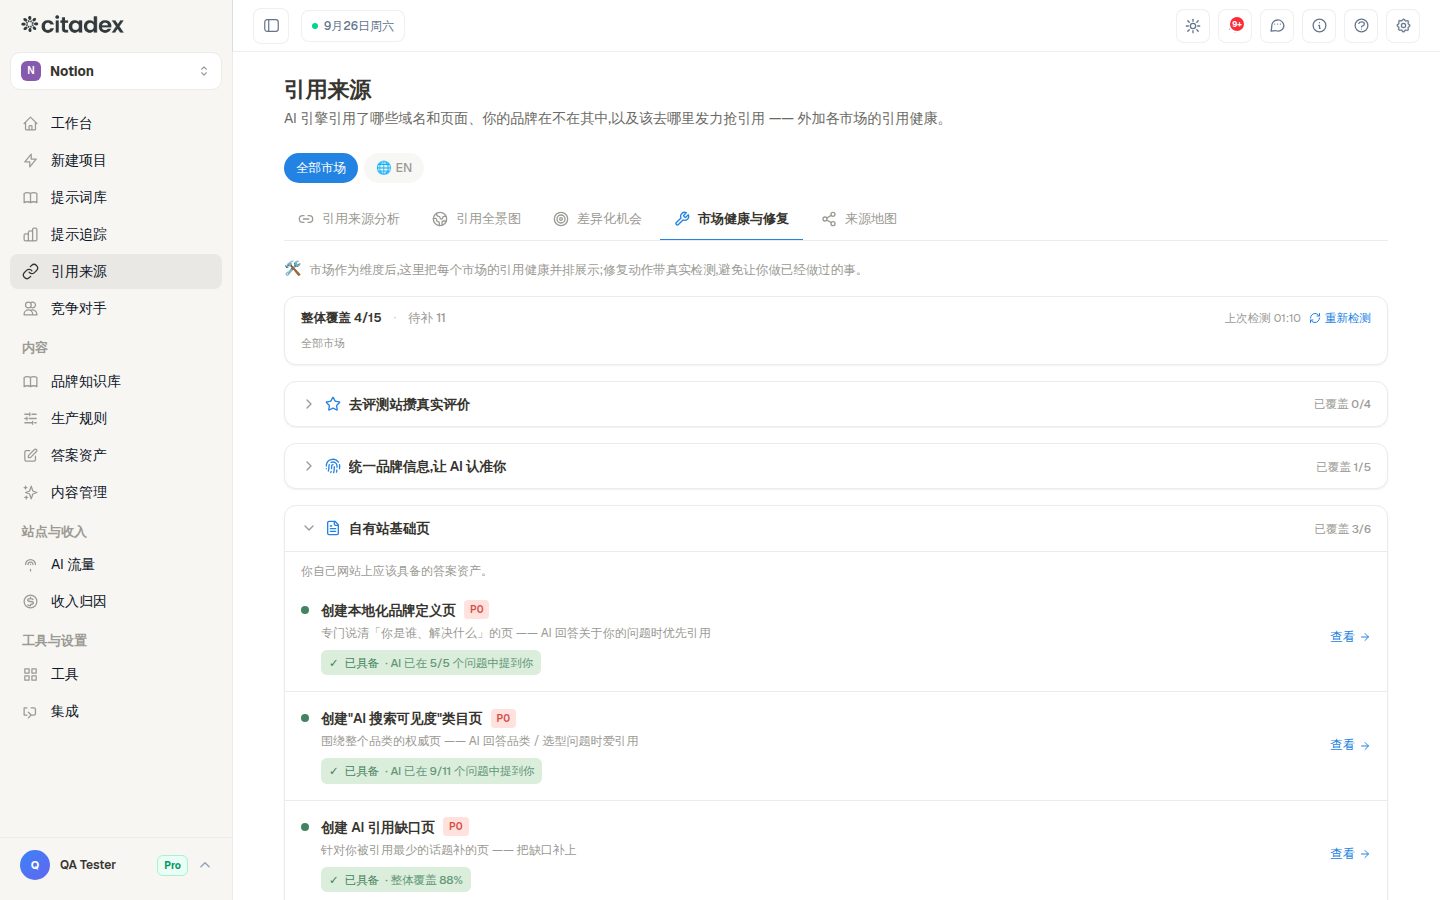
Screenshot 6-1: Market health & repair, marking market selection, the three groups and Covered c/n
Screenshot 6-2: Go claim → and I'm already on it → on review site rows, with their status
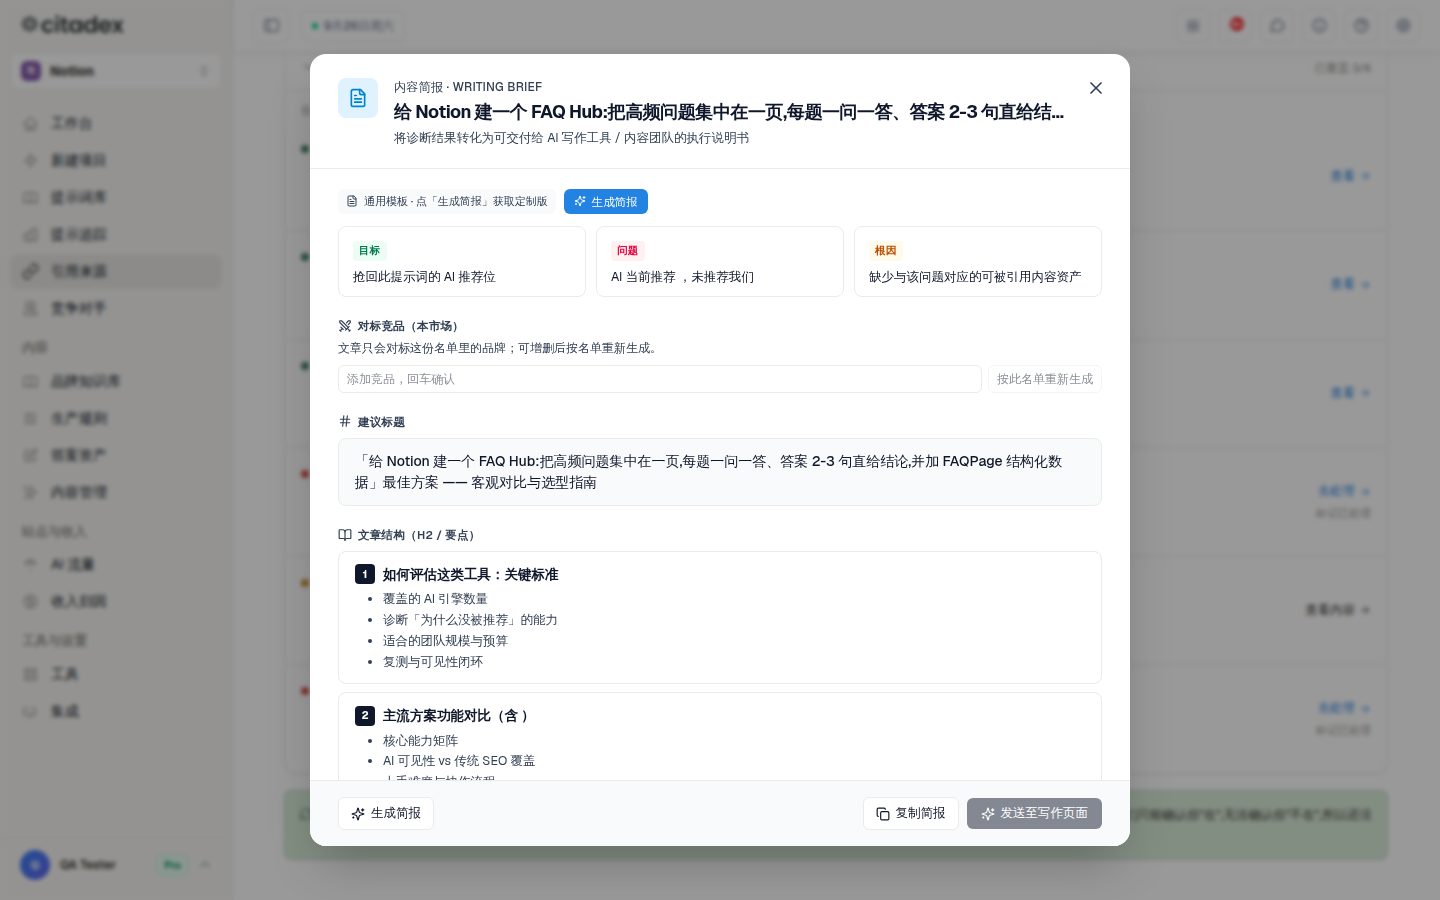
Screenshot 6-3: Take action on an own-site base page P0 task, and the schema JSON-LD
Done when: in every market at least the main review sites and brand-information platforms are registered, every P0 own-site base page exists or is on the generation list, and after Re-detect there are no P0 items left as Not verified.
Don’t skip this stage
Many people jump from here straight to writing. The result: articles get written and published, and AI still doesn’t cite them, because it can’t find you on review sites and information platforms, or your own site doesn’t even say clearly what you are. Signal sources are the foundation.
Stage 7: Make your site readable to AI
Page: sidebar AI Traffic. Tabs: Overview, AI referrals, AI crawlers, Agents, Data sources.
Why this comes before writing: AI search has to be able to fetch your pages before it can cite them, and when AI agents look up prices or contact details for a user, they have to be able to get through your site. If robots.txt blocks them, or pages only render with JavaScript, new articles are published for nothing.
Step 1: Connect AI traffic data
- 1
Open the Data sources tab
Data sources (pick one) lists three methods in recommended order.
- 2
① Google Analytics (no code)
Click Authorize Google Analytics, then choose this site’s property in the dropdown. Only the workspace owner can authorize.
- 3
② Site tracking script
For sites without Google Analytics, copy the one-line snippet into the head of every page (or the site template or tag manager); Installation guide has detailed steps. Revenue attribution in stage 14 also relies on this script to match AI visitors to leads and orders, so we recommend installing it whether or not you use Google Analytics.
- 4
③ AI crawler monitoring
Under What is your site built on?, choose Cloudflare (recommended: Direct connection: enter a read-only API Token and Zone ID and click Connect, no Worker to deploy), Vercel, WordPress (Download plugin, then upload and activate it in your admin), Next.js, Netlify or Other server, and follow the code and steps on the card. Each project has its own ingest key; if it leaks, you can regenerate it.
Step 2: Check AI crawlers and fix blocks and errors first
By purpose splits AI crawlers into three kinds and shows, for each, allowed / blocked / partly blocked, the number of visits and the error rate:
- Search: AI search building its index; this decides whether AI answers can find and cite you. Must be allowed.
- User-triggered: a user asks the AI to open your page. Must be allowed.
- Training: used to train future models. Allowing it is your choice and doesn’t affect citations in AI search.
At the top of Overview, To fix this week lists, in order, pages blocked by robots.txt, crawl errors, and pages AI reads often but doesn’t cite. Optimization plan contains This week (the few pages most worth changing), Prompt ownership (which page is responsible for answering each question) and Change list (the specific edits for this page); when the edits are done, click Done, start retest.
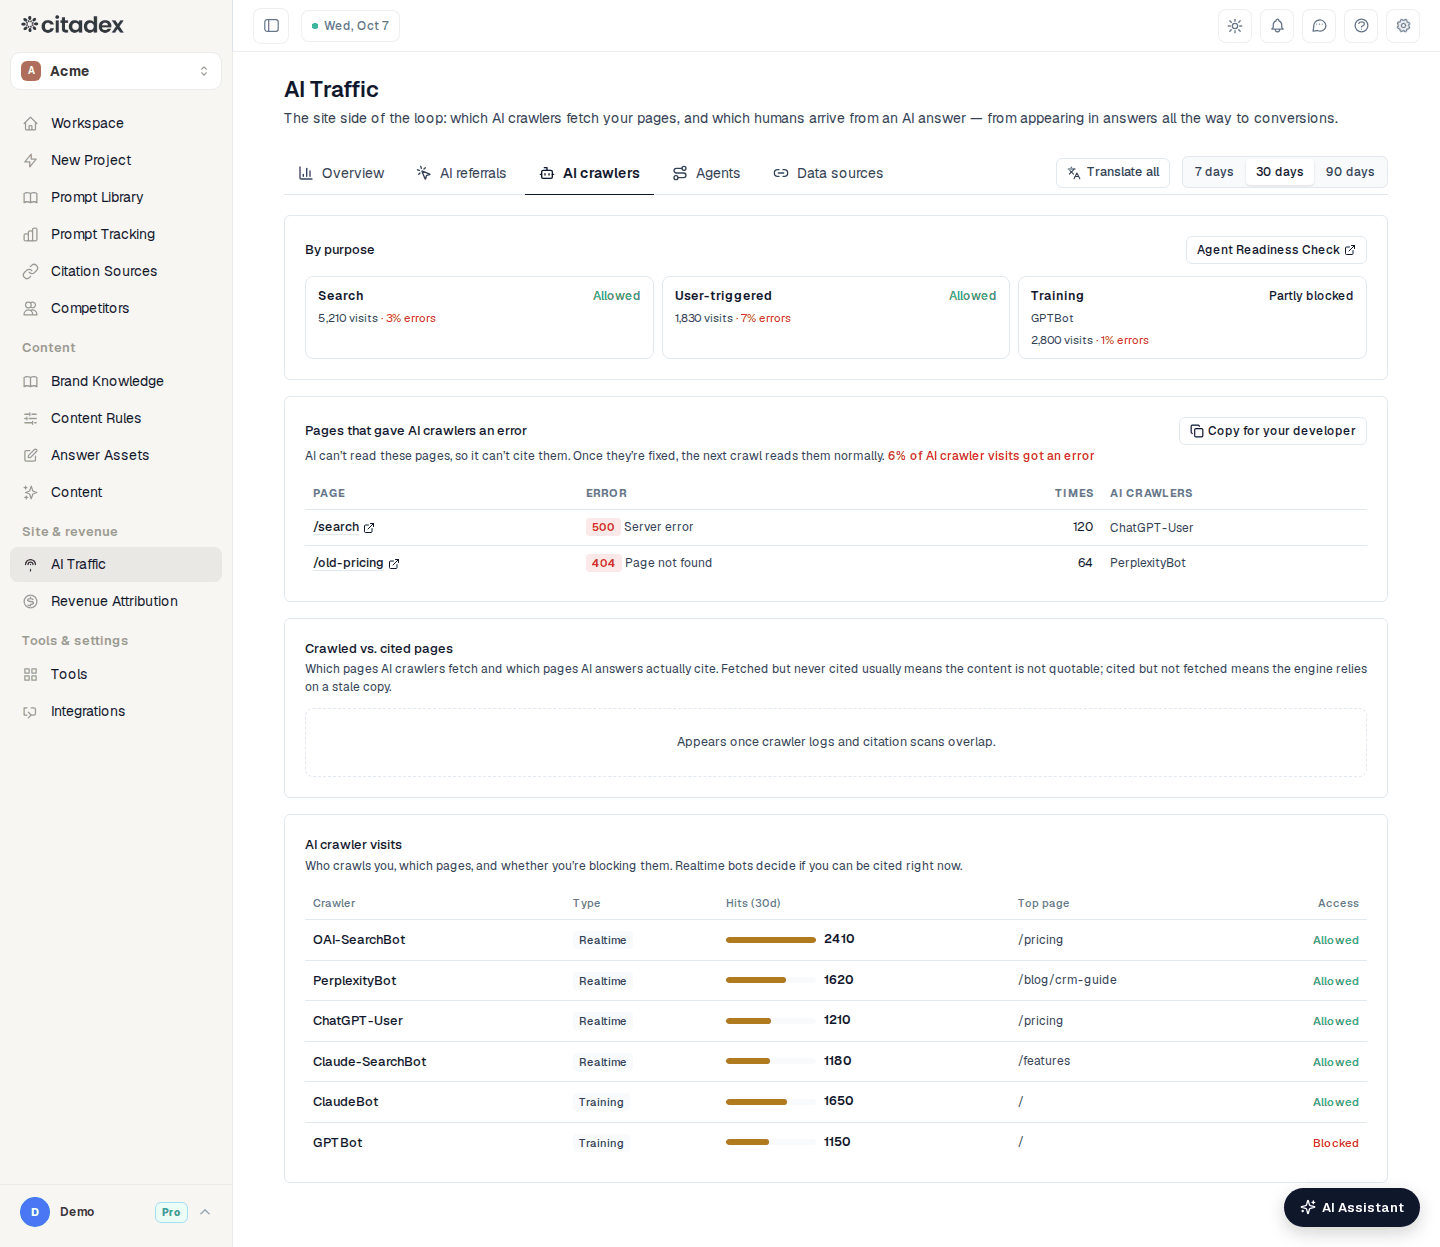
Screenshot 7-1: the AI Traffic AI crawlers tab, marking the three kinds Search / User-triggered / Training, allowed or blocked status, number of visits and error rate
Step 3: The Agents tab: can AI agents get things done on your site?
- 1
Check Agent readiness
An overall score plus four groups: discoverable, readable, operable, transactable. It is Checked automatically every Monday and shows New issue and Fixed compared with last time, plus the error rate for real-time fetchers and search crawlers. An alert is sent when the score drops noticeably or an item starts failing. To see results right away, click Check now (no credits); Full checklist shows every item and how to fix it.
- 2
Run Simulated agent tasks
A read-only AI agent works through tasks on your site, such as finding prices, finding a product, checking stock, finding the refund policy, or finding a quote form or contact details. It doesn’t run JavaScript, sign in, submit forms or place orders, and opens at most 8 pages per task. The results table shows Done or Failed for each task, Where it got stuck (which step, what blocked it) and time taken; click Steps to see which pages it read.
- 3
Edit and run tasks
By default you get 6 tasks based on your site type; Edit tasks lets you change them to what customers do most. Tasks run automatically once a week at no extra credit cost; to run them again right now, click Run. You first see the credits this run needs, and it starts only after you click Run to confirm.
Agent readiness monitoring is a paid-plan feature. If you’re not on a paid plan yet, or want to show a prospect first, use the free public check page /agent-readiness: enter a URL and click Check. Without signing in you see the overall score and Main issues; signed in, you see the full checklist and fixes, and can Copy fix list or Ask AI Assistant how to fix.
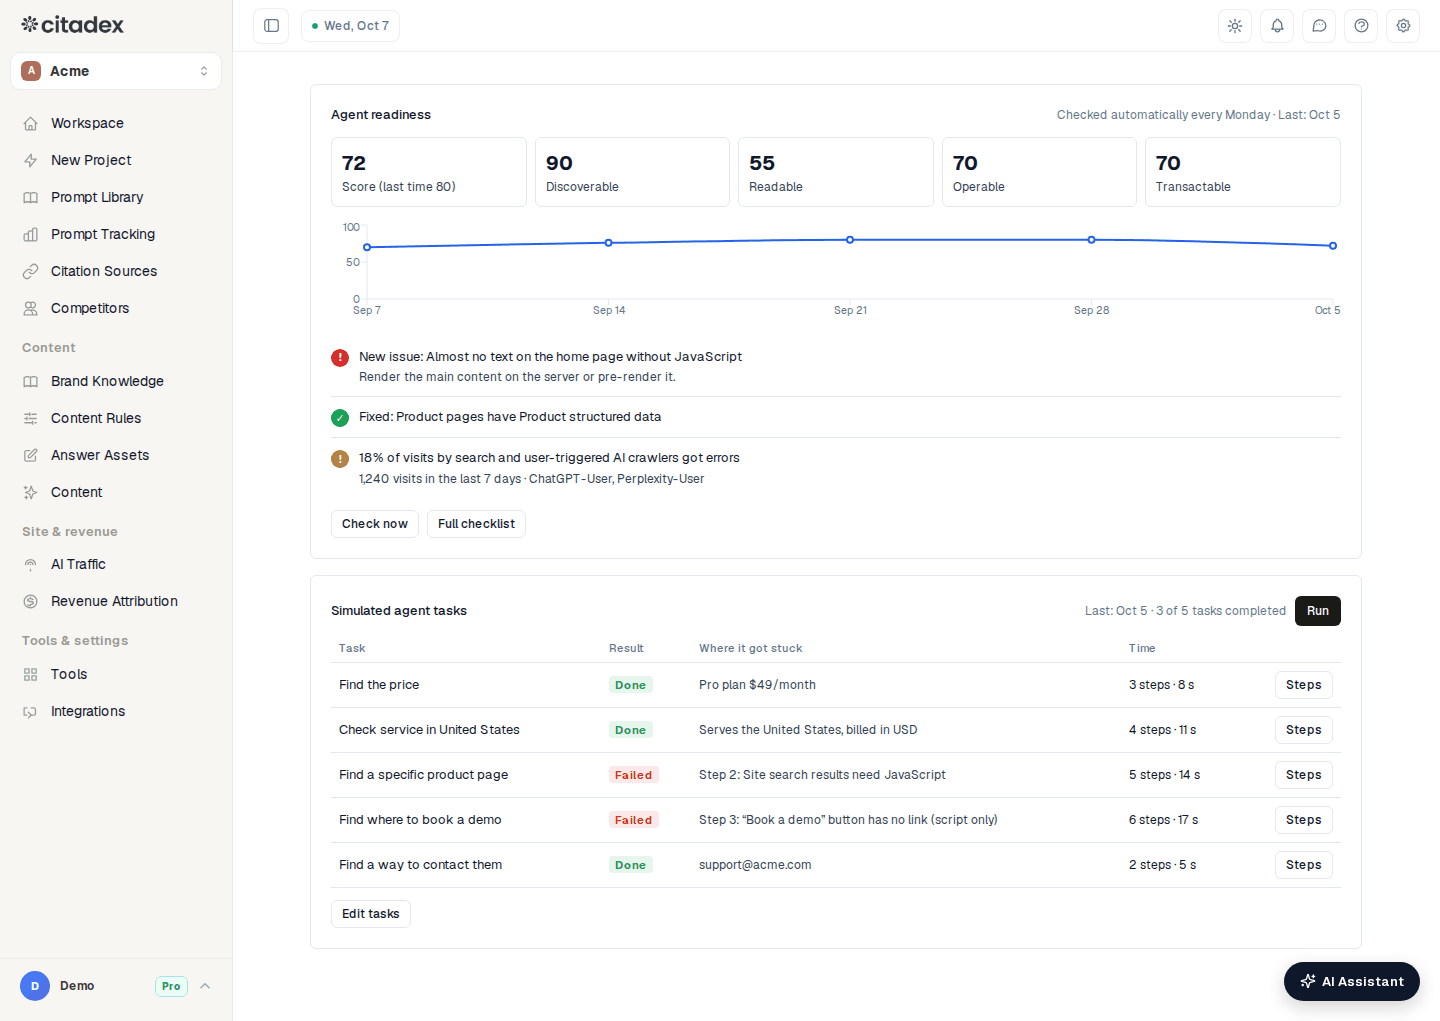
Screenshot 7-2: the AI Traffic Agents tab, marking the agent readiness score, New issue / Fixed, Where it got stuck in the simulated agent tasks table and the Run button
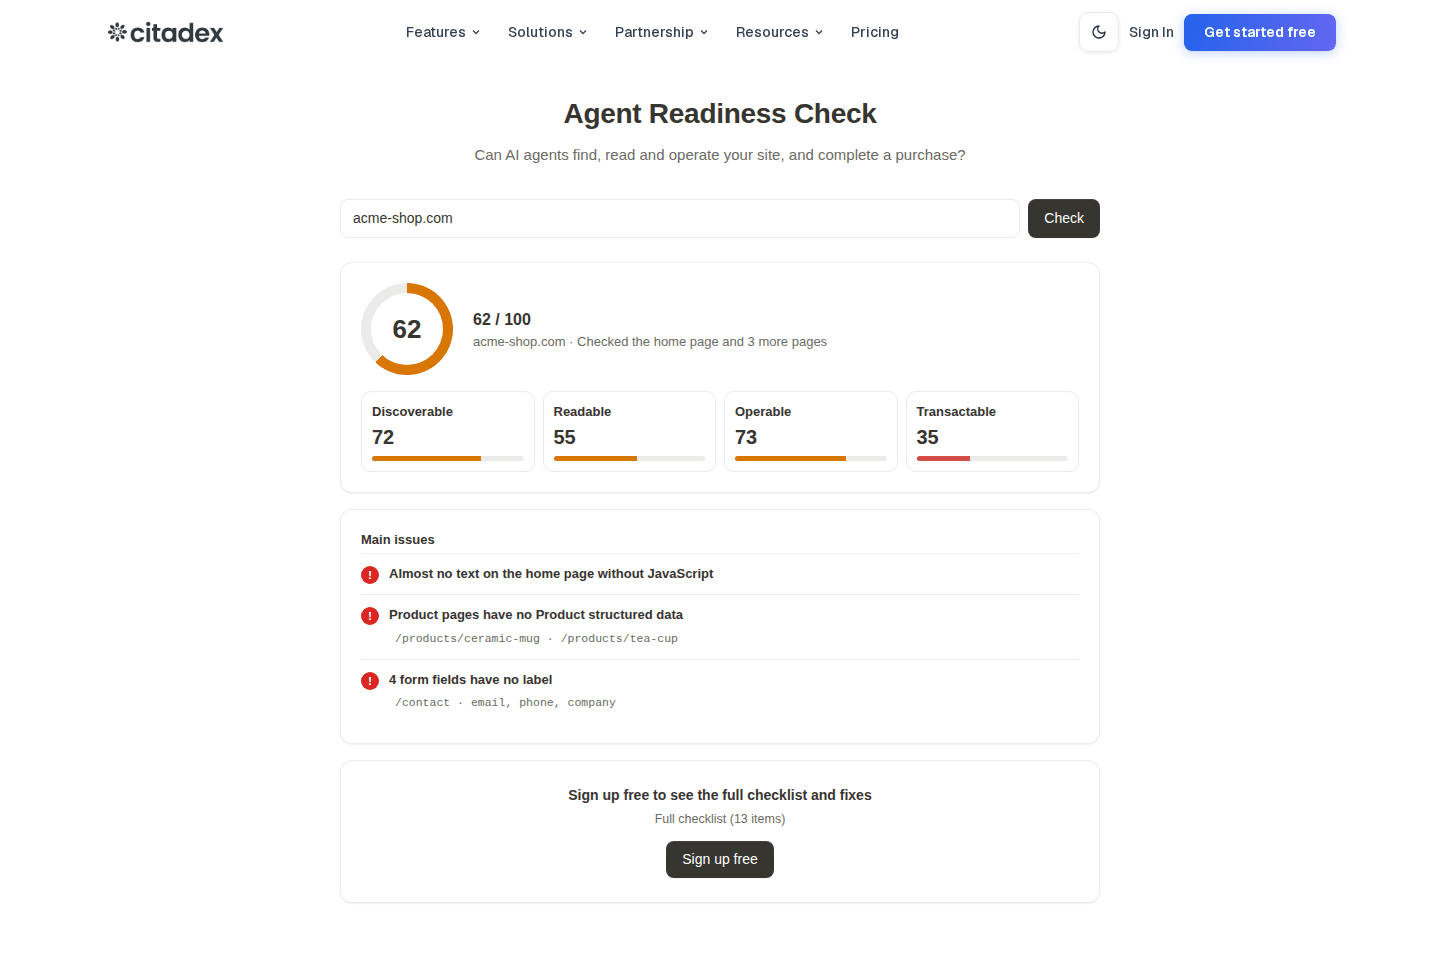
Screenshot 7-3: /agent-readiness check results, marking the overall score, the four group scores Discoverable / Readable / Operable / Transactable and the main issues
Done when: at least one data source is connected and receiving data; under By purpose, Search and User-triggered are both allowed with a very low error rate; agent readiness has no failing items, or the failing items are on the change list; and the find-prices and find-contact-details tasks in Simulated agent tasks show Done.
Stage 8: Fill in Content Rules
Page: sidebar Content Rules. Both cards save automatically, and ✓ Saved shows in the top-right corner.
- 1
Business info (required)
One positioning sentence + target customers + three core selling points + price. When it’s empty the border turns red and multi-agent generation won’t start. Every article reads this field, so put core facts that change often, such as pricing and the number of engines, here, not only in the knowledge base.
- 2
Team instructions
3 to 5 hard rules: “No exclamation marks”, “Avoid marketing speak”, “Mention the brand at most 3 times in the body, never in the first two paragraphs”.
- 3
Call To Action (CTA)
Copy + link; set the placement to End of article.
- 4
One-click presets
Click Professional, Friendly or Academic, then expand Customize ▼ on any agent to fine-tune it. Presets overwrite each agent’s instructions but leave business info and team instructions untouched.
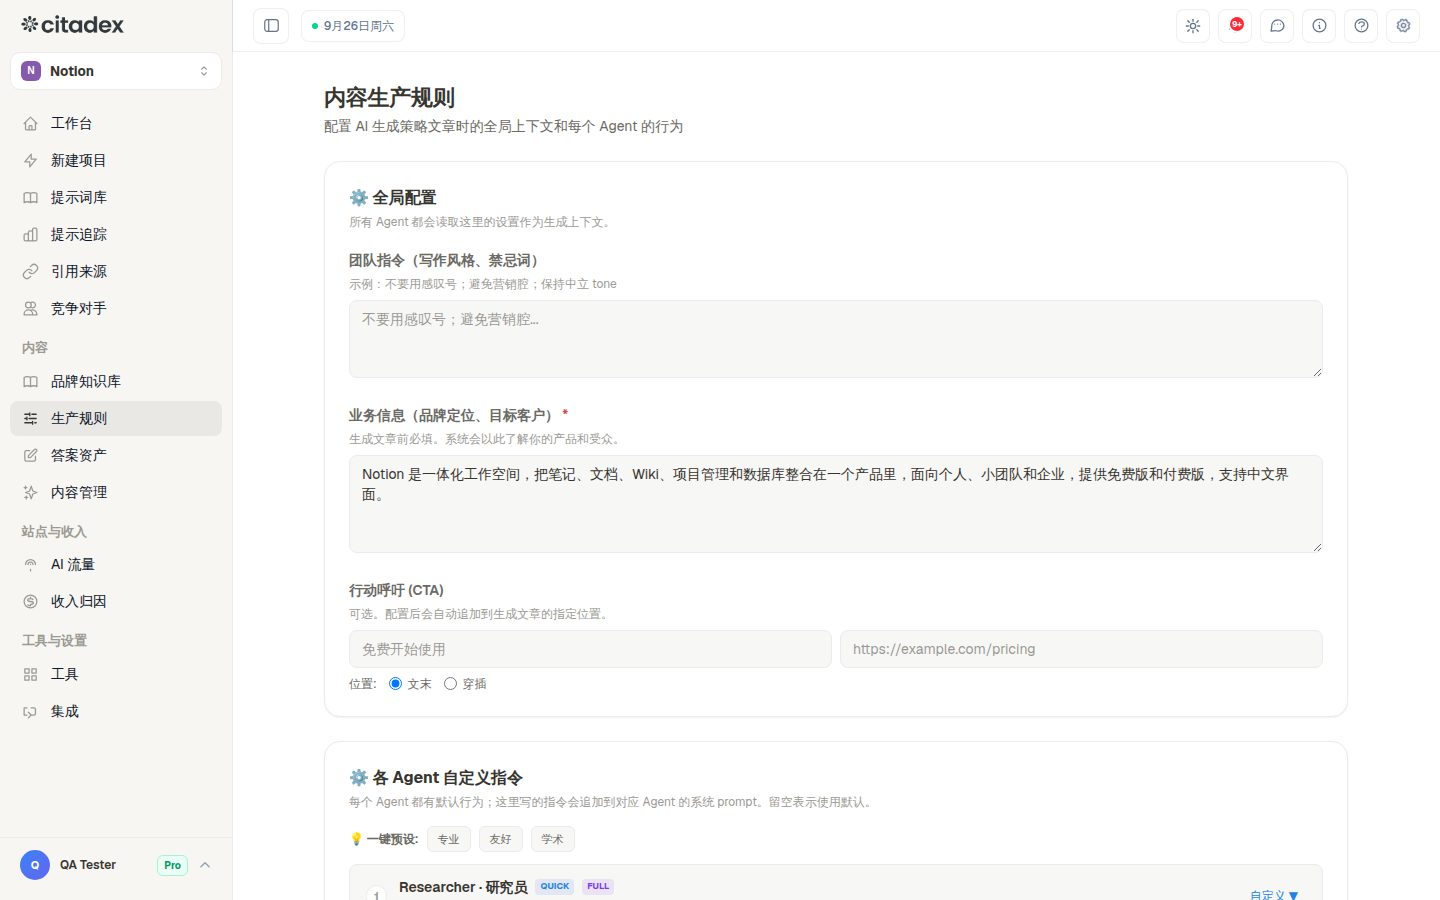
Screenshot 8-1: Content Rules global settings, marking the required business info, team instructions, CTA and saved status
Done when: business info is filled in and shows ✓ Saved.
Stage 9: Fill in Brand Knowledge (required before publishing)
Page: sidebar Brand Knowledge. Three ways to add: write or paste, from URL, upload a file.
Why it must happen before generating articles: strategy articles, AI agent generation and Autopilot all look up facts here first. Without it, numbers such as prices, specs and certifications can only come from the open web, or be made up. One wrong price of yours can be quoted by AI for a long time. The correct versions of the wrong phone numbers, URLs and prices found in stage 4 also belong here.
- 1
From URL
Add the pricing page, product pages, about page and case studies. The system fetches the main text and splits it into excerpts.
- 2
Write or paste
Fill in the facts that are asked about most and must never be wrong, following the template in the input box: one-line brand summary, pricing, product specs, certifications, case studies, countries served, FAQs, each with a source. At least 3 to 5 entries.
- 3
Upload a file
Product manuals and white papers (PDF / Word / Markdown, up to 8 MB).
- 4
Test retrieval
Type a typical customer question (for example “your pricing”) and see whether the excerpts you just added come back. If they don’t, add the product name and keywords to the title and text. This uses exactly the same retrieval as the pipeline, so it only counts once you’ve tested it.
- 5
Add competitor material
Tick This is competitor content when adding it. It is used only as a positioning reference; the writer will never treat it as your facts.
- 6
Keep it up to date
When pricing or specs change, find the entry and click Edit to update the text; for web sources, click Re-index after the page is updated. The knowledge base only contains material you add yourself; generated and published articles are not added automatically.
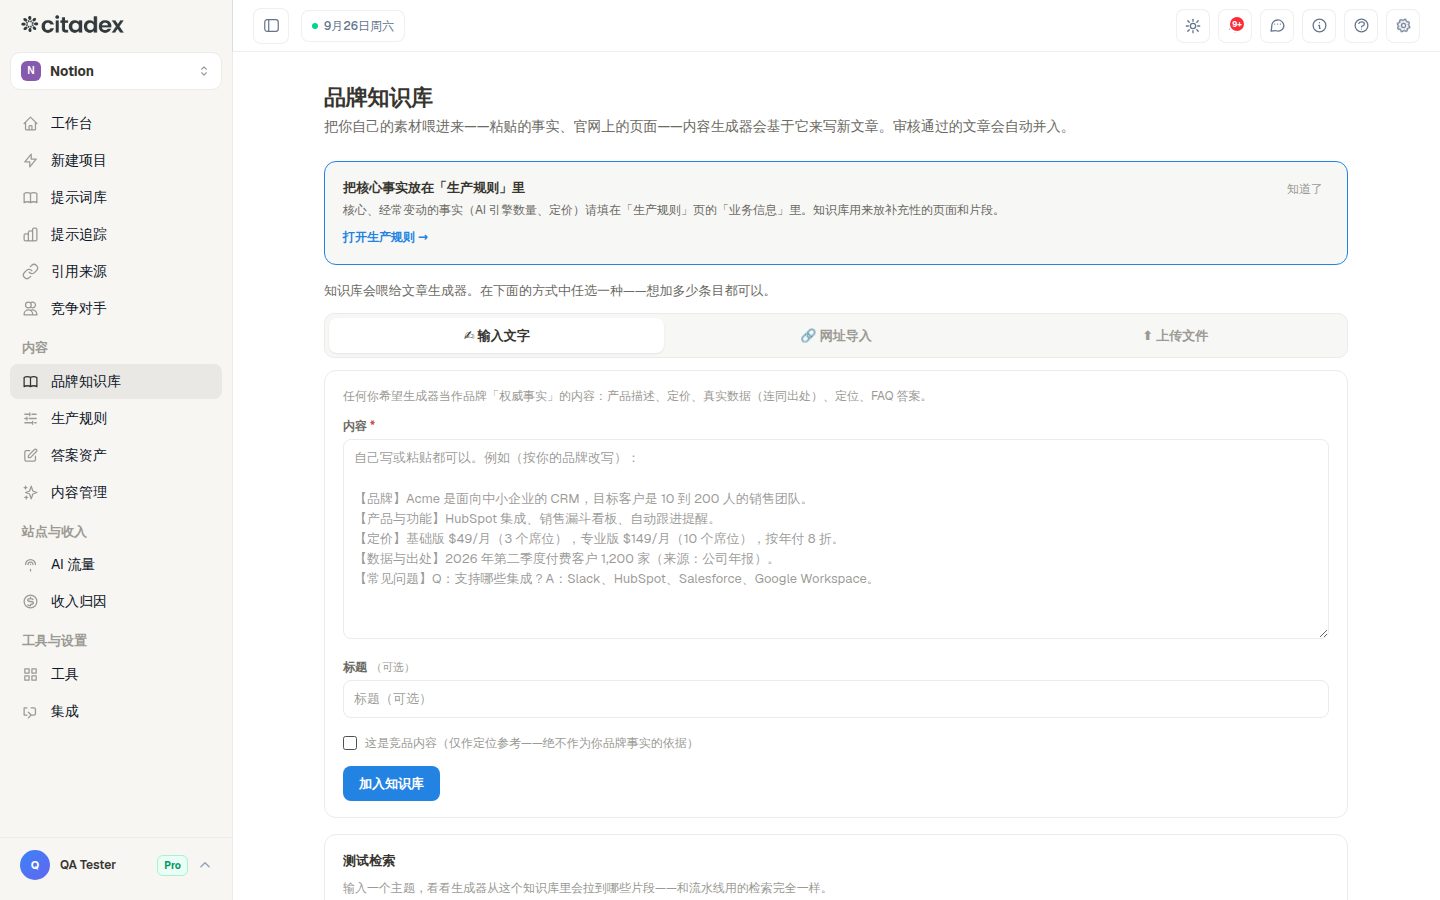
Screenshot 9-1: the three tabs in the Brand Knowledge add area and the write-or-paste template
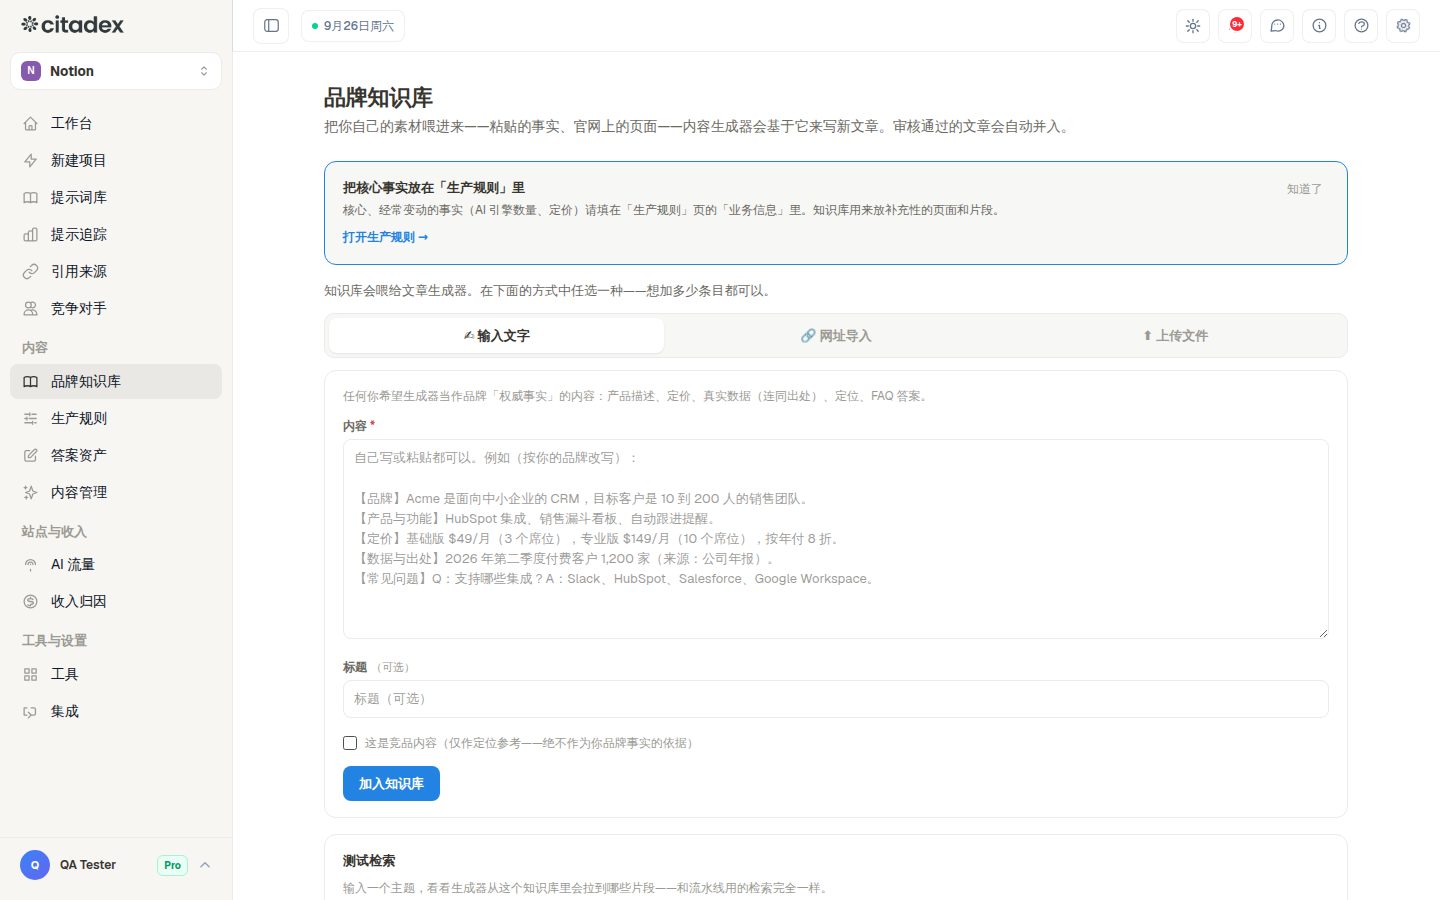
Screenshot 9-2: Edit / Re-index / Remove in the source list
Done when: the pricing and product pages are imported, 3 to 5 key facts are entered, and Test retrieval finds them.
Stage 10: Connect publishing channels
Page: sidebar Integrations. Needs a paid plan. Check that Configuring project at the top is this client’s project. Integrations that require signing in (GitHub, Google Search Console and so on) are connected by the workspace owner.
Why this comes before generating: once an article is generated it needs somewhere to go. Publishing to a channel marked “not connected” in the publish dialog will fail.
- 1
Connect your own site (first choice)
WordPress / Ghost: click Integration on the card → enter the site address, username and application password → Test direct publish → Done. GitHub static site: connect GitHub to authorize → choose the repository → Test Connection → Save. Shopify / Webflow / Wix: follow the 3 steps to connect on the card. Only a green Connected means you can really publish; Not tested can’t publish yet.
- 2
Clients without a CMS
Use Hosted blog: enter the address and name and save, then Use your own domain and add the DNS records as prompted, then Check status. Or generate a token in Content API / RSS and hand it to the client’s developers.
- 3
Install the browser extension
Third-party platforms (Medium, note, Qiita and others) rely on the Citadex Publisher extension to open their editor in your browser. It’s ready only when the banner shows Connected. Chrome / Edge only.
- 4
Connect Google Search Console
AEO Signal Tools → Google Search Console: connect with your Google account. After that, every publish submits the URL for indexing automatically, Prompt Library can import real search terms, and the demand data on the Coverage tab comes from here too. For Bing IndexNow, enter the key. robots.txt health check checks whether AI crawlers are blocked; if they are, use the Fix snippet.
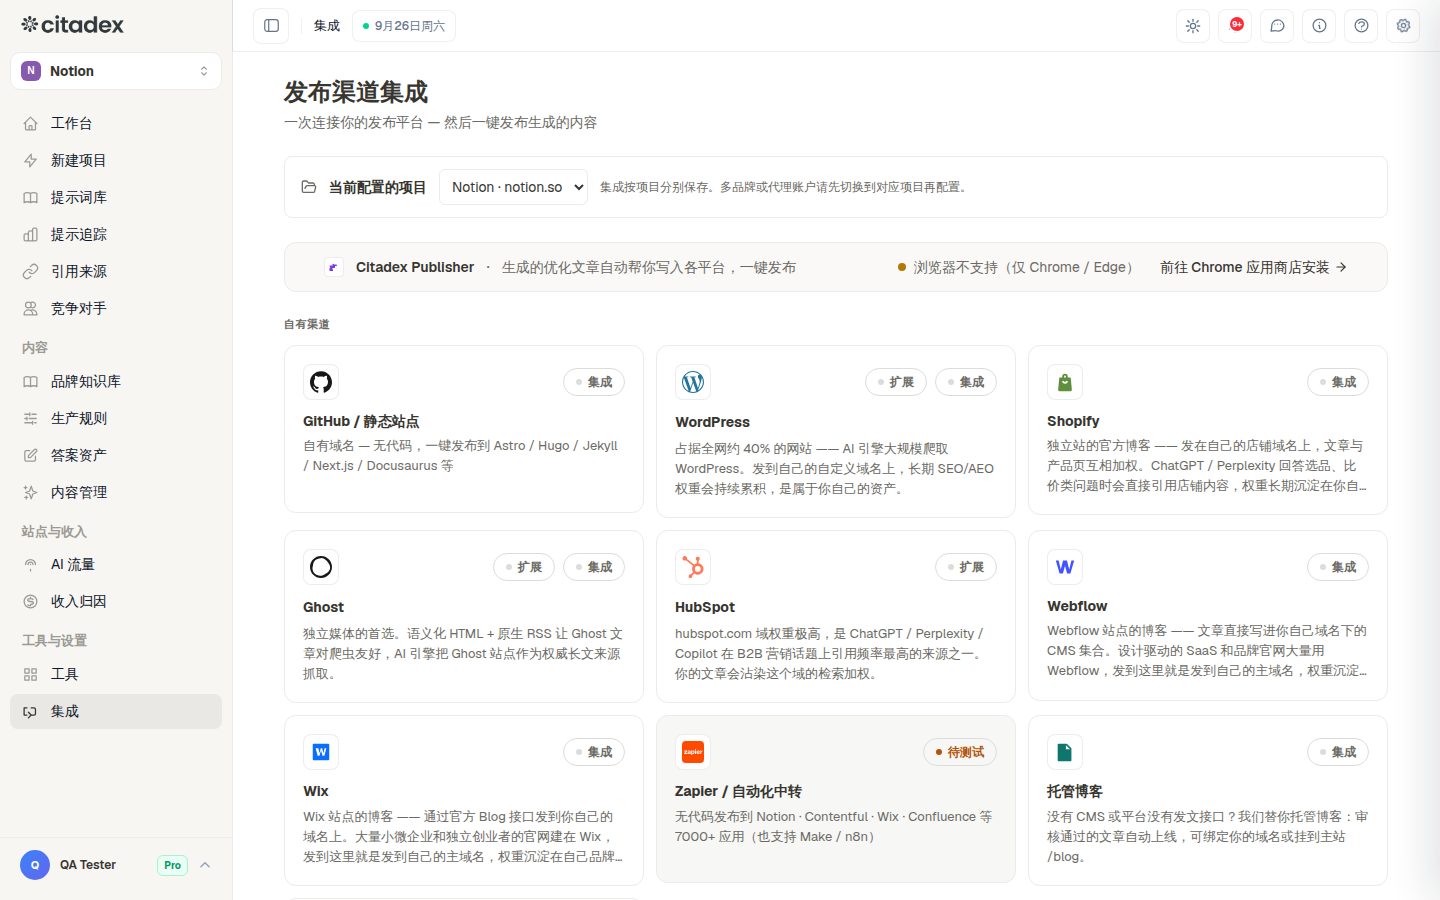
Screenshot 10-1: the three groups of cards on the Integrations page, marking what each status means (Connected / Not tested / Disabled / Integration)
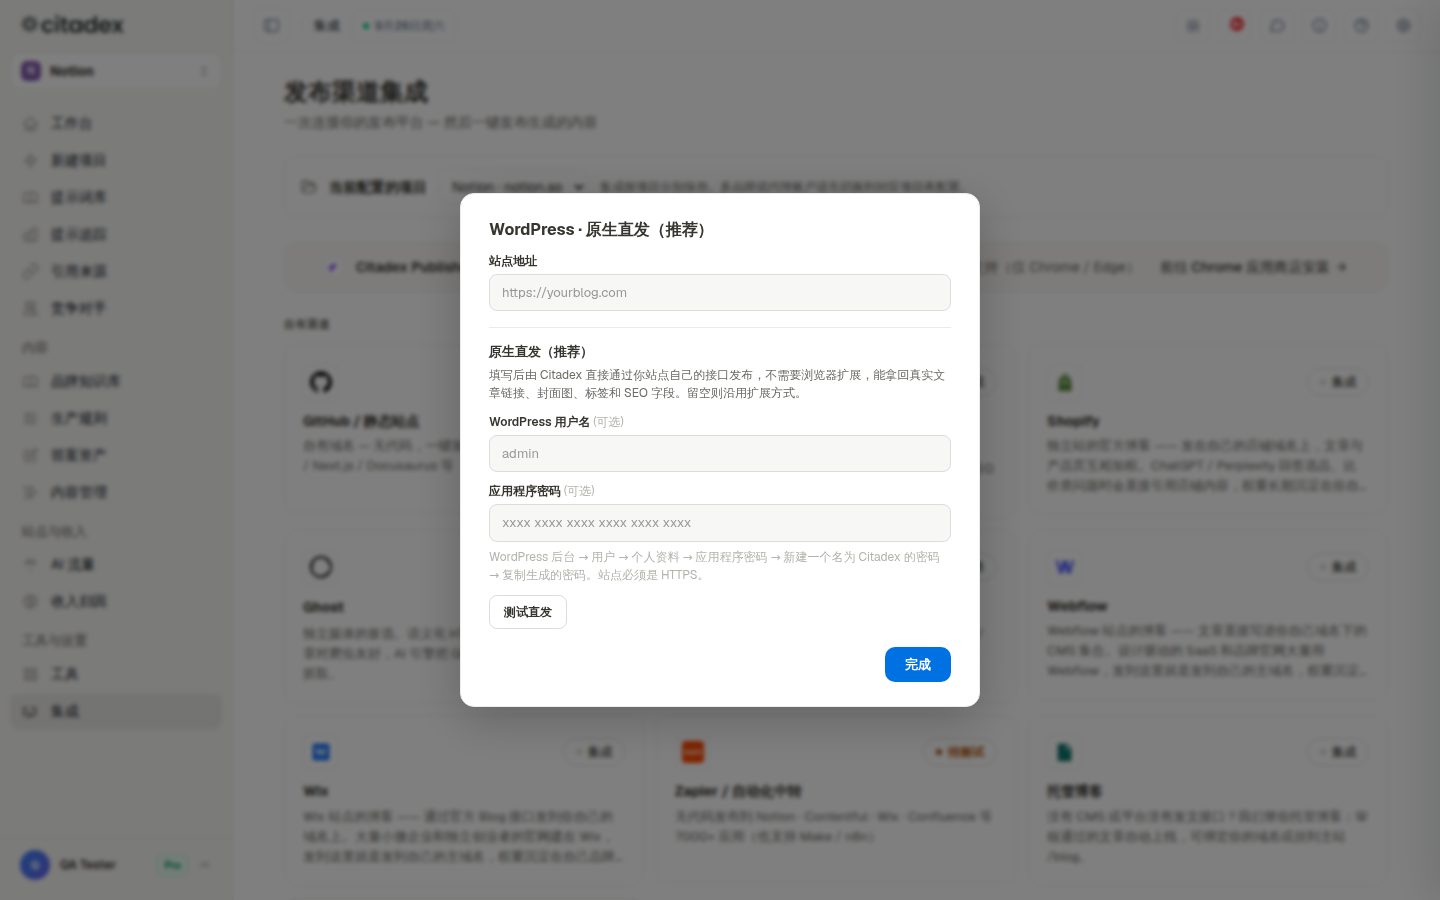
Screenshot 10-2: Test direct publish in the WordPress integration drawer
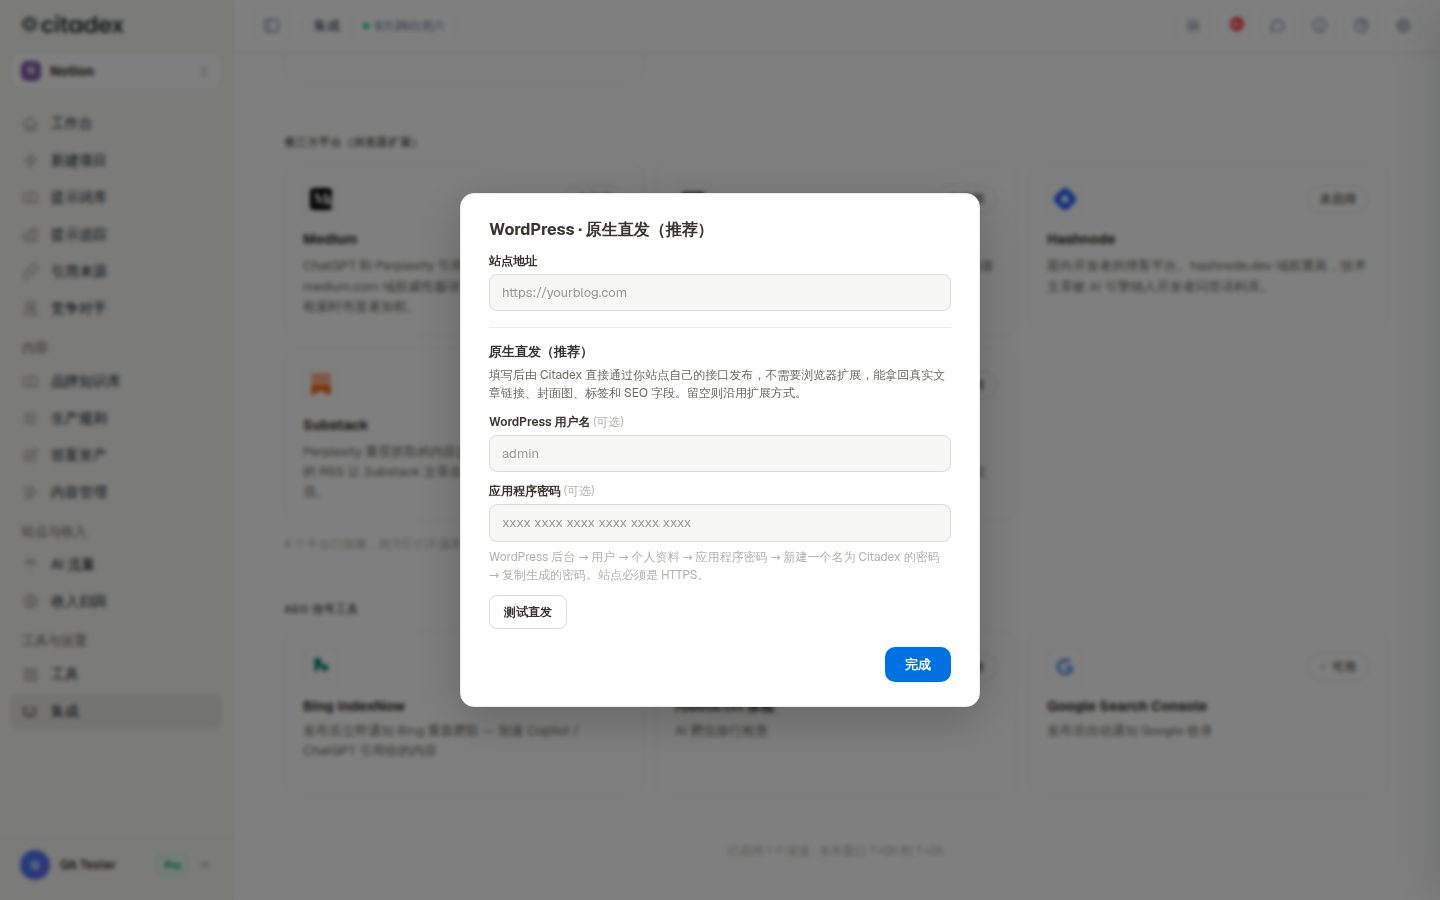
Screenshot 10-3: the extension banner and the Google Search Console card
Done when: at least one owned channel shows a green Connected, Google Search Console is connected, and the robots.txt health check passes.
Stage 11: Create countermeasure content
This is the core path that turns “AI cites someone else” into “AI cites you”: pick a problem from this week’s tasks → see who AI trusts → view the countermeasure and generate a brief → send it to the writer and generate the article → publish → re-test.
Start from This week’s tasks on the Workspace
Page: sidebar Workspace → This week’s tasks card (below the metrics).
The system compares the last 14 days with the 14 days before and picks up to 5 things most worth doing first. Each has a type label:
- Recommended less: the share of answers that recommend you went down.
- Citations lost: the share of answers that cite your site went down.
- Competitor ahead: a competitor appears more than before and is now ahead of you.
- Prompt gap: competitors appear in answers where you aren’t mentioned.
- Page not cited: AI reads a page often but doesn’t cite it (or cites it but sends no visits).
- Wrong brand info: AI gives a wrong phone number, URL or price (see stage 4 for how to handle it).
Tasks are ranked by how big the change is and which buying stage the question belongs to; once revenue attribution is connected, the AI revenue each topic brings in is also taken into account. If an AI platform changed across the board over the same period, the task’s weight is halved and it’s labelled as a platform-wide change.
- 1
Look at the evidence first
On each task, click See evidence to read the AI’s exact words. For page tasks click Open change list; for brand info tasks click Wrong brand info to go straight to the Brand searches tab.
- 2
Act on it
Prompt gap and Competitor ahead tasks can go straight to Write article, which opens Answer Assets with that prompt (credits are confirmed there). Handle other tasks using the routes below.
- 3
Mark the result
When you’re done, click ✓ Done; the task shows as done and moves to Resolved once the problem actually disappears. Click ✕ Dismiss for anything you don’t plan to handle; if you clicked by mistake, click Undo. Viewers don’t see these two buttons.
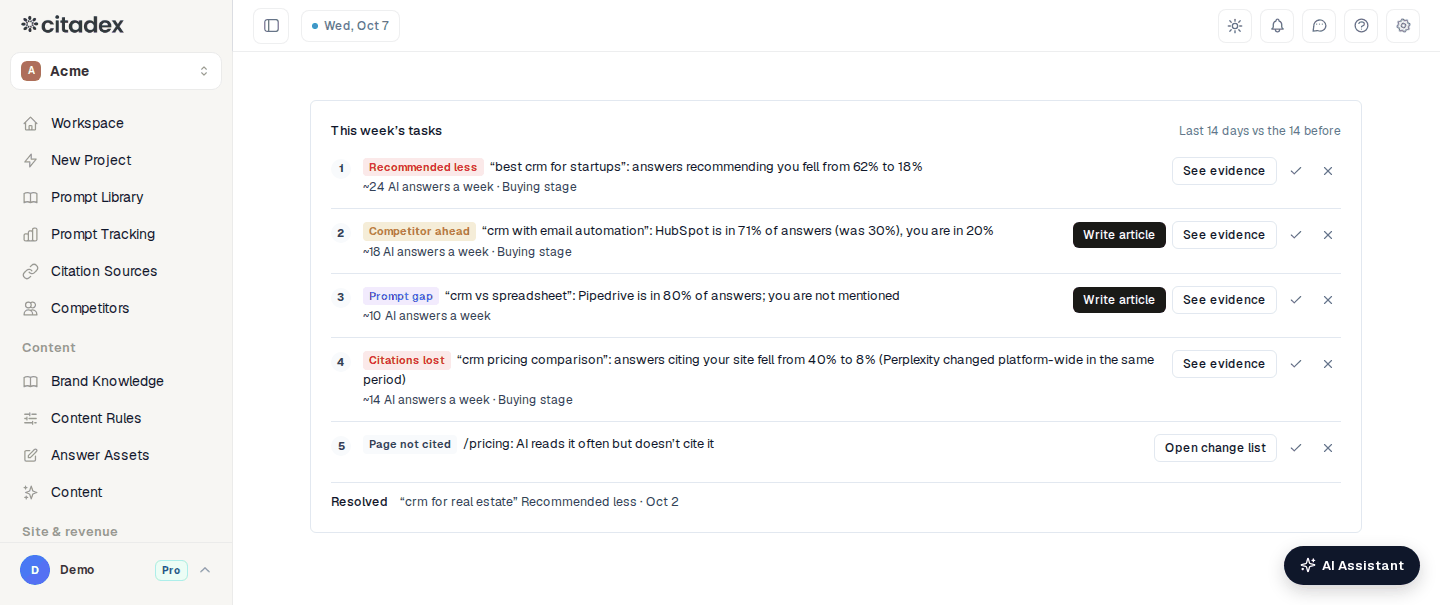
Screenshot 11-1: the This week’s tasks card on the Workspace, marking task type labels, See evidence, Write article, ✓ Done / ✕ Dismiss and the resolved list below
See who AI trusts
Page: sidebar Citation Sources → Citation analysis tab: four metrics (own-site cited rate, you cited, cited source domains, uncovered top sources). The Cited source domains table is sorted by number of citations; look at Retrieved (the share of answers to your prompts that list it) and You (the share of times it’s cited where you also appear). Click a row to expand Pages AI cited and Prompts that cited it, each with View the AI answer.
Each domain has a type label, Community, Creator, Government, Academic or Licensed (the publisher has publicly signed a content deal with an AI company), to help you decide whether to post, partner with someone or pitch a submission. The AI can read column comes from the site’s robots.txt: content you place on a site that blocks a given AI usually won’t appear in that AI’s answers, and you can pick those sites out with the filter Sites that block an AI. Sources are split into owned, competitor and third-party: competitors’ own sites are never listed as gaps or outreach targets, and vendor pages are ranked after independent sources.
Attack map · citation gaps: sources AI cites often that include competitors but not you; the higher the gap score, the sooner you should go after it. Each source gets actions based on its type.
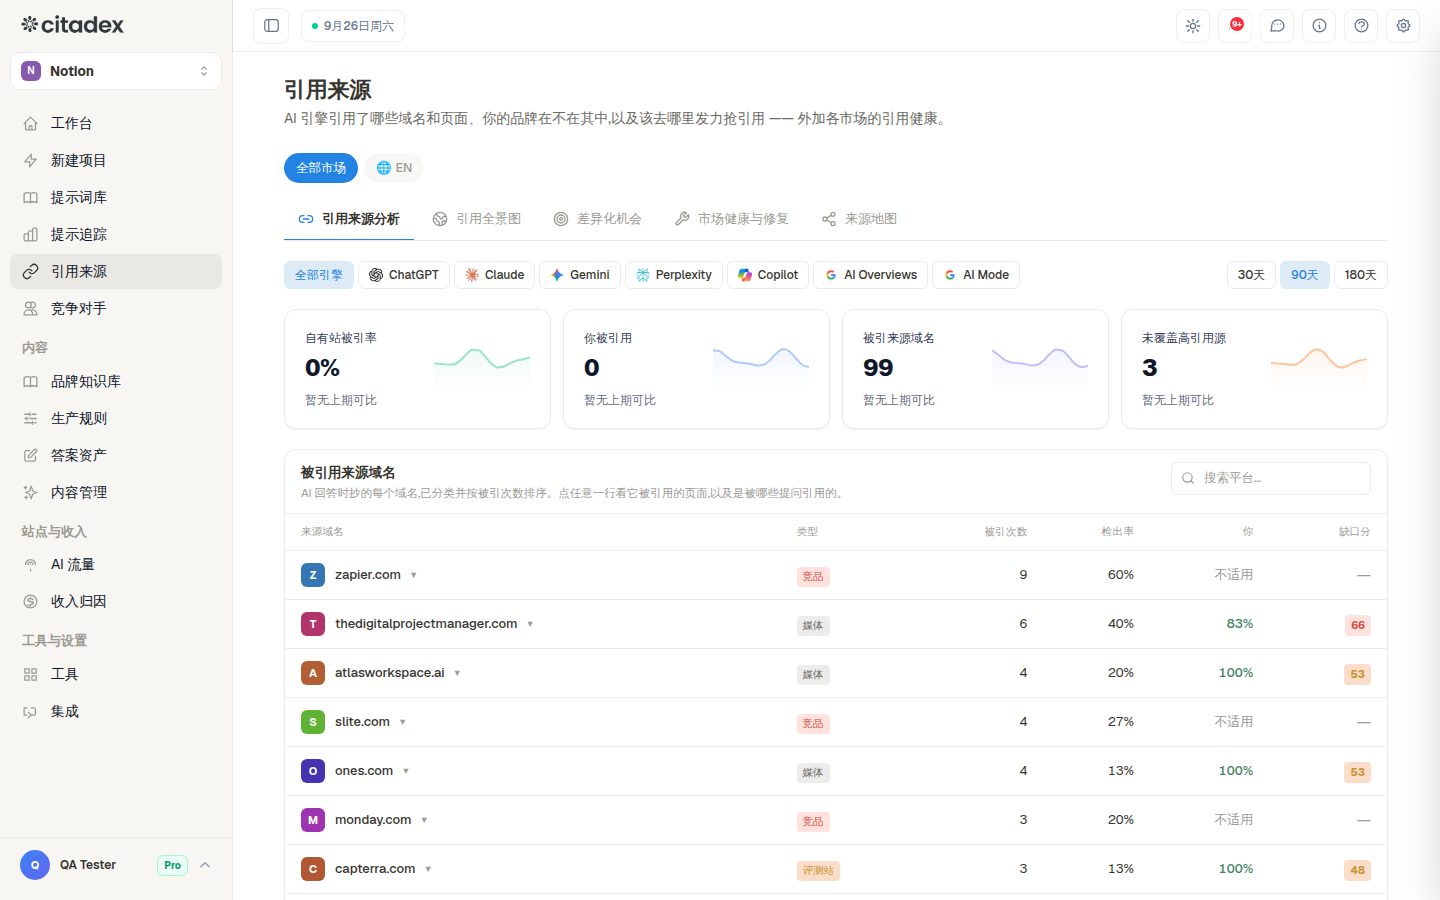
Screenshot 11-2: the four metrics and the cited source domains table in citation analysis
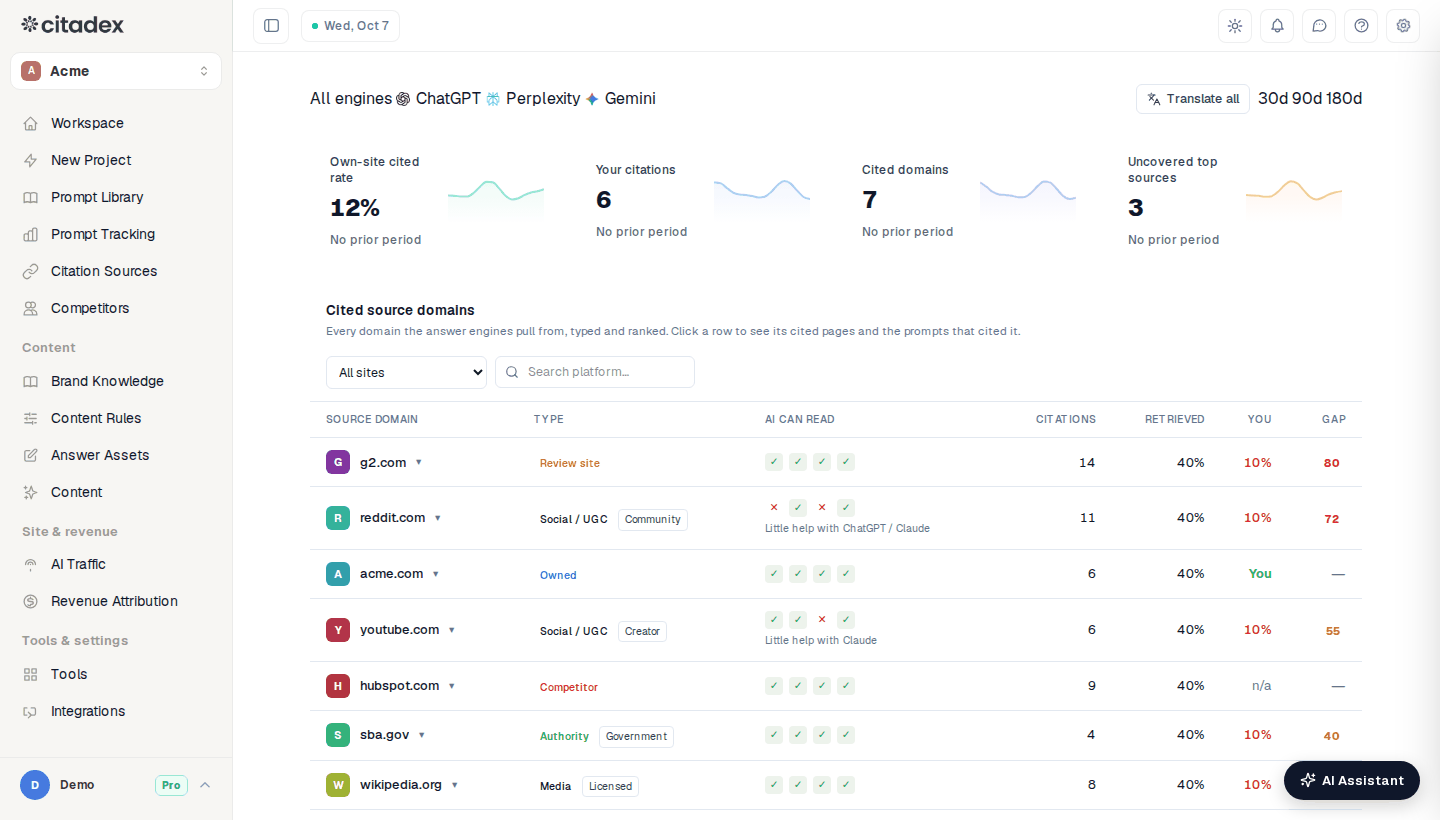
Screenshot 11-3: the Cited source domains table, marking the type labels (Community / Creator / Government / Academic / Licensed) and the AI can read column
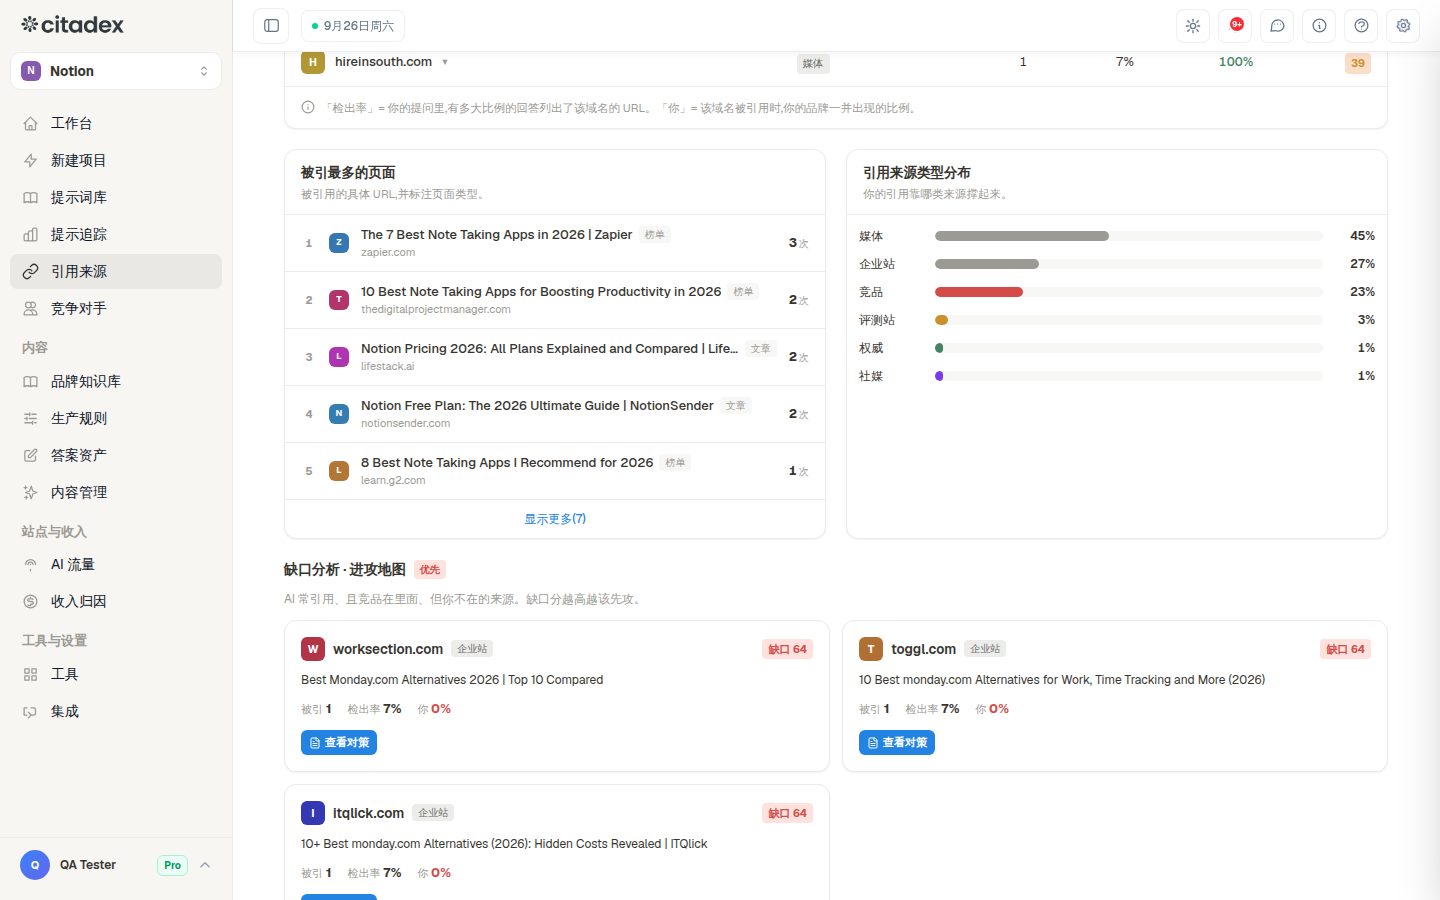
Screenshot 11-4: Attack map · citation gaps, marking gap scores and the buttons on each card
Look at one set of prompts only
When you want to know “who is AI citing for these few questions”, you don’t have to search the whole table.
- 1
Choose the prompts
Tick them in Prompt Tracking and click View cited sources (N) to land here directly; or on the Citation Sources page, click Prompts at the top, right of the market selector, search and tick prompts, or select all Starred prompts, or all prompts of a Stage or Type in one click, then click Apply. Up to 50 at a time.
- 2
By source
The source domains table gains a Prompts column. For example, “7 of 10” means the answers to 7 of the prompts in this set cited it. Sort by this column: the sources at the top are the ones this set of questions relies on, and the ones most worth winning over or countering.
- 3
By prompt
Switch to By prompt: one card per prompt, listing which pages its answers cited, which engines cited them and how many times.
- 4
Clear the filter
Click the ✕ next to Prompts to go back to all data. The filter only applies to the Citation analysis tab.
Route 1: media / review / company-site sources → View solution → brief → article (most common)
- 1
Pick the two or three sources with the highest gap scores
On the attack map, pick from the highest gap score down.
- 2
Click View solution
This opens Writing Brief. At the top is the benchmark information: which engines cite this source, and that you aren’t in it. This ONE article covers all n prompts lists the prompts linked to this source; they’re read-only in the dialog.
- 3
Click Generate brief in the bottom-left corner
AI generates a tailored brief from these prompts, your business info and the target market: suggested title, article structure, competitors that must be mentioned, evidence that must be added, suggested publishing platforms and publishing order. Not happy? Regenerate. Copy brief lets you hand it to an outside writer.
- 4
Click Send to writer
Available only after the brief is generated. You jump to Answer Assets with everything prefilled: the brief goes into Outline, the linked prompts fill the Prompts box line by line, competitor names come along, and Content Type is chosen automatically from the source type.
- 5
Add or remove prompts on Answer Assets
The Prompts box takes one prompt per line; delete or add freely, or click Pick from tracked prompts (N) to tick them. At least 1; if there are more than 10, only the first 10 are used. Content Type and Article language can be changed.
- 6
Click ✨ Generate Content
Articles started from View solution always use web deep research, whatever content type you choose (researcher → architect → writer → SEO → headline → reviewer). It takes 3 to 5 minutes; you can click Close — keeps running. When finished you jump to Content automatically, the article carries the Counter tag, and the source shows Generated n×.
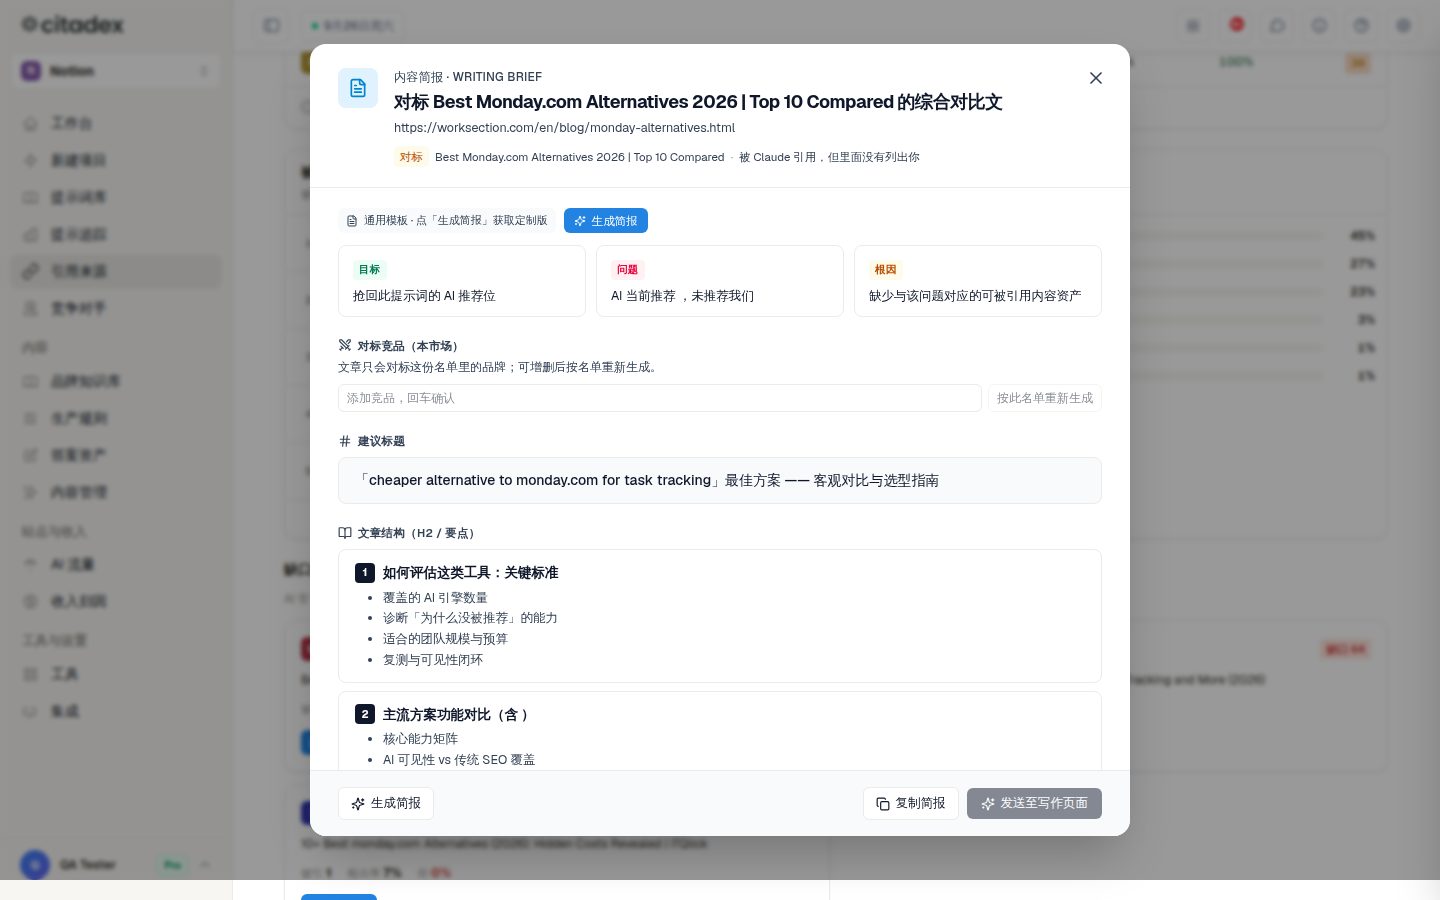
Screenshot 11-5: the content brief dialog, marking Generate brief, Copy brief and Send to writer
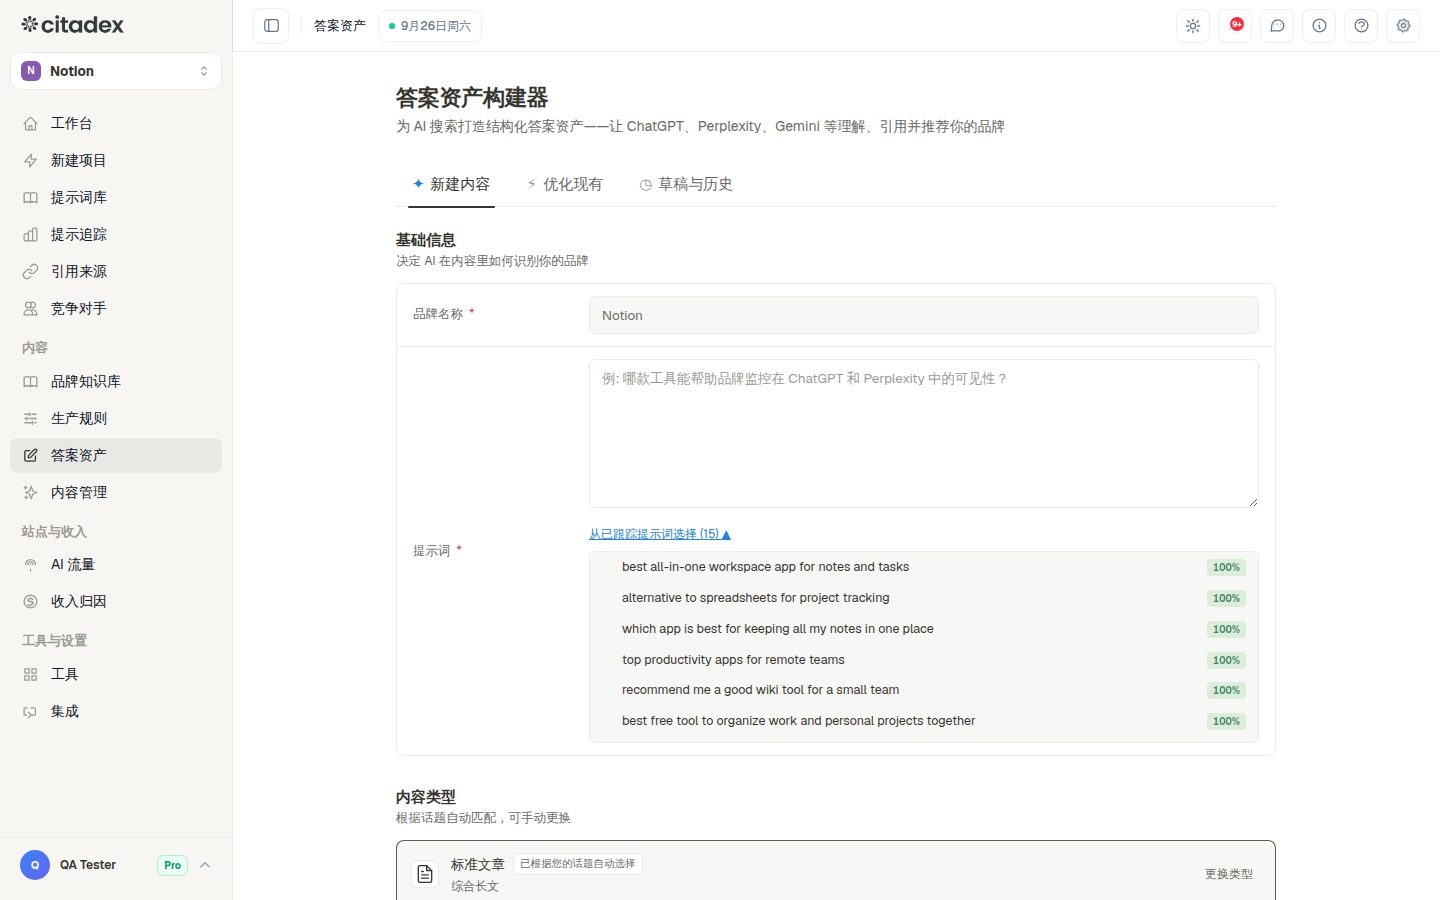
Screenshot 11-6: the prefilled prompts box, content type and ✨ Generate Content on Answer Assets
Route 2: community / forum sources (Reddit, Quora and others)
Click Find live threads to find posts discussing the topic right now; Draft reply or Draft post writes a reply or a new post in the language of the source page; copy it to the platform and post it yourself. Community content doesn’t go through Content. Video sources only have Video script.
Route 3: media sources → Outreach
Click Outreach to open the drawer. The system writes an outreach email and identifies the article’s author and contact details. Choose the Angle (Suggest inclusion / Offer data / Expert take), Tone and Language, choose a contact, edit the Subject and Body, and send with Open in mail client. Afterwards, update Stage to Replied / Placed.
To see every site worth contacting in one place, open Prompt Tracking → Outreach: it gathers, per market, the sites where AI cites competitors but doesn’t mention you, split into High priority, Warm and Watch, and records each site as Pending / Contacted / Replied / Declined.
Route 4: Opportunities tab → Generate article
Tracked prompts are split into Stronghold (you already appear; write more of the same), Open ground (competitors are absent; get there first), Uphill (competitors dominate; don’t go head-on yet) and Neutral. Prioritize Open ground and Stronghold: click Generate article at the end of the row, tick prompts in the dialog, choose an article angle and click Generate article.
Route 5: Strategy articles from Prompt Tracking or Competitors
In Prompt Tracking, tick questions from the same market and of the same kind → Generate strategy article. In the dialog, choose the target market and article angle:
- In-depth guide: covers the method, full examples and tables.
- How-to, Explainer: written step by step or concept by concept.
- Comparison / Roundup: compared against the competitors configured for this market, drawing on the pages AI cites most for these questions.
In-depth guide, How-to and Explainer generate directly by default, doing a round of web research before writing; you can tick several angles at once and get one article per angle. For more depth, tick AI agents to switch to deep research (one angle at a time, 3 to 15 prompts). When you choose Comparison / Roundup, AI agents is ticked automatically and can’t be unticked.
You can also go to Competitors → Prompt battlefield, tick 3 to 8 P0 rows → View countermeasure (n) → Generate brief → generate the article. Articles from every route end up in Content.
How much per week
Two to four articles per client per week is enough: first do the top few items in This week’s tasks, then finish the P0 own-site base pages from stage 6 and the two or three sources with the highest gap scores, then expand into Opportunities. Each article is billed in credits, shown before generation starts; if generation fails partway, the credits are refunded automatically.
Done when: the top items in This week’s tasks have all been handled (article written, change list opened, or marked done / dismissed), and this week’s two or three countermeasure articles are generated and in Content.
Stage 12: Review and publish
Page: sidebar Content. Every generated article is here, and nothing is published without your action.
- 1
Open the article detail
Filter the list by source (Autopilot / strategy articles / Answer Assets) and click Article Detail.
- 2
Read it through and edit
For small changes use AI edit (say in one sentence what to change; AI changes only that part, and you can undo); for big changes use Edit content. On the right, AEO readiness (N / 5) checks five things: structure completeness, entity clarity, data support, length and direct answer; AI suggestions can Re-analyze. Grounded on (knowledge base) shows which knowledge base excerpts this article used; check any number that has no grounding.
- 3
Check the cover image
Browse Unsplash or Upload image.
- 4
Publish in one click
Click Publish Now. The dialog groups platforms under Your own channels, Cited sources (by citation volume) and Added; tick the ones you want. For any marked Not connected · publishing will fail, click Set up in Integrations → first. If the brand name appears too often you get a warning, and publishing to strict platforms requires ticking I understand the warning above and want to publish anyway. Click Confirm Publish.
- 5
Check the results
Owned channels are published by the system directly and the link is filled in; for third-party platforms the extension opens their editor and you click publish once there. The result banner shows, for each platform, Published + View → or Failed (reason); links open after about a minute. If a platform keeps showing processing…, refresh the page later; if it still isn’t done after 10 minutes, click publish again to push it again.
- 6
Log manual publishing
For things you posted by hand on another platform (community posts, outreach placements), go back to the list, expand Publishing log → Log one and fill in the channel, link and date, so re-tests know which day to count from.
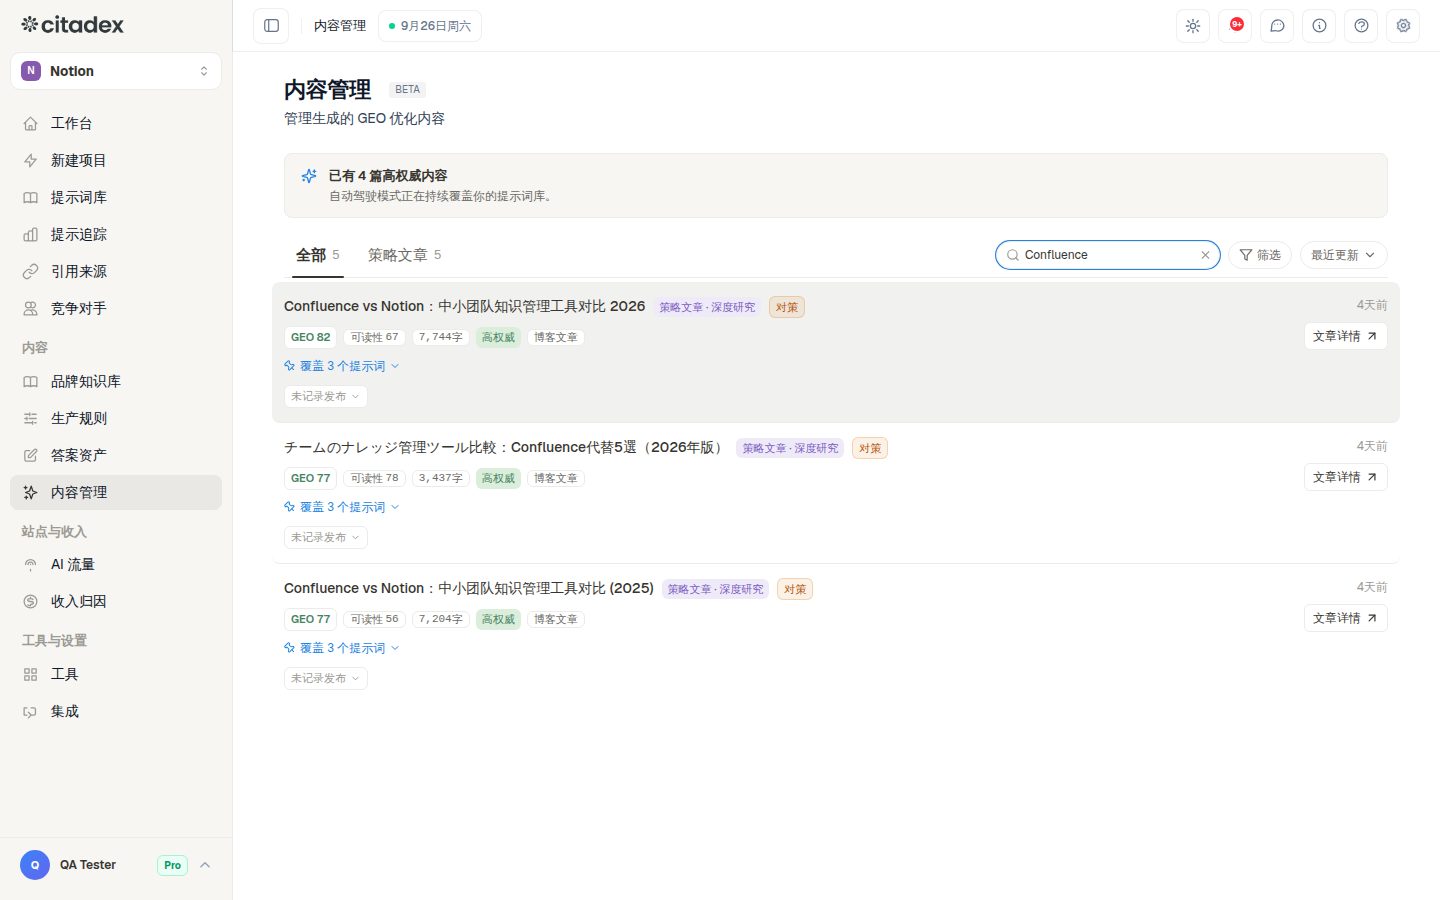
Screenshot 12-1: the Content list, marking the source filter, GEO score, Publishing log and Article Detail
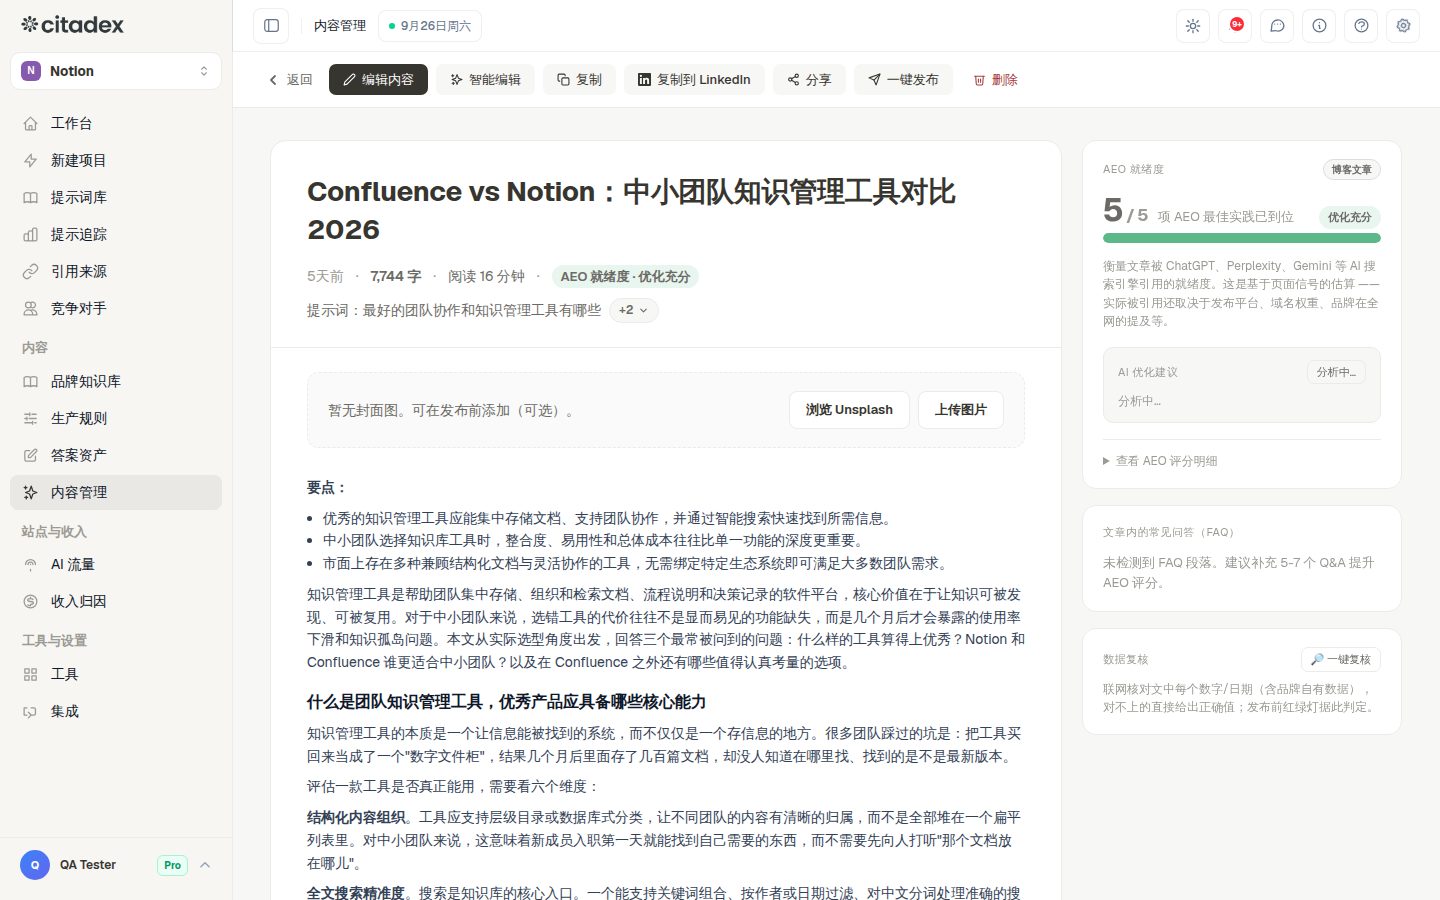
Screenshot 12-2: the article detail page, marking AI edit, Edit content, AEO readiness, Grounded on (knowledge base) and Publish Now
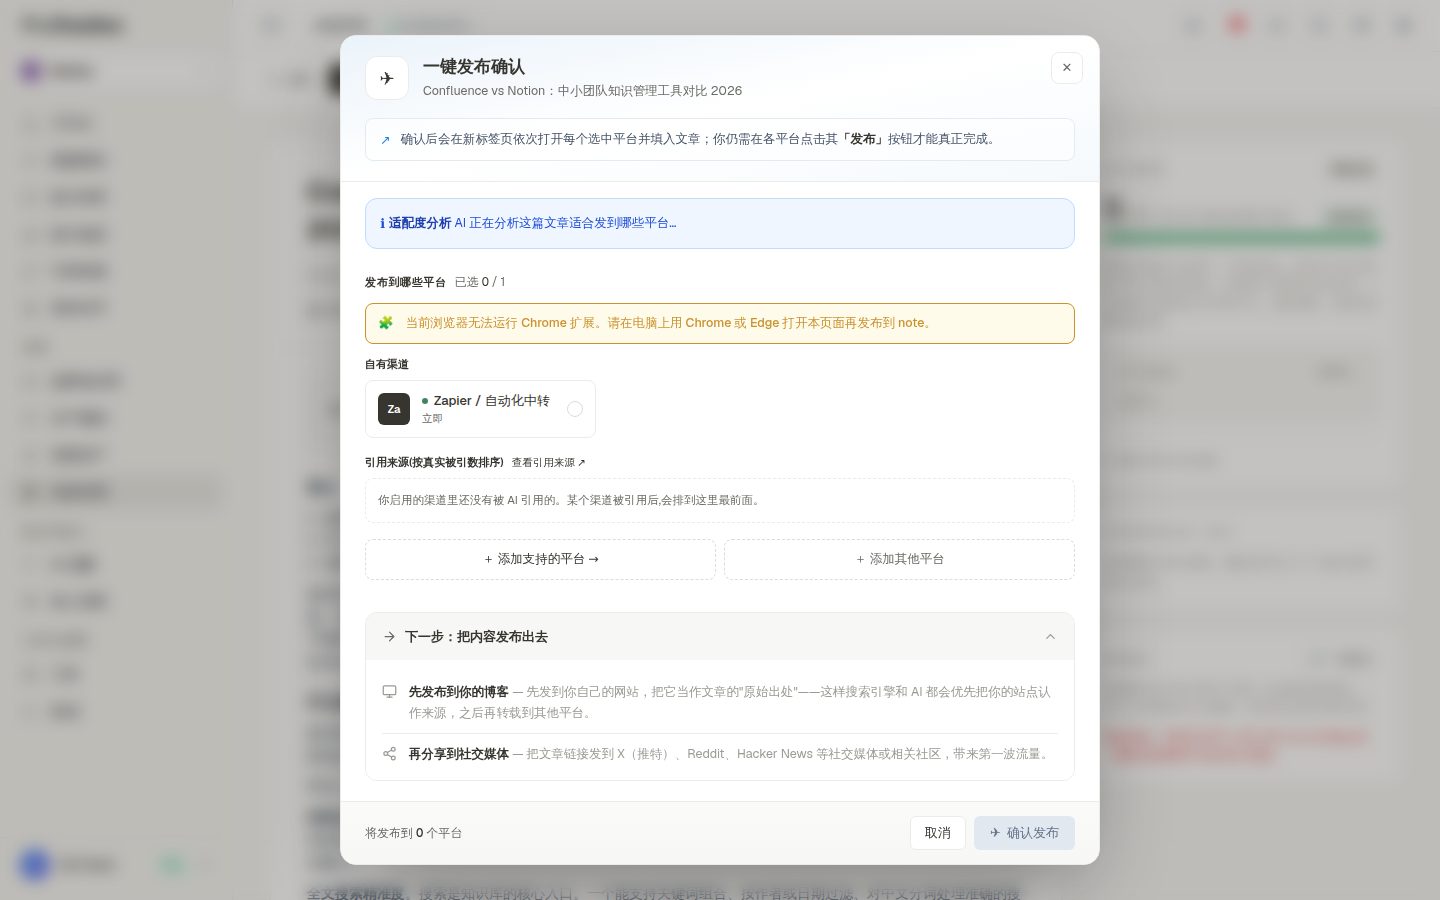
Screenshot 12-3: channel groups and the not-connected warning in the Publish Now dialog (the sample account only has Zapier connected; your project will list your connected owned sites)
Done when: the article is published to at least one owned channel and the publishing log has the link.
Stage 13: Re-test and verify
Page: sidebar Prompt Tracking → Retests and Achievements tabs.
Publishing is not the finish line. AI engines usually take days to weeks to reflect your new content.
- 1
Wait for the automatic re-scan
The brief notes that the same prompts are re-scanned automatically 7 days after publishing (auto-scan must be on). If you can’t wait, click Scan now in the evidence drawer. Pages where you clicked Done, start retest in the stage 7 Optimization plan are re-measured automatically on their re-test date.
- 2
Check how coverage changed
In Tracked, check whether these prompts’ coverage went up and their platform icons gained ✓ and 📎; on the Workspace, check whether the recommendation rate in From mention to recommendation rose with it.
- 3
Create a re-test for a change
Retests tab → + New re-test → in What changed, describe the change in one sentence (the system picks the target questions from it), optionally fill in Page URL (optional) (a snapshot is saved before and after the change), choose the Change date and one market. Advanced (optional) holds the automatically chosen control questions; you usually don’t need to change them. Click Start re-test.
- 4
Read the re-test verdict
A re-test has a baseline period and an observation period, and each question is tested 3 times on each engine. The verdict is Improved, No clear change or Inconclusive: it’s only Improved when the target questions clearly rose while the control questions didn’t move the same way; when there aren’t enough answers it shows Inconclusive and explains why. The detail page shows the numbers By engine, the before/after page comparison under What changed, and the evidence. Re-tests are available on some paid plans, marked in the interface.
- 5
Check achievements
Achievements are counted by day: coverage crossed 50%, beat competitor intercept, new citations, article worked, first coverage, rank improved, re-test / optimization worked. Each one has View evidence for a before/after comparison.
- 6
Set goals
In Achievements, click + Set a goal, or tick prompts in Tracked and choose Set a goal from the bulk bar: fill in Goal name, scope, metric (average coverage, engines that mention you, average rank) and deadline. The goal card shows when you’ll reach it at the current pace and lists the prompts that are behind; once reached, it’s recorded in Achievements.
- 7
Give the client or your boss a results report
Achievements → Create report: choose Period, Market and Report language; optionally tick Quote the AI for each win and Include losses that need attention; write an Account manager’s note (optional); set Link expires and Password (optional); click Create, then Copy link and send it. Open it and click Download PDF to save a PDF. Not sure what the report looks like? Click View a sample report first. White-label accounts can tick Use my brand (white label).
- 8
Competitor re-tests
The Re-test section on the Competitors page shows how the appearance rate changed from baseline to re-test for intercept tasks.
- 9
Check the Workspace
Mentions, citations, share of voice and the AI visibility gauge on the Workspace are the summary for clients (share of voice is compared only against the competitors configured in stage 5; without configured competitors the number runs low). Export PDF creates a report, and white-label accounts can use their own brand. To compare trends on a fixed set of questions, use Frozen comparison in the Prompt Tracking header.
- 10
What if nothing changed
Don’t just keep writing more. Go back and work out where the problem is: signal sources not filled in (stage 6), AI crawlers blocked or pages unreadable (stage 7), articles not indexed (Google Search Console and robots.txt in stage 10), facts not specific enough (stage 9), or the wrong questions chosen in the first place (stage 2).
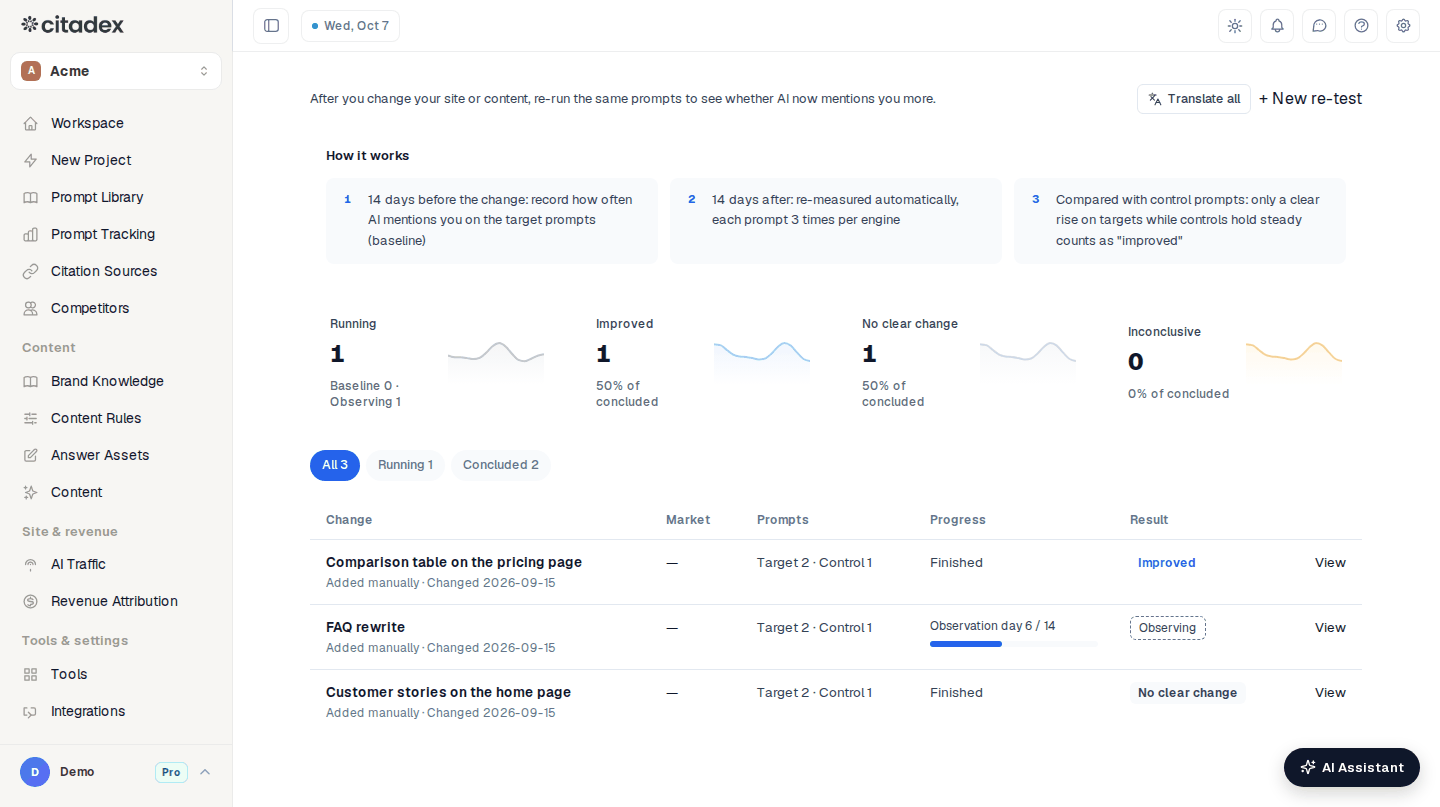
Screenshot 13-1: the Prompt Tracking Retests tab, marking + New re-test, progress (baseline / observation) and the verdicts Improved / No clear change / Inconclusive
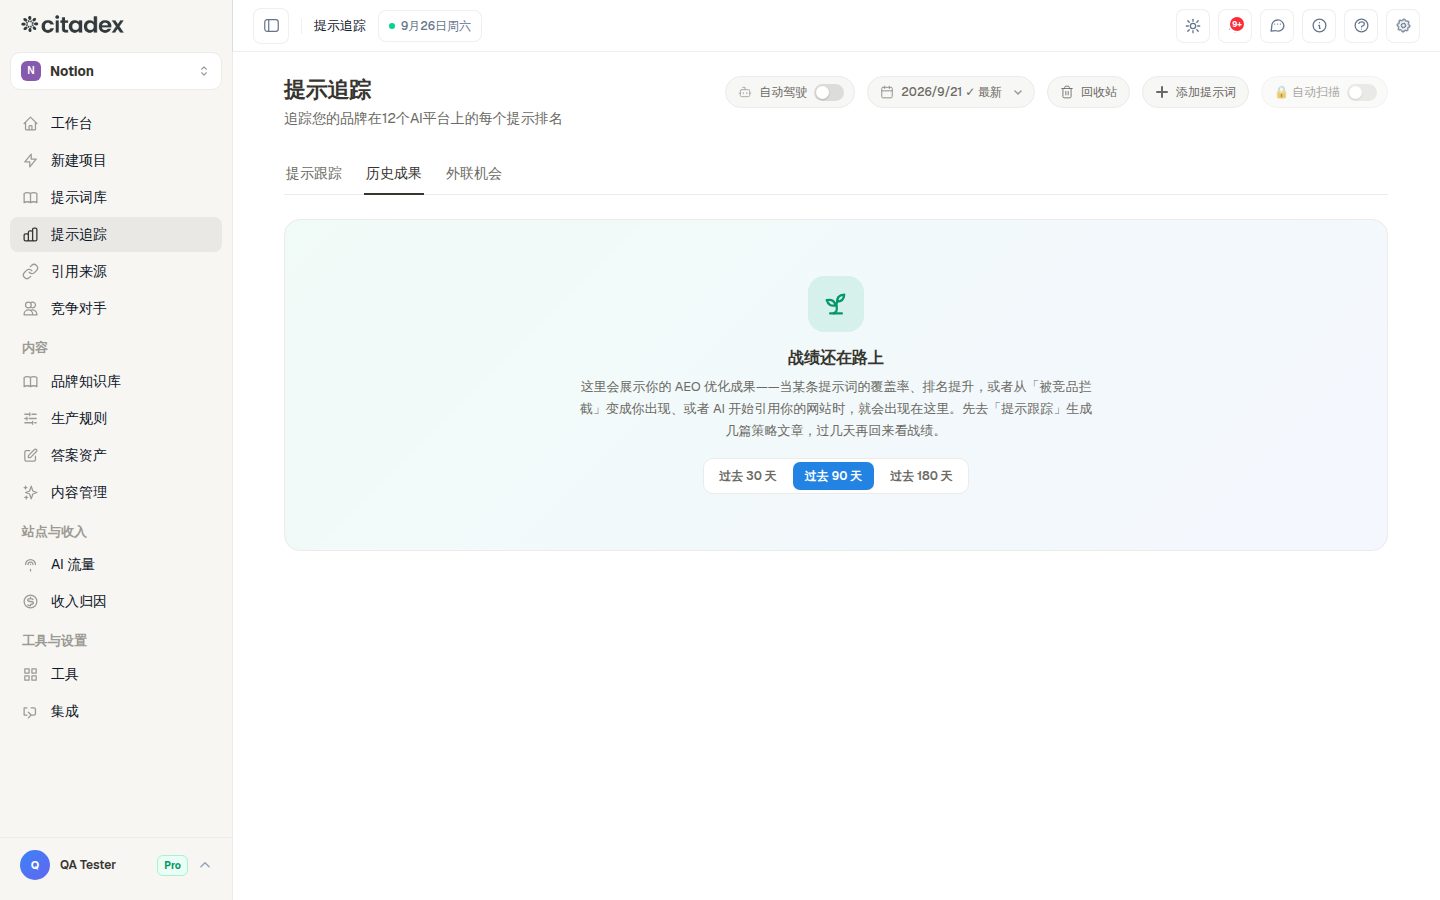
Screenshot 13-2: the Achievements tab, marking achievement types and View evidence (the example shows the empty state before any achievements; after you publish articles and re-scan, each achievement is listed here)
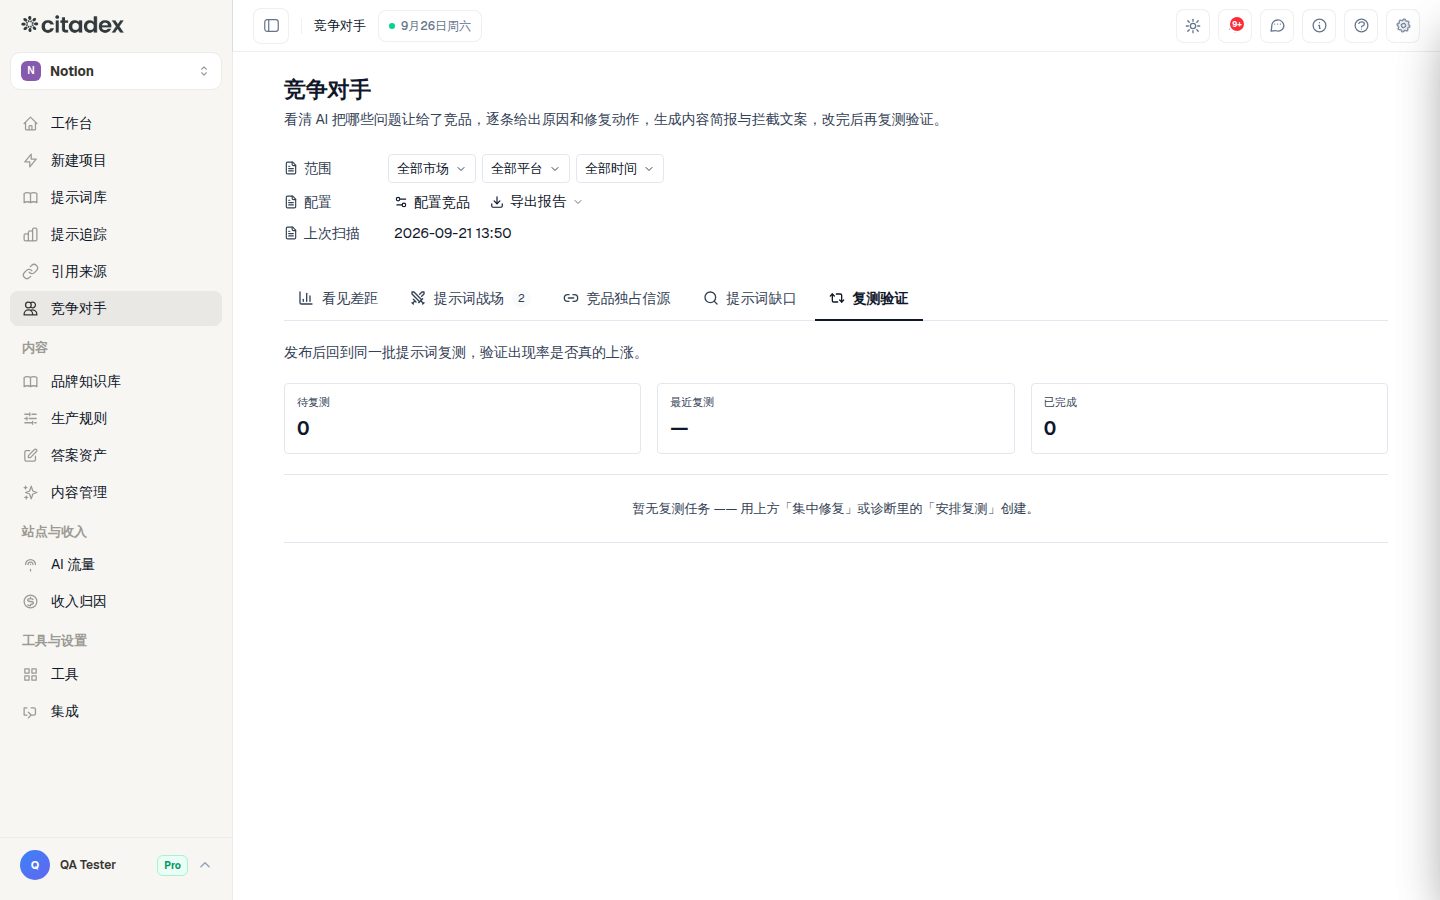
Screenshot 13-3: Re-test on the Competitors page
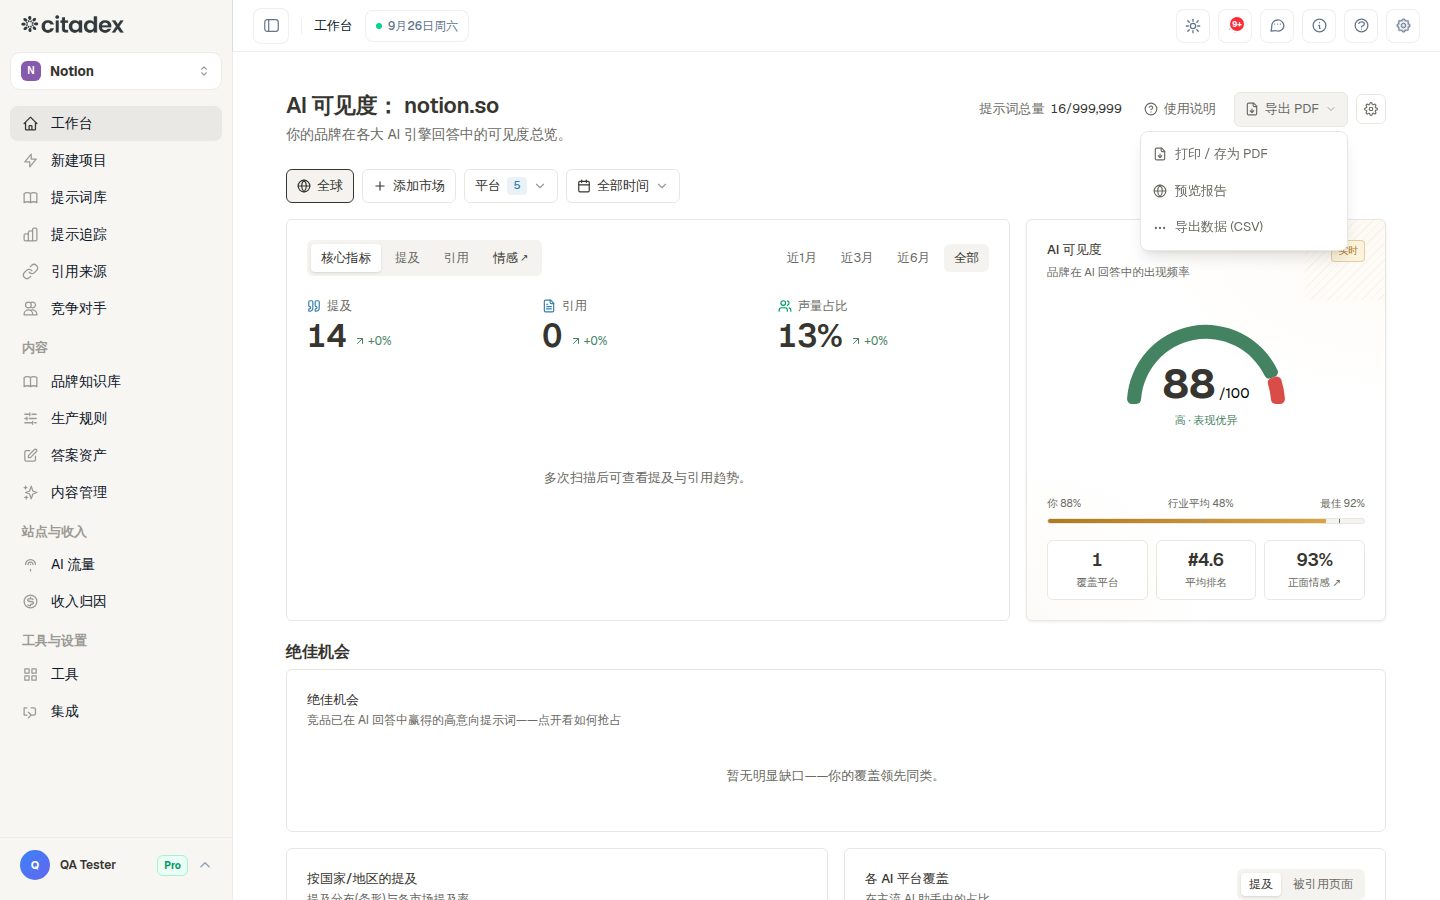
Screenshot 13-4: Export PDF on the Workspace
Done when: every important change has a re-test; after re-testing, at least some target questions are Improved or have new citations; anything that didn’t improve has been traced to a specific stage; at least one goal is set, and the results report has been sent to the client.
Stage 14: Connect revenue attribution
Page: sidebar Revenue Attribution. Tabs: Overview, Funnel, AI engines, Markets, Topics, Landing pages, Attribution, Experiments, Connections. Available to every account.
Why do it: once visibility grows, what bosses and clients ultimately ask is “how many leads and how much revenue did AI bring in”. Revenue attribution matches AI visits to leads, deals and orders.
- 1
Step one is always the site script
Open the Connections tab. The five steps of First-time setup are site script, CRM, stage mapping, attribution window & currency, and verification, each with a link to go there. First confirm the site script is detected (if not, follow the link to the AI Traffic page to install it; it’s the tracking script from stage 7), then on the Site snippet card turn on Auto-capture form emails (off by default). The reason: Stripe, HubSpot and Shopify only know who paid; the script knows who came from AI, and the two are matched by email. If you connect a revenue source without installing the script, revenue comes in but you can’t tell which came from AI.
- 2
Then connect a CRM or revenue source
Pick the card for the tool the client actually uses:
- HubSpot: Connect HubSpot → create a read-only service key in HubSpot (the drawer lists the scopes to tick, with one-click Copy) → paste it and click Verify and connect → in Stage mapping, mark each deal stage as open, won or lost → Save and start sync. The first sync backfills 12 months, then syncs every 30 minutes.
- Salesforce: create a Connected App in Salesforce, paste the consumer key and secret into the card, and click Authorize Salesforce.
- Stripe: add a webhook endpoint in the Stripe dashboard (use the address from the card), tick the events listed on the card, paste the signing secret back and click Save secret. New payments come in automatically from then on; past payments aren’t imported.
- Shopify: in Shopify’s notification settings, create an Order payment webhook, paste the secret back and click Save secret. The card’s Order channels lists which sales channels orders come from. Channels whose names show they are AI checkouts are recognised automatically, and you can also tick yourself which channels close sales inside an AI conversation and which AI platform each belongs to.
- WooCommerce: in WooCommerce Settings → Advanced → Webhooks, add an Order updated webhook, paste the same secret into the card and click Save secret.
- Webhook / API: for in-house CRMs, Pipedrive, Zoho and others, click Generate endpoint and have the CRM or Zapier / Make push new leads, deal changes and won deals to it.
Every card has Step-by-step (the exact click path) and Walk me through it (AI Assistant). Google Analytics is connected on the AI Traffic page (Connect on the AI Traffic page).
- 3
Read the overview
Attribution mix on Overview splits AI revenue into two kinds: AI referral (visit, then order) is when a user clicks through from an AI answer to your site and then buys; Bought inside AI is when the user orders directly inside an AI conversation (for example checking out in ChatGPT) without visiting your site, and it’s counted as long as the order channels are ticked correctly. In Attribution, every contact has a confidence level and Evidence you can open.
- 4
Prove impact with Experiments
After changing a set of pages, to find out whether the growth in AI revenue came from those changes: Experiments → New experiment, fill in Name, Start date, Test pages (changed) (wildcards with * are allowed), Control pages (empty = all other landing pages), Metric (AI revenue / AI leads / AI visits) and Days to compare, then Save. The system compares how the test and control groups changed over the same number of days before and after the start date. Incremental = the test group’s change minus the control group’s change, shown with a range. If either group has fewer than 10 before or after the start, it shows Not enough data instead of a number; check again once enough data has built up.
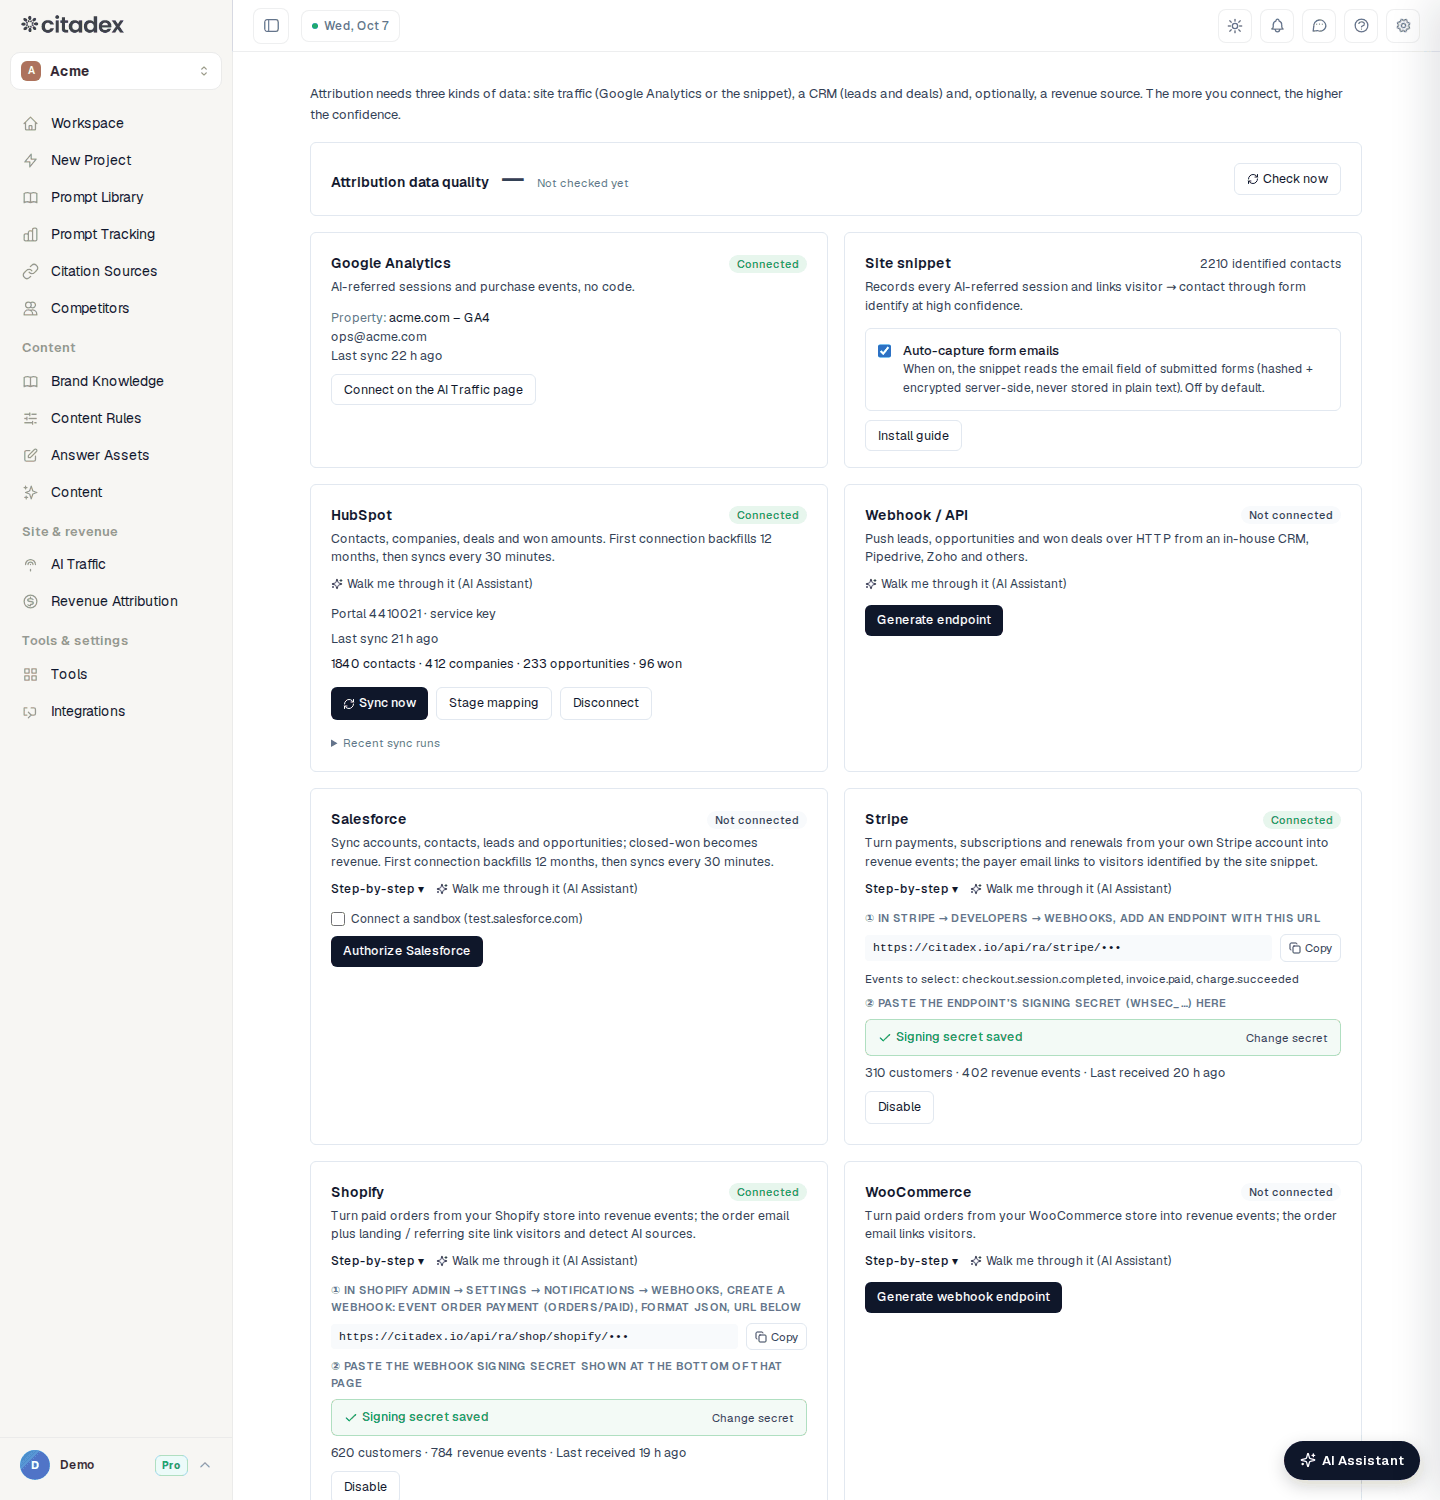
Screenshot 14-1: the Revenue Attribution Connections tab, marking the five setup steps at the top, Auto-capture form emails on the site snippet card, and Step-by-step and Walk me through it (AI Assistant) on each card
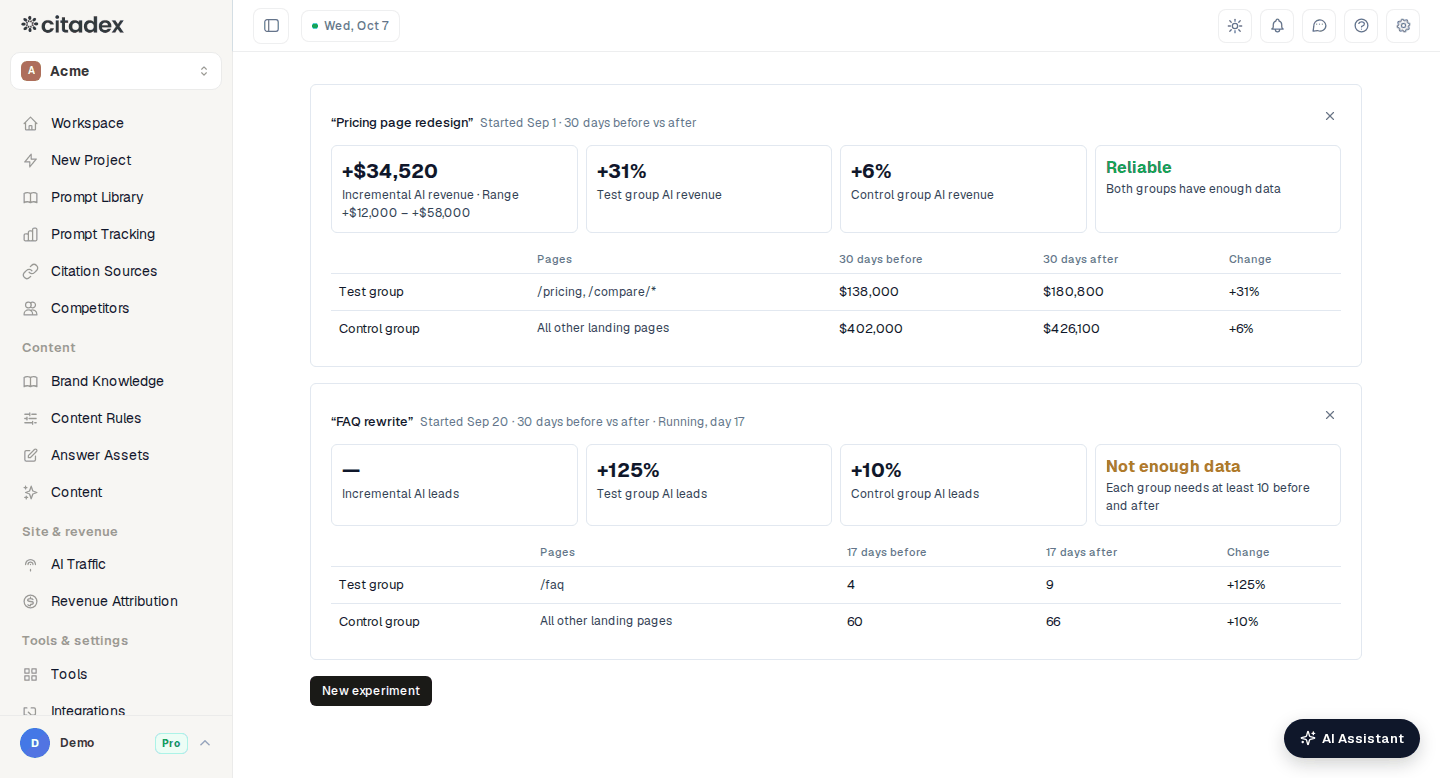
Screenshot 14-2: the Revenue Attribution Experiments tab, marking test group / control group, the before / after numbers, the increment and its range, and the Not enough data notice
Done when: the site script is detected and Auto-capture form emails is on; at least one CRM or revenue source is connected with data coming in; Overview shows leads or revenue from AI; and for clients who have done a round of page changes, an experiment is set up.
Stage 15: The day-to-day routine
Use the AI Assistant
The AI Assistant opens on the right of any page. It uses this project’s own data to explain the current page and answer “what should I do now”. It can also look up how-to steps in the Help Center and help you connect revenue attribution data sources. At the top are Contact support and History.
- Actions need confirmation: when you ask it to re-check prompts, add prompts, generate article drafts or generate change lists, it first lists Confirm these actions, each marked Free or Uses credits; nothing starts until you tick them and click Confirm. It never publishes articles or changes settings on its own.
- Weekly automation: click the calendar icon at the top of the assistant → turn on Prepare my week automatically, choose a time → Save. Every Monday a plan for the week appears: last week’s recap, Do first this week (the top 3 items in this week’s tasks), change lists for this week’s key pages, and re-test results. With Recommended actions turned on it also lists suggestions that use credits, again waiting for your confirmation. To get one right away, click Prepare one now (once a day). The Free plan only gets last week’s recap.
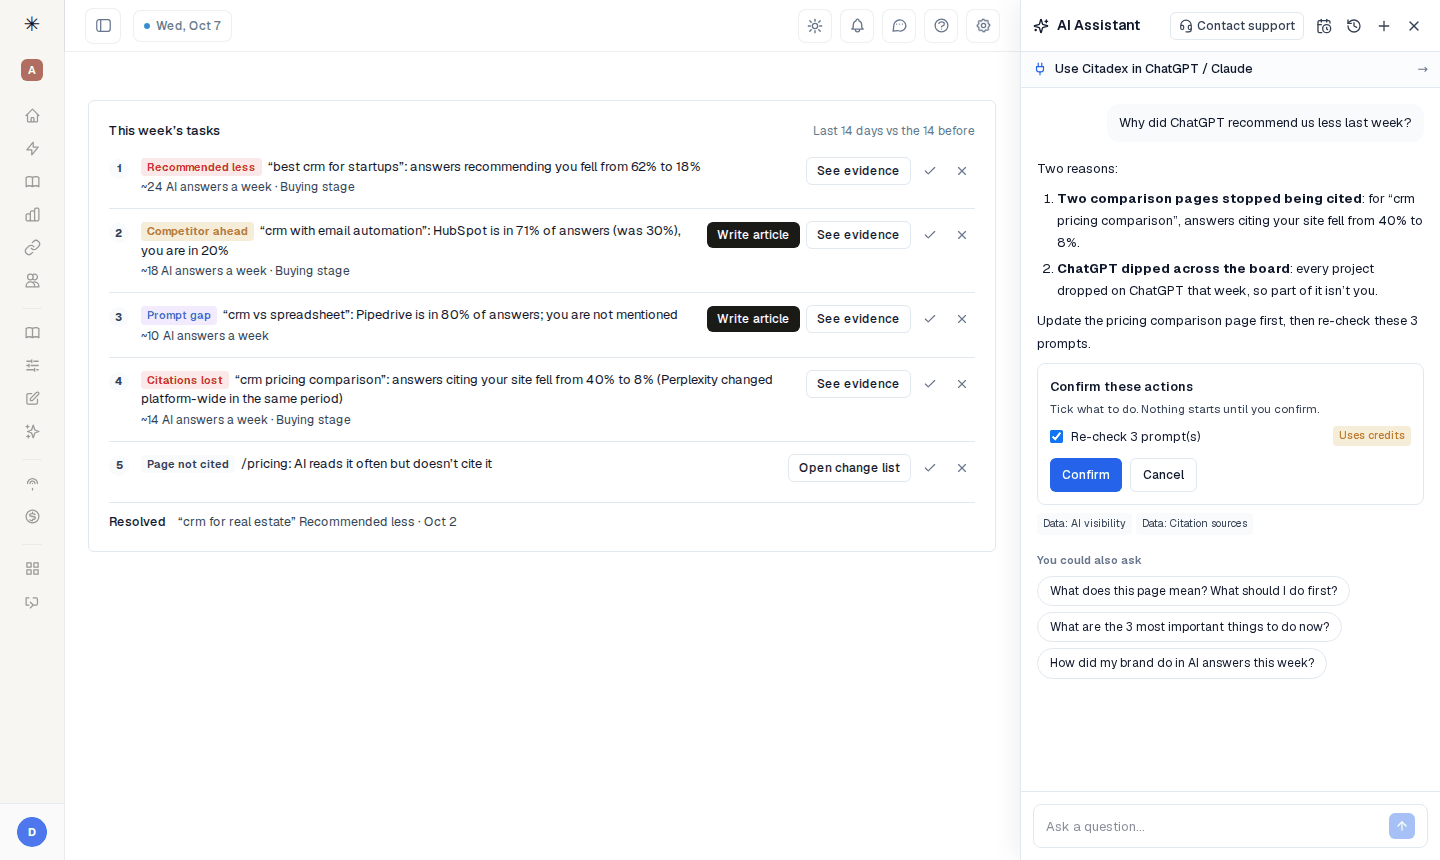
Screenshot 15-1: the AI Assistant drawer, marking the question box, the action confirmation card and Confirm, the weekly automation calendar icon at the top, and Contact support
Use Citadex inside ChatGPT / Claude
Page: Settings → API & MCP (Pro and above).
- 1
Add the connector
Claude: Settings → Connectors → Add custom connector, name it Citadex, paste the Connection address from the page → Connect. ChatGPT: Settings → Apps & Connectors → Advanced settings, turn on developer mode → Create, paste the connection address and choose OAuth for authentication.
- 2
Sign in and choose permissions
On the Citadex sign-in page that opens, choose the permission: Read only can only view data; Read + actions can also re-check, add prompts and generate article drafts, always asking you before spending credits and subject to the Monthly credit limit. Click Allow access.
- 3
Manage
Under Connected apps you can Edit the permission or disconnect. For tools that don’t support sign-in authorization, such as Cursor or Claude Code, generate a key under Keys (advanced). Not sure what to ask? Open the prompt library and copy a ready-made question.
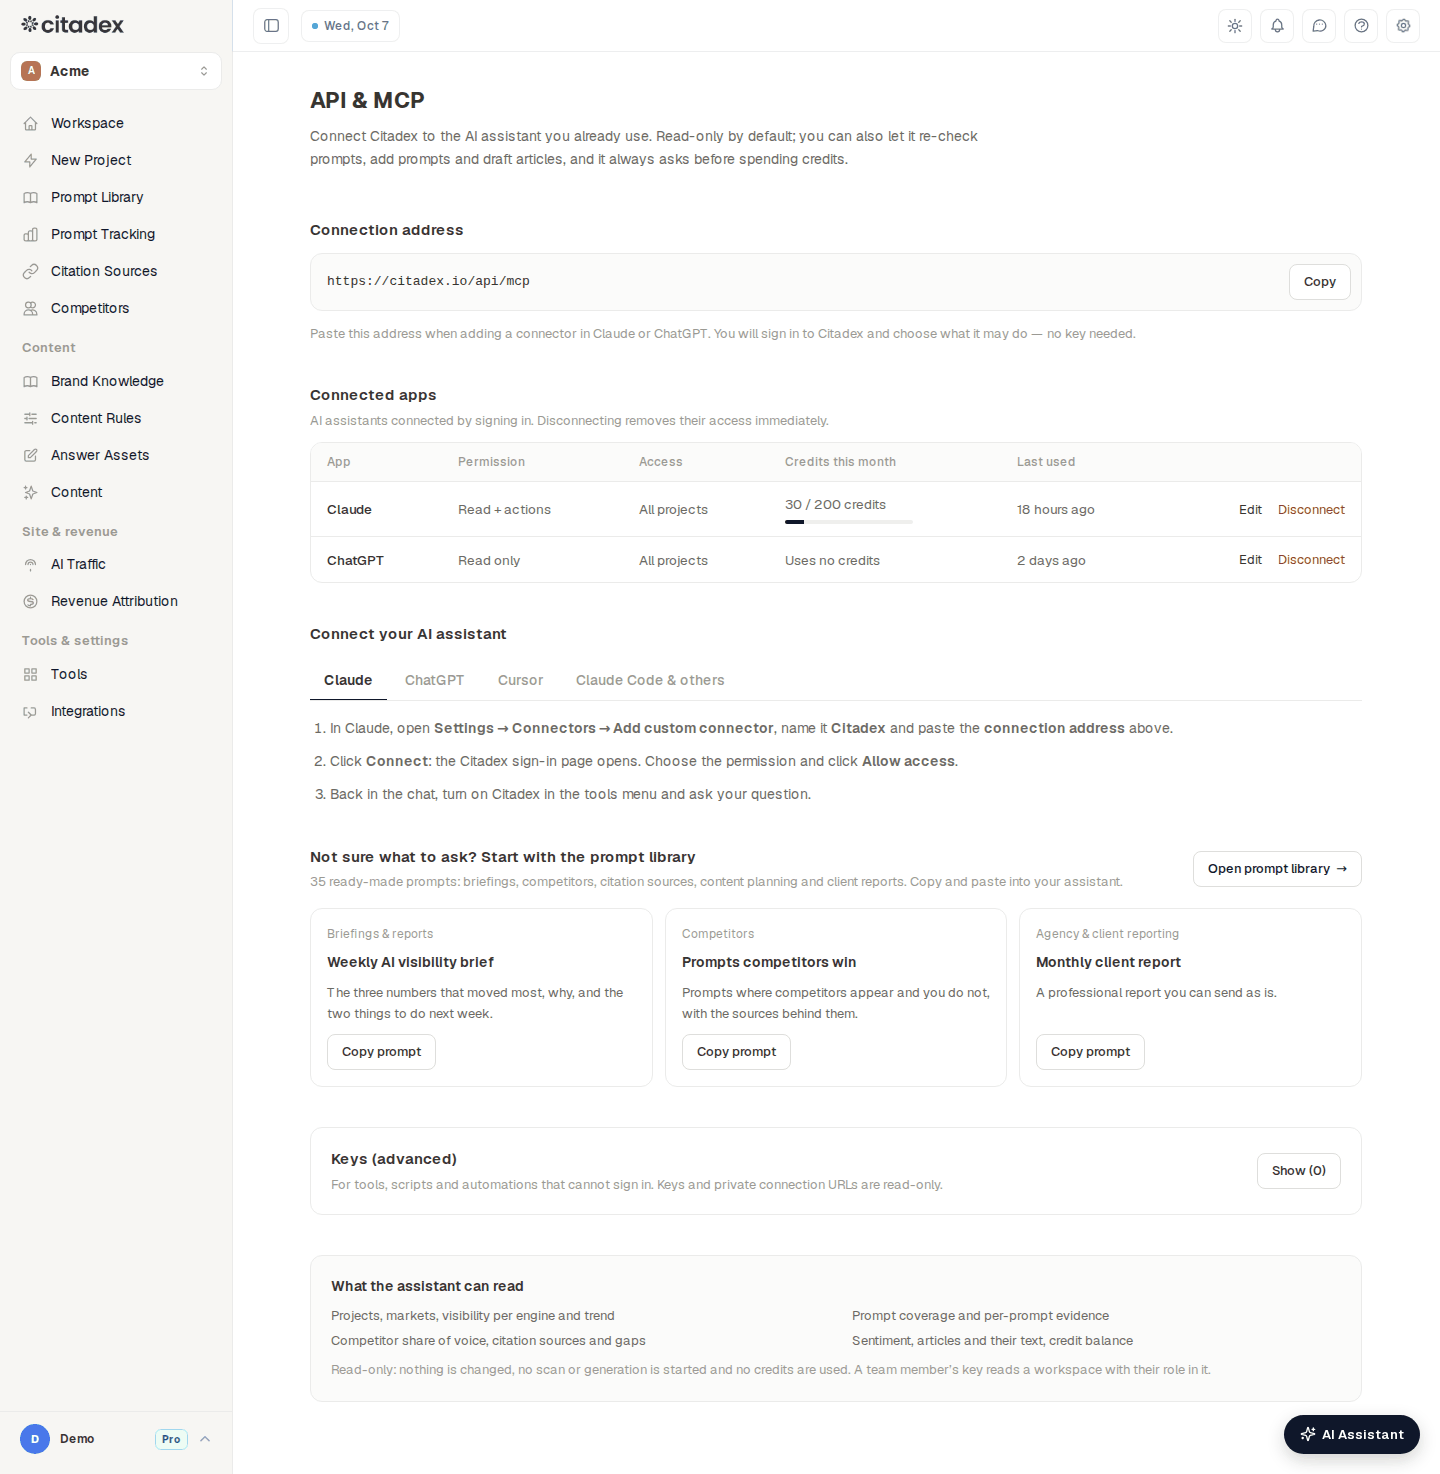
Screenshot 15-2: the Settings API & MCP page, marking the connection address, the Claude / ChatGPT connection steps, connected apps and the permissions Read only / Read + actions
Weekly
- Open Workspace, work through This week’s tasks, and check From mention to recommendation and Platform-wide changes.
- In Prompt Tracking, set Coverage to Needs and Context issue, and check the Brand searches tab for new high-risk issues.
- In Citation Sources → Attack map · citation gaps, pick two or three new sources and follow stage 11.
- Review and publish this week’s articles in Content, and log manual publishing.
- In AI Traffic, check To fix this week and new issues on the Agents tab.
- Go through each alert in the Notifications bell (the red dot is the unread count) and in your email.
Monthly
- Add real search terms in Prompt Library and delete low-value prompts; check the Coverage tab for new Few / None groups.
- Re-detect each market once in Citation Sources → Market health & repair.
- Find another batch in Competitors → Prompt gaps.
- Check pricing, phone numbers and URLs in Brand Knowledge and Brand searches → Official facts for anything out of date.
- Review AI leads and revenue in Revenue Attribution and go over your experiments.
- Send the client a monthly report via Achievements → Create report.
- Agency accounts: check the credit balance and each project’s usage this month on API keys & credits.
Alerts
Settings → Email Notifications → Project alert notifications, set separately for each project: competitor intercept, visibility anomaly, weekly wins digest (Mondays), AI traffic issues; choose instant, daily digest or weekly digest, and email or Slack as the channel. High-risk brand search issues and drops in agent readiness are also notified according to these settings.
Auto-scan and credits
Auto-scan re-checks each prompt at its own frequency and deducts credits from your wallet. When the balance runs low it scans as much as it can, pauses only when it can’t scan any more and sends you an email, then resumes automatically after you top up. Each project can have a monthly cap set on API keys & credits (leave it empty for no cap); hitting the cap also pauses scanning and sends a separate email, and scanning resumes once you raise or clear the cap.
Autopilot (optional)
After a month or two of steady operation, once signal sources and the knowledge base are complete, you can turn on Autopilot in the Prompt Tracking header: the system automatically generates articles for uncovered prompts into Content, and you only review and publish. While it’s on, Generate strategy article isn’t available; it’s one or the other. If your current plan doesn’t include it, you’ll be prompted to upgrade.
Agencies
- One client, one project: prompts, knowledge base, integrations and revenue attribution are all kept separate per project.
- First diagnosis report: before signing a client or when taking one over, choose First diagnosis report as the Report type in Achievements → Create report. Using this project’s last 30 days of data, it covers the current situation, the gap to up to 3 competitors, the sites AI cites most, basic website issues and the 3 things to do first. It can be white-labelled and saved as PDF.
- White label: White label in the user menu, with five tabs: Brand, Custom domain, Client accounts, Email and Reports. On Brand, turn on Turn on full-site white label, upload your logo and set the main color; on Custom domain, connect your own subdomain; on Client accounts → + Invite client, choose which projects and permissions the client gets. Clients see your brand in the app, the sign-in page, emails, reports and alerts, only see the projects assigned to them (the AI Assistant and API & MCP are limited to those projects too), and can’t see billing.
Common mistakes in the order
| What people do | What happens | Correct order |
|---|---|---|
| Generate articles right after creating the project | Blocked by “business info not filled in yet”, or articles with no facts behind them | Do stages 8 and 9 first |
| Look only at mention rate, not evidence and recommendation level | Assume being mentioned means being recommended, and work in the wrong direction | Stage 3: read the evidence and From mention to recommendation |
| Write new articles while AI is quoting the wrong phone number or price | The wrong information keeps sending customers away | Stage 4: fix brand searches first |
| Skip Market health & repair | Articles go out and AI still doesn’t cite them, because it can’t find you on review sites and information platforms | Stage 6 is required |
| Publish without checking AI crawlers | Pages are blocked by robots.txt or their text can’t be read, so AI can’t fetch them at all | Stage 7 before writing |
| Connect integrations only after generating articles | The publish dialog shows everything as not connected | Stage 10 before stage 11 |
| Don’t turn on auto-scan or create re-tests | You only ever have first-round results and can’t prove impact | Turn on auto-scan in stage 3, create re-tests in stage 13 |
| Don’t configure competitors | Share and battlefield are calculated from AI’s guessed list | Stage 5 |
| Don’t log manual publishing | Re-tests don’t know which day to count from, and achievements aren’t recorded | Log it in stage 12 |
| Connect Stripe / HubSpot first without installing the site script | Revenue comes in, but you can’t tell which came from AI | Stage 14: install the site script and turn on Auto-capture form emails first |
Related articles
- Getting started: from sign-up to your first published article
- Citation Sources: find the sources AI trusts and get cited there
- Brand Knowledge: give every sentence AI writes about you a source
- Content: review, edit, publish and log every generated article
- Integrations: connect once, then publish every article to your own site in one click
- Quotas and credits: articles, prompts, scans and prepaid credits
Was this article helpful?